Aggressively buffing your nails for a smooth finish is creating microscopic wounds that compromise your nail’s natural defenses and invite infection.
- The goal of buffing is not to remove layers, but to gently prepare a surface; using low-grit files (like 180) aggressively thins the nail plate.
- These invisible scratches, or micro-lesions, act as gateways for bacteria like Pseudomonas and can lead to allergic reactions to products.
Recommendation: Shift your focus from aggressive mechanical abrasion to a health-first approach using high-grit buffers (240+) and understanding the nail plate as a vital immunological barrier, not just a canvas.
For the meticulous nail enthusiast, the pursuit of a flawless canvas is paramount. A perfectly smooth, prepped nail plate seems like the essential first step for any long-lasting manicure. This often leads to a common belief: more buffing equals better adhesion and a cleaner look. We grab our buffers and work diligently to erase any ridge or imperfection, assuming that a chalky-white, uniformly abraded surface is the ideal state. But this very process, driven by a desire for perfection, is the source of a significant, yet invisible, threat.
The conventional wisdom to “rough up the surface” is a dangerous oversimplification. What if the most severe damage isn’t the visible “rings of fire” or a noticeably thinned nail, but rather a catastrophic breakdown of your nail’s microscopic defenses? This article reframes the nail plate not as an inanimate surface, but as a complex and vital immunological barrier. We will journey into the micro-topography of the nail to expose how over-buffing creates a landscape of invisible cuts and lesions—perfect pathogen gateways that lead to persistent infections and chronic allergic sensitization.
By understanding the science behind this subclinical damage, we can move beyond harmful habits and adopt techniques that respect the nail’s biological function. We will explore the precise difference between safe and destructive buffer grits, identify the unseen entry points for bacteria, and explain how to rehabilitate a nail plate that has been compromised, ultimately building a foundation of health that makes any manicure safer and more beautiful.
This guide breaks down the science of nail plate integrity and provides a clear path toward safer nail preparation. Explore the sections below to understand the risks and master the techniques for maintaining a truly healthy foundation.
Table of Contents: How Over-Buffing Creates Invisible Micro-Lesions That Lead to Infection
- 180 vs. 240 Grit: Which Buffer Is Safe for the Natural Nail Plate?
- The “Invisible Cut” Mistake: Bacteria Entry Points You Can’t See
- How Do Micro-Lesions Increase the Risk of Allergic Sensitization?
- How Long Does It Take for a Buffer-Damaged Nail Plate to Regrow?
- Chemical Etching vs. Mechanical Buffing: Is Priming Without Filing Possible?
- Greenies vs. Bruises: When to Cover Up and When to Treat?
- The Infection Risk Hidden in Your Drawer: Why Alcohol Isn’t Enough?
- How to Transition from Acrylics to Natural Nails Without cutting Them Short?
180 vs. 240 Grit: Which Buffer Is Safe for the Natural Nail Plate?
The difference between a 180 and a 240-grit buffer may seem trivial, but at a microscopic level, it’s the difference between preparation and destruction. Grit refers to the number of abrasive particles per square inch; the higher the number, the finer and gentler the file. A 180-grit buffer is considered aggressive for the natural nail. Its purpose is to shape enhancements or quickly reduce length, not to prep the delicate surface of the nail plate. When used on natural nails, it removes multiple layers of keratin cells, significantly thinning the plate with each pass.
Conversely, a 240-grit buffer is the professional standard for gentle natural nail prep. Its finer particles are designed to remove surface shine and oils with minimal invasion. According to nail technology experts, a 180-grit buffer can tear away significant layers, while a 240-grit buffer is designed to only remove the very top, non-living cells. This action creates a subtle texture for product adhesion without compromising the structural integrity of the nail plate below.
It’s not just about grit, but also technique. Aggressive, back-and-forth “sawing” motions generate heat, which can dehydrate the nail and further weaken the bonds between keratin layers. Professionals advise filing in one direction to minimize this thermal damage and prevent the fraying of keratin cells at the free edge. Over-filing with a coarse file can destroy these bonds, making the nail porous and prone to splitting and peeling. The goal is never to create a rough, chalky surface, but to gently and meticulously cleanse the plate for optimal, safe adhesion.
The “Invisible Cut” Mistake: Bacteria Entry Points You Can’t See
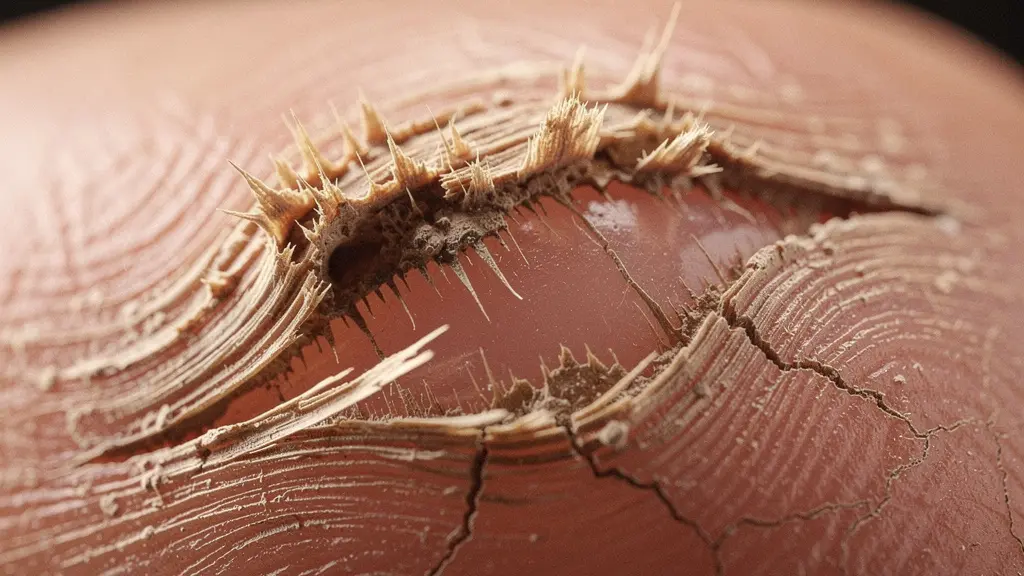
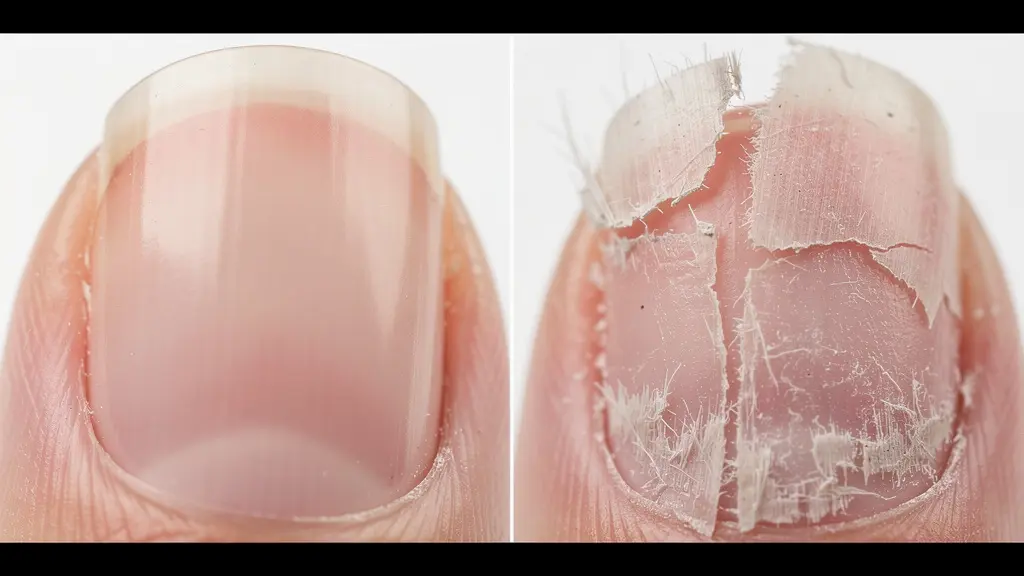
The most dangerous consequence of over-buffing isn’t the visible thinning of the nail; it’s the creation of a porous, damaged surface riddled with microscopic fissures. These are the “invisible cuts”—subclinical injuries that you cannot see or feel, but which effectively dismantle the nail’s protective barrier. A healthy nail plate has a smooth, tightly sealed surface. Over-buffing shatters this landscape, creating a rough micro-topography of peaks and valleys. This newly textured surface is the perfect breeding ground for microorganisms.
This damage creates direct pathogen gateways. Bacteria, which would normally be unable to penetrate the nail, can now settle into these cracks. As noted by dental care researchers studying nail hygiene:
Surface Roughness: Filing and buffing during application creates microscopic cracks that allow bacteria to settle in.
– Smile Essentials Dental Care, Study on Long Nails and Health Impact
This illustration provides a stark comparison between a healthy nail surface and one that has been compromised by aggressive buffing, highlighting the creation of these bacterial entry points.
Once these gateways are open, common bacteria like Pseudomonas aeruginosa can colonize the area, leading to the infamous “green nail syndrome.” Medical microbiology research confirms that P. aeruginosa has been isolated from paronychia infections that occur in the skin surrounding damaged nail plates. What begins as a quest for a perfect manicure can quickly become an invitation for a persistent and difficult-to-treat bacterial infection.
How Do Micro-Lesions Increase the Risk of Allergic Sensitization?
The nail plate is more than just a hard surface; it functions as a critical part of the body’s immunological barrier. Its job is to prevent foreign substances, including potential allergens found in nail products, from reaching the living tissue of the nail bed and surrounding skin. A healthy nail plate is composed of densely packed, flattened, and interconnected keratin cells. This structure forms a highly effective shield against molecular penetration.
When you over-buff, you physically break down this shield. The micro-lesions created by the buffer are not just superficial scratches; they are breaches in your body’s natural armor. These fissures create direct pathways for chemicals to bypass the protective outer layers and seep down towards the sensitive, vascular nail bed. According to a study on the nail’s barrier function, the cells of a healthy plate are “closely-packed, adherent, interdigitating and very flat,” creating an effective barrier until mechanical damage compromises it.
This is where the risk of allergic sensitization skyrockets. Many nail products, including primers, gels, and acrylic monomers, contain potent allergens like HEMA (hydroxyethyl methacrylate). On a healthy nail, these chemicals are meant to stay on the surface. But when applied over an abraded, porous plate, they can migrate through the micro-lesions and come into prolonged contact with the living tissue underneath. The immune system can then identify these chemicals as a threat, triggering an allergic reaction. This can manifest as redness, itching, swelling around the nail (contact dermatitis), or even onycholysis (nail plate separation). Once you become sensitized to an ingredient, the allergy is often permanent, making it difficult or impossible to use many professional nail products in the future.
How Long Does It Take for a Buffer-Damaged Nail Plate to Regrow?
Once the nail plate is thinned and damaged by over-buffing, there is no quick fix to restore its original thickness or integrity. The damaged portion cannot be “repaired”; it must be completely grown out and replaced by new, healthy nail growing from the matrix (the area under the cuticle). Understanding this timeline is crucial for managing expectations and committing to a rehabilitation plan.
Fingernail growth is a slow process. Comprehensive research on healthy American adults found fingernails grow at an average rate of 3.47 mm per month. This means that a fully damaged nail can take anywhere from 5 to 6 months to be completely replaced, from cuticle to free edge. Several factors can influence this rate, including age (growth slows with age), season (nails grow faster in summer), nutrition, and overall health.
The location of the damage dictates how long you will have to deal with its consequences:
- Damage at the cuticle area: This is the most significant, as the entire nail growing out will be compromised. You are looking at a full 5-6 month regrowth period.
- Damage at the mid-nail: The weakened area will take approximately 3-4 months to reach the free edge where it can be trimmed off.
- Damage near the free edge: This is the best-case scenario, as the thin portion can typically be filed or trimmed away within 4-6 weeks.
- Toenails: The process is much slower, with a full replacement taking anywhere from 12 to 18 months.
During this grow-out period, the thinned nail will be weak, overly flexible, and prone to bending, splitting, and further damage. It requires gentle handling and a dedicated care routine to protect the new growth and prevent setbacks. Patience is not just a virtue; it is a biological necessity.
Chemical Etching vs. Mechanical Buffing: Is Priming Without Filing Possible?
Given the significant risks of mechanical buffing, it’s natural to question if there are safer alternatives for preparing the nail plate. The primary goal of prep is to create a surface that products can adhere to. This can be achieved mechanically (buffing) or chemically (etching with a primer). Some modern systems even claim to require no prep at all, relying on advanced base coat formulations.
Chemical etching, typically done with an acid-based primer, uses a chemical reaction to create microscopic porosity on the nail surface for adhesion. This avoids the physical removal of nail layers associated with buffing. While it eliminates the risk of thinning the plate, it introduces a different concern: chemical exposure. Acid primers can be corrosive if they contact the skin and still carry a risk of allergic sensitization, especially if the nail plate is already compromised.
No-buff systems represent a growing trend in the nail industry. These systems use advanced polymer chemistry in their base coats to create a strong bond with the natural, un-buffed nail plate. They are by far the safest option in terms of preserving the nail’s structural integrity and minimizing the risk of creating pathogen gateways. However, their longevity can be more variable and highly dependent on the user’s nail chemistry and application technique. They often require meticulous cleansing and dehydration of the nail plate to be effective.
This table compares the risk profiles of the different methods:
| Method | Risk of Plate Thinning | Risk of Sensitization | Reversibility | Adhesion Longevity |
|---|---|---|---|---|
| Chemical Etching (Acid Primer) | Low | Moderate | Mostly Reversible | High |
| Mechanical Buffing (240 grit) | Moderate | High if overdone | Irreversible | Moderate |
| No-Buff Systems | None | Low | N/A | Variable |
Ultimately, the safest method is the one that removes the least amount of natural nail. While priming without any filing is possible with specific no-buff systems, the most balanced approach for most users is extremely gentle mechanical buffing with a 240 or higher grit buffer, used only to remove surface shine, followed by a non-acid primer. This minimizes both physical damage and chemical exposure.
Greenies vs. Bruises: When to Cover Up and When to Treat?
When a mysterious discoloration appears on the nail, it’s easy to panic or, conversely, to dismiss it as a simple bruise. However, distinguishing between a subungual hematoma (a bruise under the nail) and chloronychia (green nail syndrome) is critical, as one can be covered while the other requires immediate treatment and a halt to all nail services.
A bruise is caused by trauma. It typically appears as a red, purple, or black discoloration that is located in the nail bed, beneath the nail plate. As the nail grows, the bruise will grow out with it, and it will not change in color or shape. A bruise is trapped blood and is not an infection; it is generally safe to cover with polish once any initial tenderness has subsided.
“Greenies,” on the other hand, are a sign of a Pseudomonas aeruginosa bacterial infection. This discoloration is not in the nail bed but is a byproduct of the bacteria colonizing a space between the natural nail and a lifting enhancement or even within the layers of a damaged nail plate. The color can range from greenish-yellow to dark green or black. Unlike a bruise, it will often spread or darken over time. This infection thrives in moist, occlusive environments. One case study highlighted a patient who developed a Pseudomonas infection from the combination of nail damage due to friction and a moist environment created by wearing PPE for extended hours. This is precisely the scenario that can occur when moisture gets trapped under a lifting nail enhancement on an over-buffed nail.
Covering up a greenie is the worst thing you can do. It traps the bacteria in a dark, moist environment, allowing it to flourish. If you suspect a Pseudomonas infection, all nail coatings must be removed immediately. The nail should be kept clean, dry, and exposed to air. A professional diagnosis is recommended, as a topical or oral antibiotic may be necessary to resolve the infection. Do not re-apply any nail products until the discoloration has completely grown out and a medical professional has given the all-clear.
The Infection Risk Hidden in Your Drawer: Why Alcohol Isn’t Enough?
The focus on the nail plate itself can obscure an equally significant threat: contaminated tools. Even if you perfect your gentle buffing technique, using a dirty file on a minimally abraded nail can still introduce dangerous pathogens. The micro-fissures you’ve worked so hard to minimize are still entry points, and a contaminated tool delivers bacteria directly to them. Many people believe a quick spritz of rubbing alcohol is sufficient for sanitizing tools like buffers and files, but this is a dangerously inadequate practice.
Porous tools like nail files and buffers cannot be truly sterilized with a simple alcohol spray. The microscopic nooks and crannies of the abrasive surface can harbor bacteria, skin cells, and fungal spores. When these tools are used, they can accumulate debris and create a biofilm—a protected community of bacteria that is highly resistant to simple disinfectants. This biofilm shields pathogens from the brief contact with alcohol, rendering it ineffective.
Serious bacteria, including antibiotic-resistant strains like MRSA (Methicillin-resistant Staphylococcus aureus), can be transmitted this way. Health experts warn that MRSA can spread through the sharing of unsanitized nail implements. To be effective, non-disposable metal tools must be thoroughly cleaned of all debris and then fully immersed in a hospital-grade disinfecting solution for a minimum of 10 minutes. Porous items like buffers and traditional emery boards are technically single-use items in a professional setting because they cannot be properly disinfected. For at-home use, they should be designated for one person only and replaced frequently.
A simple alcohol wipe does not penetrate the biofilm and does not have the contact time required to kill resilient pathogens. To truly mitigate risk, you must either use single-use disposable files or invest in disinfectable tools (like glass files or metal implements) and a proper immersion disinfectant. Assuming your tools are clean because they “look clean” or have been sprayed with alcohol is ignoring the invisible world of microbes that pose a real threat to the health of your nails and skin.
Key Takeaways
- Over-buffing physically removes protective nail layers, creating invisible micro-lesions that act as gateways for bacteria.
- The nail plate is an immunological barrier; damaging it increases the risk of developing permanent allergies to nail products.
- A 240-grit or higher buffer should be used for natural nail prep, not aggressive low-grit files like 180-grit.
How to Transition from Acrylics to Natural Nails Without cutting Them Short?
Transitioning away from acrylics or other enhancements often reveals nails that are weak, thin, and damaged from years of filing and chemical exposure. The common advice is to cut them short and start over, but this isn’t the only option. With a dedicated rehabilitation protocol, it’s possible to support the damaged nail as it grows out, maintaining some length and improving its health over time. This process requires patience and a shift in focus from aesthetics to structural support and nourishment.
The key is to provide a combination of external reinforcement and internal nourishment. The weakened nail plate is overly flexible and prone to bending and breaking, which can cause further damage and setbacks. Using a “soft” gel overlay, like a Builder-in-a-Bottle (BIAB) product, can act as a flexible, protective splint. Unlike rigid acrylic, these gels are designed to have some give, protecting the natural nail from mechanical stress while it recovers. Regular infills every 2-3 weeks are crucial to maintain this support and prevent lifting, which could trap moisture.
Simultaneously, you must nourish the new nail growth from its source: the matrix. This is achieved through the consistent, daily application of a high-quality, jojoba-based cuticle oil. Jojoba oil’s molecular structure is very similar to the body’s natural sebum, allowing it to penetrate deeply into the nail plate and surrounding skin to deliver moisture and nutrients. This helps the new nail grow in stronger, healthier, and more flexible. Gentle shaping with a glass file will prevent the micro-fraying caused by traditional files.
Your Weekly Nail Rehabilitation Protocol: A Checklist for Recovery
- Assess Current Damage: Carefully examine your nails. Identify any thin spots, areas of sensitivity, discoloration, or lifting to establish a baseline for your recovery journey.
- Establish a Nourishment Routine: Commit to applying a high-quality, jojoba-based cuticle oil directly to the cuticle area and underside of the nail at least twice daily to nourish the matrix.
- Switch to Gentle Shaping: Discard all coarse files. Use only a glass file or a 240+ grit buffer for weekly shaping, always filing gently in a single direction to prevent splitting.
- Implement Structural Support: Apply a keratin-bonding nail treatment or a professional BIAB overlay to act as a protective shield, preventing bending and breaking of the weak nail plate.
- Track and Adjust: Take weekly photos to monitor progress. As the healthy new nail grows from the cuticle, you can gradually adjust your routine and celebrate the return of your natural nail’s strength.
By adopting a mindful, health-first approach to your entire nail care routine—from preparation to maintenance to recovery—you ensure your nails remain a strong, resilient, and truly beautiful canvas for years to come.