In summary:
- True shine comes from progressively smoothing the nail plate with decreasing grit levels, like polishing a gemstone.
- A natural chamois buffer is superior because its protein structure creates shine through controlled friction, not excessive heat.
- Buffing frequency must be synchronized with your nail’s natural growth rate to prevent over-thinning.
- Nourish the nail’s growth center (the matrix) with penetrating oils like jojoba, and protect the surface shine with occlusive oils like almond.
For many, achieving lustrous, healthy-looking nails seems synonymous with a bottle of top coat. But what if polish isn’t an option due to professional requirements, religious practices, or a simple preference for natural grooming? The common advice often circles around generic four-sided buffer blocks and a quick swipe of cuticle oil, leaving many with a fleeting, dull sheen rather than a true “wet look” brilliance. This approach fails to address the fundamental nature of the nail itself and why genuine, lasting shine is an achievable state of nail health.
The secret doesn’t lie in a coating, but in a traditional, highly refined technique. The pursuit of a polish-free shine is not about applying a product; it’s about physically re-engineering the nail’s surface at a microscopic level. The process is far more akin to the work of a lapidary polishing a raw gemstone than a painter applying a coat of lacquer. It requires an understanding of keratin architecture, friction dynamics, and the precise progression of grits to transform a textured surface into a flawless, light-reflecting mirror.
This guide will deconstruct the art and science behind achieving that coveted glass-like finish using only a chamois buffer and natural aids. We will move beyond superficial tips to explore the correct sequence of actions, the safe frequency of practice, and the biological principles that underpin a truly radiant, natural nail. By mastering this technique, you can cultivate nails that are not just shiny, but are a genuine reflection of their own intrinsic health and strength.
Summary: The Art and Science of Natural Nail Polishing
- What Is the Correct Order of Sides on a Polishing Block?
- How Often Can You Buff for Shine Before Thinning the Plate Too Much?
- Chamois vs. Synthetic Buffers: Which Creates More Heat?
- Using Buffing Cream or Wax: Is It Necessary for High Shine?
- Can You Buff Out Ridges Entirely Without Compromising Strength?
- What Does “Etched Surface” Mean and Why Does It Seal the Layers?
- Massage Techniques to Boost Blood Flow to the Matrix for Faster Growth
- Jojoba vs. Almond Oil: Which Molecule Is Small Enough to Penetrate the Matrix?
What Is the Correct Order of Sides on a Polishing Block?
Achieving a mirror-like shine is a process of systematic refinement. Think of it not as “buffing,” but as polishing a precious stone. You begin with a coarser surface to create a uniform foundation and progress to ever-finer surfaces to eliminate micro-scratches until the surface is perfectly smooth and reflective. A standard multi-sided buffer is designed to facilitate this exact progression. While the chamois provides the final, magical touch, the preparatory steps are non-negotiable for a high-quality result. Each side has a specific grit level and a distinct purpose in the sequence.
The journey from a matte, ridged surface to a glossy finish follows a strict order from the highest grit number (coarsest) to the lowest (finest), culminating in the near-zero abrasive action of the chamois. Skipping a step is like trying to polish a rough-hewn rock with silk; you will not achieve the desired outcome because the underlying surface is not prepared for such a fine level of polishing. The following table breaks down the typical progression and its purpose.
| Buffer Side | Grit Equivalent | Sandpaper Comparison | Purpose | Frequency |
|---|---|---|---|---|
| Side 1 (Coarse) | 240-320 grit | ≈ P320 sandpaper | Remove major ridges | Once monthly max |
| Side 2 (Medium) | 600-1000 grit | ≈ P600-800 sandpaper | Smooth surface | Every 2-3 weeks |
| Side 3 (Fine) | 3000-4000 grit | ≈ P2000 sandpaper | Pre-polish refinement | Weekly safe |
| Chamois (Ultra-fine) | 8000-12000+ grit | ≈ P5000+ sandpaper | Final mirror shine | Daily if gentle |
To apply this knowledge, use the coarsest side (e.g., 240 grit) with extreme care, making only 4-6 light passes on pronounced ridges. Then, progress to the medium grit using gentle, X-pattern strokes across the entire nail. The fine grit should be used in one direction only, from cuticle to tip, to align the nail’s keratin layers. Finally, the chamois is used with quick, light circular motions to generate the friction that creates the final shine.
How Often Can You Buff for Shine Before Thinning the Plate Too Much?
The primary concern with buffing is the potential to weaken the nail by removing too many layers of keratin. The key to safe and sustainable buffing lies in synchronizing the practice with your nail’s natural regeneration cycle. Every time you use an abrasive surface, you are minutely thinning the nail plate. Therefore, the frequency of full, multi-step buffing must be dictated by the rate at which your nails grow and replace that lost material. According to dermatological studies, nails grow at an average rate of 0.08 to 0.12 inches (2-3mm) per month. This provides a biological baseline for how often you can safely perform a full buffing routine.
A “full buff” involving the coarser grits should be a relatively infrequent event, reserved for addressing new growth and texture near the cuticle. Most professionals suggest a full buffing session every three to four weeks is a safe interval for a person with normal, healthy nails. For individuals with thinner or more brittle nails, this should be extended to every six to eight weeks. However, the final, shine-inducing step with the chamois buffer is different. As it has a grit equivalent of 8000 or higher, its abrasive action is minimal. Gentle buffing with a clean chamois can be done daily to refresh the shine without causing significant thinning.
Tailoring your buffing schedule to your specific nail type is crucial for maintaining both shine and strength. A one-size-fits-all approach can lead to damage, while a personalized strategy promotes long-term nail health.
Your Personalized Buffing Calendar: A Growth-Based Strategy
- Brittle/Thin Nails: Perform a full, multi-step buff only every 6-8 weeks, concentrating abrasive work solely on the new growth near the cuticle. Lightly spot-buff other areas as needed.
- Normal Nails: A full buff every 4-5 weeks is safe. Focus the coarser grits on the proximal third of the nail (the part closest to the cuticle) and use a lighter touch on the rest of the plate.
- Strong/Thick Nails: You can safely perform a full buff every 3-4 weeks. Even with strong nails, it’s best practice to concentrate on the newest growth to preserve the integrity of the nail tip.
- Daily Maintenance (All Types): Gentle buffing with a chamois-only side (no abrasive grit) is safe for all nail types to maintain the high-gloss shine between full sessions.
- Listen to Your Nails: If you notice increased flexibility, peeling, or sensitivity, cease all abrasive buffing immediately and allow the nail to grow out completely before resuming a less frequent schedule.
Chamois vs. Synthetic Buffers: Which Creates More Heat?
The material of your final-stage buffer is a critical factor in the quality of shine you can achieve. The debate between natural chamois and modern synthetic buffers often comes down to one crucial physical property: heat generation and management. While both can create shine, they do so through different mechanisms, and this difference is palpable. Synthetic foam buffers, typically made from ethylene-vinyl acetate (EVA) foam with a micro-abrasive coating, tend to generate heat more quickly and aggressively. This rapid heat build-up can be uncomfortable and, in extreme cases, can cause temporary sensitivity to the nail bed.
A natural chamois, on the other hand, operates on a principle of controlled, productive friction. Made from sheepskin leather, its unique, porous protein structure interacts with the keratin protein of the nail in a more harmonious way. It generates a gentle, consistent warmth rather than a sharp, intense heat. This controlled friction is more effective at smoothing the final, microscopic keratin layers to create a highly reflective surface without causing thermal stress to the nail plate. The experience is often described as “polishing” rather than “sanding.”
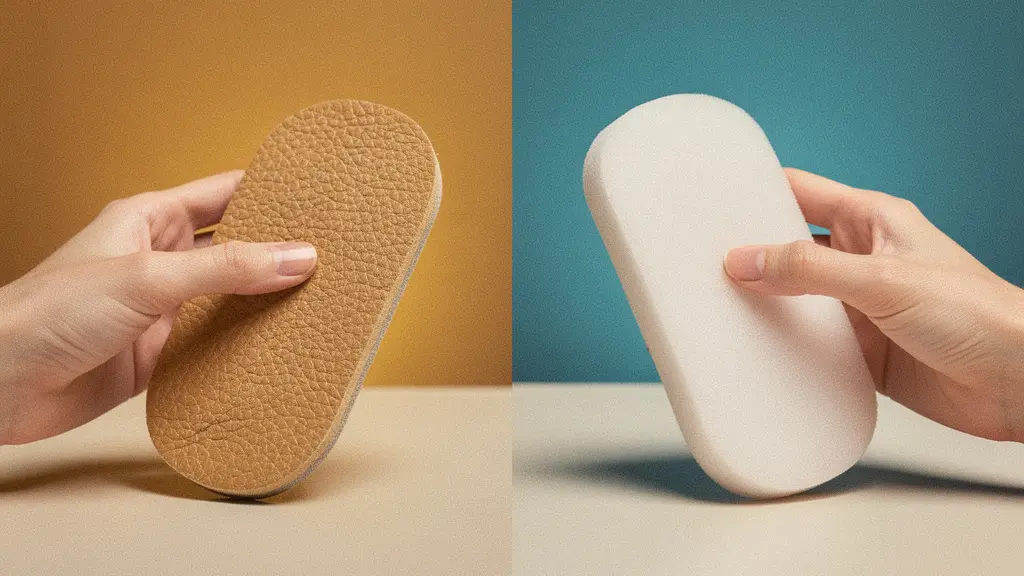
As the side-by-side comparison illustrates, the textures are fundamentally different. The natural leather of the chamois is designed to work with polishing compounds, holding them within its fibers and using them to refine a surface. As one nail care expert notes, this is much like you’d use a chamois and buffing compound to polish a car. The material itself is a tool designed for high-gloss finishing. The synthetic buffer’s uniform surface is more akin to very fine sandpaper, relying on pure abrasion, which is why it can generate more friction heat.
Using Buffing Cream or Wax: Is It Necessary for High Shine?
While a high-quality chamois buffer can produce a remarkable shine on its own, the use of a specialized buffing cream or wax can elevate the result from merely glossy to truly glass-like. These products are not a coating like nail polish; they are polishing compounds. They act as ultra-fine liquid abrasives, filling in microscopic imperfections and providing the perfect medium for the chamois to work its magic. It is not strictly necessary, but for achieving the absolute pinnacle of “wet look” shine, it is highly recommended.
Commercial buffing creams often contain a mild abrasive like diatomaceous earth or kaolin clay, suspended in a waxy or oily base like paraffin. This combination smooths the nail while the wax component helps to seal the shine, making it last longer. The world-renowned podiatrist Bastien Gonzalez, a master of natural nail grooming, underscores this synergy. As he states regarding his signature treatment:
The secret of the shine obtained lies in the combination of a polishing paste with a natural, non-synthetic chamois: the nails are polished and sparkle for several weeks
– Bastien Gonzalez, Reverence de Bastien Natural Horn Buffer
For those who prefer a completely natural, DIY approach, creating your own buffing paste is simple and effective. It allows you to control the ingredients and leverage the polishing power of natural clays. A tiny amount of this paste, smaller than a grain of rice per nail, is all that is needed before finishing with the chamois.
- Mix 1 tablespoon of kaolin clay (an ultra-fine polishing compound).
- Add 1 drop of pure jojoba oil (which mimics the nail’s natural oils).
- Optional: Add 1/4 teaspoon of melted beeswax for extra shine and protection.
- Blend into a smooth paste. Apply a minuscule amount to each nail and buff with a chamois using an X-motion for 10-15 seconds per nail.
Can You Buff Out Ridges Entirely Without Compromising Strength?
Vertical ridges are a common feature on adult nails and represent a challenge for those seeking a perfectly smooth, reflective surface. The temptation is to buff them down until they disappear completely. However, this is a dangerous approach. A ridge is not something sitting *on top* of the nail; it is part of the nail’s structure—a peak next to a valley. Attempting to buff a ridge into oblivion means you are also buffing the “valley” areas, thinning the entire nail plate uniformly and severely compromising its strength.
The correct and safe technique is not to eliminate the ridge, but to gently reduce the “peak” of the ridge, bringing it closer to the level of the “valley.” This creates the optical illusion of a smoother surface without removing excessive material from the entire nail. This requires precision and the right tools. For this task, it’s critical to use a buffer with an appropriate grit. Professional nail technicians recommend using nothing coarser than 240 grit on the top of the natural nail; anything more aggressive risks causing damage and over-thinning.
As the diagram visualizes, the goal is to focus the abrasive action exclusively on the highest point of the ridge. Use the corner of a fine-grit block or a light touch with the coarsest part of your 4-way buffer. Make only a few (2-3) targeted passes directly along the line of the ridge. Then, proceed with your normal, full-nail buffing sequence using finer grits. Over time and with consistent, careful application, the appearance of ridges will be significantly diminished without sacrificing the structural integrity of your nails.
What Does “Etched Surface” Mean and Why Does It Seal the Layers?
The concept of an “etched surface” is central to understanding how buffing creates shine. A natural, unbuffed nail, when viewed under a microscope, has a surface composed of overlapping keratin cells, much like the shingles on a roof. These cells can be slightly raised and lie in various directions, scattering light and resulting in a matte or dull appearance. The initial stages of buffing with coarser grits (e.g., 240-600) effectively “etch” this surface, meaning they abrade away the highest, most irregular points and create a more uniform, albeit still microscopic, pattern of scratches.
This is where the technique becomes critical. To create a seal, you must work in harmony with the nail’s structure. As nail technicians advise, you should always buff your nails in one direction, preferably from the cuticle towards the tip. This encourages all the keratin “shingles” to lie down flat and in the same direction. Buffing back and forth or in random circles can lift and fray the edges of these cells, preventing a smooth, sealed finish.
The “sealing” effect occurs during the final stages of polishing. As you move to ultra-fine grits, such as the 600-2400 grit files or buffer sides, you are progressively refining the etched surface. The micro-scratches from the previous grit are replaced by even finer scratches, until they are virtually nonexistent. The final pass with a chamois, with its 8000+ grit equivalent, smooths these flattened keratin layers so perfectly that they form a single, continuous, highly compacted surface. This sealed surface reflects light uniformly, like a placid lake, creating the brilliant “wet look” shine.
Massage Techniques to Boost Blood Flow to the Matrix for Faster Growth
A beautiful nail is, first and foremost, a healthy nail. While buffing perfects the external surface, true, long-lasting nail quality begins from within, at the nail matrix. The matrix is the area of living tissue at the base of the nail, hidden under the cuticle, where nail cells are created. The health, strength, and growth rate of your nail are all determined here. One of the most effective ways to support a healthy matrix is to ensure it has a rich supply of oxygen and nutrients, which is delivered by your blood.
Gentle massage of the cuticle and surrounding area is a powerful, traditional technique to stimulate circulation. As professional manicurists note, the very act of buffing stimulates nail bed blood flow, but a dedicated massage ritual can amplify this effect significantly. Increased blood flow to the matrix can support faster, stronger nail growth, meaning your nails will be more resilient and can better withstand a regular buffing routine. This ritual doesn’t need to be long; a few minutes a day is all it takes to make a difference.
Incorporate this simple 3-minute massage before your buffing session or as a daily self-care practice. Use a small drop of a high-quality penetrating oil (like jojoba, discussed next) to reduce friction and nourish the skin simultaneously.
- The Matrix Pinch (30 seconds): Gently pinch the skin just behind the cuticle between your thumb and index finger. Hold for 3 seconds, release, and repeat across the base of the nail.
- The Eponychium Roll (60 seconds): Use the pad of your thumb to gently “roll” the skin over the matrix area in small, firm circular motions.
- Tool-Assisted Pressure (60 seconds): If available, use a smooth, rounded tool like a rose quartz roller or a jade stone to apply gentle, rolling pressure along the entire nail bed, from cuticle to tip.
- Final Circulation Boost (30 seconds): Finish with rapid but very light tapping motions with your fingertips all around the nail area to invigorate the circulation.
Key takeaways
- The “wet look” is achieved by physically refining the nail plate through a precise sequence of decreasing grits, culminating in a chamois polish.
- Safe buffing frequency is not arbitrary; it must be tied to your personal nail growth rate to prevent thinning and damage.
- The foundation of a shiny nail is a healthy nail. Nourishing the matrix through massage and using the correct oils for penetration and protection are non-negotiable.
Jojoba vs. Almond Oil: Which Molecule Is Small Enough to Penetrate the Matrix?
The final step in any natural nail care routine is hydration, but not all oils are created equal. Their effectiveness depends entirely on their molecular structure and size. The goal is twofold: to nourish the living tissue of the matrix and cuticle, and to protect the non-living, buffed surface of the nail plate. To accomplish this, you need two different types of oil.
For deep nourishment of the matrix, you need an oil with a small molecular structure that can penetrate the skin and nail plate. Jojoba oil is the superior choice here. Technically a wax ester, its molecular structure is incredibly similar to our skin’s own sebum, allowing it to be absorbed readily. Almond oil, a triglyceride, has a larger molecular structure and is less able to penetrate deeply. It functions more as an occlusive, surface-level moisturizer.
This table clarifies the roles of common nail oils based on their molecular properties. For deep matrix feeding, Jojoba or Squalane are ideal. For protecting the shine on the nail plate itself, Almond or Avocado oil are better suited.
| Oil Type | Molecular Structure | Penetration Level | Best Use | Application Area |
|---|---|---|---|---|
| Jojoba Oil | Wax ester (mimics sebum) | High penetration | Matrix nourishment | Cuticle/eponychium |
| Almond Oil | Triglyceride (larger molecule) | Low penetration | Surface protection | Nail plate |
| Squalane | Hydrocarbon (smallest) | Highest penetration | Deep matrix feeding | Cuticle/matrix area |
| Avocado Oil | Triglyceride (large) | Occlusive barrier | Shine preservation | Buffed nail surface |
Therefore, an effective “Two-Oil Strategy” is the best approach. In the morning and evening, apply a penetrating oil like jojoba specifically to the cuticle and matrix area and massage it in. After buffing, or anytime you want to protect your shine, apply a light film of an occlusive oil like almond or avocado directly onto the nail plate. This locks in the shine and provides a protective barrier without interfering with the deep nourishment happening at the nail’s growth center.
Begin this practice today and transform your nails into natural jewels of health and elegance. By embracing this traditional technique, you are choosing a path of conscious grooming that enhances your natural beauty from the inside out.