In summary:
- Achieving healthy cuticles requires a daily system, not a weekly treatment.
- Maximize product effectiveness by layering cream (hydration) before oil (sealing).
- Prevent 90% of damage with weekly “edge sealing” and daily UV protection.
- Choose an applicator (like a pen) that makes daily use effortless and builds the habit.
- Use a combination of humectants and occlusives in your night routine for deep repair.
You know the cycle. You ignore your hands for a week, caught up in a busy schedule. Then one day, you look down and see it: dry, peeling cuticles, a painful hangnail, and nails that feel brittle and uncared for. You promise to do better, maybe slather on some cuticle oil once, and then the cycle repeats. This frustrating loop isn’t a personal failing; it’s a system failure. The common advice to “just moisturize” is incomplete and leads to inconsistent results, leaving you feeling like beautiful nails are an unattainable luxury.
But what if the solution wasn’t about finding more time or trying harder, but about applying a smarter, more efficient system? The secret to permanently breaking the cycle of neglect and repair isn’t found in a single miracle product, but in understanding the science of how your skin and nails work. It’s about strategic product layering, preventative maintenance, and building a habit so quick and effective it becomes an automatic part of your day.
This guide moves beyond generic tips to give you a 5-minute, non-negotiable evening routine built on optimization principles. We will deconstruct the process, explaining why consistency trumps intensity, how to layer products for maximum absorption, and how simple preventative tricks can eliminate the root causes of damage. Get ready to transform your hands from an afterthought into a point of pride, not with more effort, but with more intelligence.
This article provides a complete system, breaking down each critical component of an effective cuticle care routine. Explore the sections below to master the science and strategy behind salon-worthy nails at home.
Summary: Your 5-Minute Evening Routine for Salon-Worthy Cuticles
- Why Does Applying Oil Once a Week Fail to Prevent Hangnails?
- Cream or Oil: Which Product Should You Apply First for Maximum Absorption?
- The UV Risk While Driving: Do You Need Sunscreen on Your Hands?
- How to Fix a Tiny Tear Instantly Before It Ruins the Whole Nail?
- The Sunday Filing Trick That Prevents 90% of Weekday Breakage
- Pen vs. Dropper Bottle: Which Encourages More Frequent Application?
- Occlusives vs. Humectants: What Does Your Cuticle Area Need at Night?
- Oil or Serum: Which Penetrates Deeper Into the Nail Plate?
Why Does Applying Oil Once a Week Fail to Prevent Hangnails?
Applying cuticle oil once a week is like watering a plant once a month and expecting it to thrive. It’s a temporary fix for a constant problem. Your hands are perpetually exposed to drying elements: water, soap, sanitizers, and environmental changes. This continuous stress depletes the natural moisture from the delicate skin around your nails, the eponychium. When this area becomes dehydrated, it loses flexibility, tightens, and tears, creating those painful hangnails.
A weekly treatment can’t possibly counteract seven days of consistent moisture loss. The key to preventing hangnails isn’t intensity; it’s unwavering consistency. A small amount of hydration applied daily maintains the skin’s moisture barrier, keeping it pliable and resilient. This prevents the micro-tears that eventually become full-blown hangnails. Think of it as a defensive strategy. Daily care builds a fortress of hydration, while weekly care is just sending in a repair crew after the walls have already crumbled.
The goal is to shift from a reactive mindset (fixing damage) to a proactive one (preventing it). A daily, 60-second massage with oil or cream is exponentially more effective than a 10-minute “rescue” session on a Sunday. It’s this small, repeated action that fundamentally changes the health and appearance of your cuticles, making hangnails a thing of the past.
Cream or Oil: Which Product Should You Apply First for Maximum Absorption?
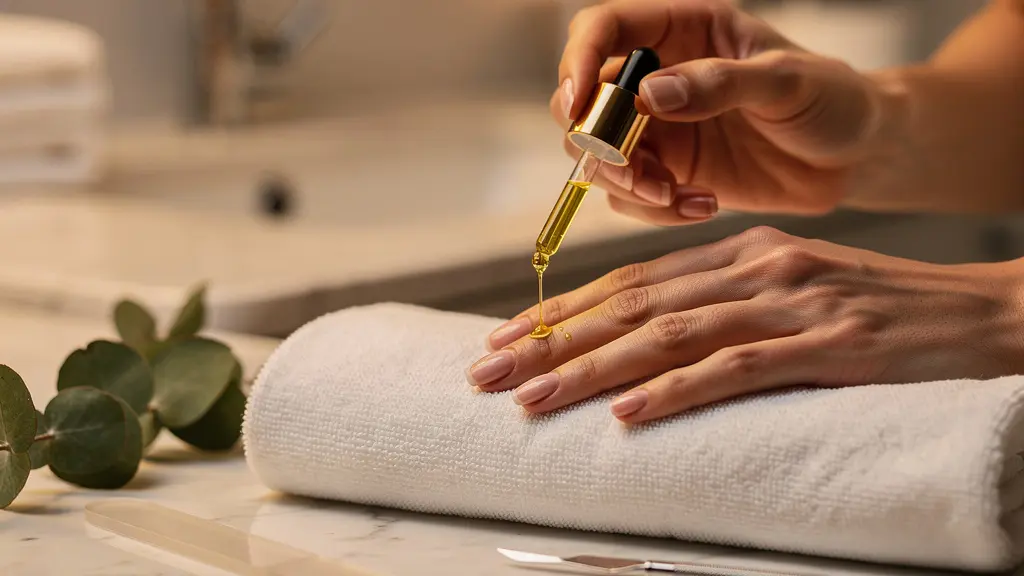
The “cream or oil first” debate is a common point of confusion, but the science of skincare provides a clear and efficient answer. For maximum absorption and benefit, you should always apply a water-based cream or lotion first, followed by an oil. This is the fundamental principle of product layering science: you hydrate, then you seal.
Water-based creams contain humectants that draw moisture into the skin. Applying them to skin that is clean and even slightly damp (e.g., after washing your hands) allows them to deliver that hydration deep into the epidermis. If you apply oil first, its larger molecules create an occlusive barrier on the skin’s surface. This barrier is excellent for locking moisture in, but it also effectively blocks anything else from getting through. Applying a cream over an oil is like trying to water a plant through a plastic sheet—it’s largely ineffective.
Case Study: The Professional Dry Manicure Technique
Professional techniques, like the one highlighted by Kara’s Nail Edit, underscore this principle. In a dry manicure, technicians avoid soaking nails in water, which can cause the nail plate to expand and weaken. Instead, they apply a hydrating cream to the cuticle area first to soften and moisturize the skin. Only after this step is an oil applied to seal in the hydration and nourish the nail. This method not only ensures maximum absorption but also maintains the nail’s structural integrity, leading to longer-lasting manicures.
Therefore, your nightly routine should be a two-step process: first, massage in a small amount of hand cream to deliver a dose of hydration. Immediately after, apply a drop of cuticle oil to lock that moisture in and nourish the nail plate itself. This simple sequence ensures you get the full benefit of both products, rather than having them work against each other.
As you can see, layering correctly creates the optimal environment for healthy skin. The cream provides the essential water content, and the oil acts as a protective blanket, preventing that precious moisture from evaporating overnight.
The UV Risk While Driving: Do You Need Sunscreen on Your Hands?
The answer is an unequivocal yes. We diligently apply sunscreen to our faces, but our hands, which are constantly exposed to the sun—especially while driving—are often completely neglected. The UVA rays that penetrate car windows are a primary cause of premature aging, leading to dark spots, loss of elasticity, and collagen breakdown. This damage isn’t just cosmetic; it weakens the skin’s structural integrity, including the delicate cuticle area, making it more prone to dryness and damage.
Protecting your cuticles is not just about aesthetics. As the Mayo Clinic points out, the cuticle serves a vital function. In their guidance on nail health, they state that the cuticle seals the skin to the nail plate, and its removal or damage can lead to infection. Chronic sun exposure compromises this natural seal, weakening your first line of defense against bacteria and fungus. Integrating UV protection into your daily routine is a crucial act of preventative maintenance.
Making this a habit doesn’t have to be complicated. The key is to reduce friction. Keep a dedicated sunscreen for your hands in your car or purse. A solid SPF stick is a fantastic, no-mess option for quick application on the backs of your hands before you start the engine. Alternatively, UV-protective driving gloves offer a physical barrier while still allowing you to grip the wheel. This isn’t an indulgence; it’s a fundamental step in preserving the health and youthfulness of your hands and nails.
Your Action Plan: UV Protection for Hands
- Identify your trigger: Decide to apply sunscreen right before you start driving or as part of your morning routine.
- Choose your tool: Purchase a solid SPF 30-50 stick or a hand cream with SPF and keep it in your car’s glove compartment or your handbag.
- Check for coverage: When applying, ensure you cover the entire back of your hands, including fingers and the cuticle area.
- Assess reapplication needs: If you wash your hands frequently throughout the day, plan to reapply your hand SPF.
- Consider an upgrade: For maximum protection during long commutes, invest in a pair of UPF (Ultraviolet Protection Factor) driving gloves.
How to Fix a Tiny Tear Instantly Before It Ruins the Whole Nail?
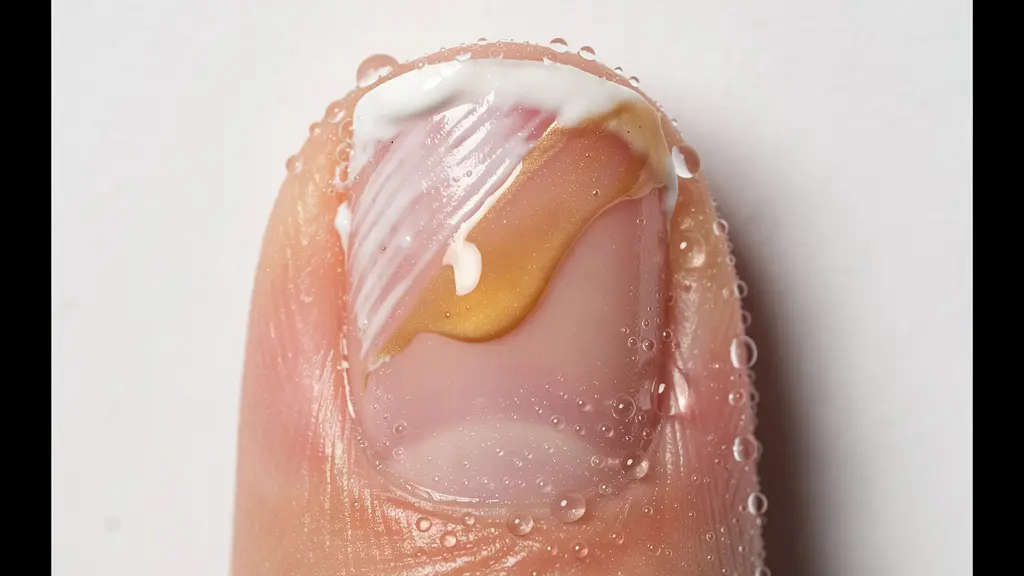
A small snag or tear at the edge of your nail is a ticking time bomb. If left unaddressed, it will inevitably catch on clothing or hair, ripping further and potentially ruining the entire nail length you’ve worked so hard to grow. The instinct to pick at it or ignore it is the enemy. Immediate, decisive action is the only way to neutralize the threat. Your goal is to create a seamless, durable patch that reinforces the weak spot.
The most reliable method, used by salon professionals, is the “tea bag patch.” It’s an incredibly effective technique that requires just a few simple materials: brush-on nail glue, a small piece of a clean, unused tea bag, and a gentle buffing block. The fiber of the tea bag acts like a microscopic-yet-strong fiberglass patch, integrating with the glue to create a flexible reinforcement that moves with your nail.
To execute the repair: apply a tiny drop of nail glue to the clean, dry tear. Using tweezers, place a small, precisely cut piece of tea bag paper over the glue to cover the tear completely. Add another thin layer of glue on top of the paper to saturate it. Once it’s fully dry (which takes about a minute), gently buff the surface until it’s perfectly smooth. The patch becomes virtually invisible and provides a robust shield that can last for weeks, allowing the nail to grow out past the break.
For a quick comparison, here is how different emergency repair methods stack up.
| Method | Time Required | Durability | Materials Needed |
|---|---|---|---|
| Nail glue only | 30 seconds | 1-2 days | Brush-on nail glue |
| Tea bag patch | 2-3 minutes | 1-2 weeks | Nail glue, tea bag paper, buffer |
| Silk wrap | 5 minutes | 2-3 weeks | Nail glue, silk wrap, buffer |
| Clear polish seal | 1 minute | 1 day | Clear nail polish |
The Sunday Filing Trick That Prevents 90% of Weekday Breakage
Most nail breakage doesn’t happen spontaneously; it starts as a microscopic fray or snag at the nail’s free edge. Throughout the week, these tiny imperfections catch on surfaces, growing into bigger chips and breaks. The most effective way to prevent this is with a weekly “edge sealing” ritual. By dedicating just five minutes on a Sunday to properly file and smooth your nail edges, you eliminate the starting points of almost all weekday damage.
The key to this technique lies in two things: the right tool and the right motion. Ditch harsh emery boards, which shred nail layers and create more frays. Instead, invest in a crystal or glass nail file. The fine, even grit of a glass file allows you to smooth the nail edge into a seamless, sealed finish without causing damage. The motion is just as important: always file in one direction, from the side of the nail to the center. Avoid the back-and-forth sawing motion, which weakens the nail structure and invites peeling.
This isn’t just an old wives’ tale; it’s backed by science. The nail plate is composed of layers of keratin. Filing correctly helps to seal these layers together at the tip, creating a stronger, more resilient edge. In fact, research published in PMC confirms that filing nails with gently rounded edges is a key practice for increasing nail strength and reducing the risk of breakage. This simple, mindful act of shaping and sealing each nail once a week is a powerful preventative measure that sets your nails up for a week of strength and resilience.
Pen vs. Dropper Bottle: Which Encourages More Frequent Application?
When it comes to building a daily cuticle care habit, the product itself is only half the equation. The other half is the “habit-stacking technology”—the delivery system that makes application so effortless it becomes second nature. This is where the debate between a cuticle oil pen and a traditional dropper bottle becomes critical. While both can deliver a great product, the pen applicator is vastly superior for encouraging frequency and consistency.
A dropper bottle, while often associated with a luxurious, mindful ritual, introduces friction into the process. It requires you to be stationary, careful not to spill, and to use both hands to dispense and massage the product. This makes it ideal for a dedicated evening routine but impractical for on-the-go or quick daytime touch-ups. It’s an “appointment” product.
The cuticle oil pen, however, is a “convenience” product. It’s portable, mess-free, and allows for precise, one-handed application. You can keep one on your desk, in your car, or on your nightstand and apply a quick swipe of oil in seconds without interrupting your workflow. This ease of use is what enables “habit stacking”—linking your new cuticle oil habit to an existing one, like after you send an email or before you turn off the lights. The pen removes all barriers, turning a chore into an effortless, repeatable action.
Here’s a breakdown of how the two formats compare for building a sustainable habit:
| Feature | Pen Applicator | Dropper Bottle |
|---|---|---|
| Portability | Excellent – fits in pocket/purse | Good – requires careful storage |
| Application control | Precise, no mess | Variable, can drip |
| Usage frequency | Higher – convenient for quick touch-ups | Lower – requires dedicated time |
| Product waste | Minimal | Some waste possible |
| Ritual feeling | Quick fix | Luxurious, mindful moment |
| Best for | Daytime habit stacking | Evening routine |
Occlusives vs. Humectants: What Does Your Cuticle Area Need at Night?
To elevate your nightly cuticle care from basic moisturizing to intensive repair, you need to understand the powerful duo of humectants and occlusives. Using just one or the other is an incomplete strategy. Your skin, especially the dry, damaged skin around your cuticles, needs both to achieve true, lasting hydration. It’s the ultimate expression of the “hydrate and seal” principle.
Humectants (like glycerin, hyaluronic acid, and aloe vera) are moisture magnets. Their job is to pull water molecules from the air and from deeper layers of your skin to hydrate the surface. They are the “hydrators.” Occlusives (like shea butter, petrolatum, natural oils, and lanolin) are moisture sealants. They form a protective barrier on the skin’s surface that prevents water from evaporating, a process known as Transepidermal Water Loss (TEWL). They are the “sealers.”
Using only a humectant in a very dry environment can backfire, as it may pull moisture from the deeper layers of your skin and let it escape, making your skin even drier over time. This is why layering is crucial. Your nightly routine should involve applying a humectant-rich serum or cream first to infuse the skin with water, followed immediately by an occlusive-rich oil or balm to lock that hydration in place while you sleep. This combination creates a “moisture sandwich” that allows the skin to repair and rehydrate itself overnight.
Case Study: The Manicurist Seasonal Care Approach
The French natural nail care brand Manucurist provides a perfect example of this science in action. Their approach, particularly for harsh winter conditions, emphasizes using both types of ingredients. As detailed in their guide to cuticle care, they recommend applying a water-based serum (humectant) first, followed by their Green Oil, which is rich in sweet almond oil (occlusive). This system ensures that the humectants have moisture to work with and that this hydration is sealed in for an intensive overnight treatment, preventing the skin from drying out further.
Key Takeaways
- True nail health is a system: daily hydration, weekly prevention, and nightly repair.
- The order matters: Always apply water-based cream before oil to hydrate then seal.
- Your tools dictate your habits. A cuticle oil pen makes daily consistency effortless.
Oil or Serum: Which Penetrates Deeper Into the Nail Plate?
When it comes to nourishing the nail itself, not just the surrounding skin, the molecular structure of the product is everything. This is where the distinction between a serum and an oil becomes critical. While water-based serums are fantastic for hydrating the skin (the eponychium), it is a high-quality oil that has the unique ability to penetrate the nail plate.
The nail plate is primarily made of keratin and is lipophilic, which literally means “oil-loving.” It naturally repels water but absorbs oils. However, not all oils are created equal. The key is molecular size. Certain oils, most notably jojoba oil, have a molecular structure that is incredibly similar to our skin’s natural sebum and is small enough to weave its way between the dense keratin layers of the nail plate. Other oils like avocado and sweet almond also have this penetrating ability.
Dr. Sara Norris explains this phenomenon clearly. In her contributions to a Healthline guide on nail health, she highlights the lipophilic nature of the nail plate. This is the scientific reason why a nightly massage with the right kind of oil does more than just sit on the surface.
The nail plate is made of keratin and is lipophilic (oil-loving). Certain oils like jojoba and avocado have a molecular structure small enough to penetrate between the keratin layers.
– Dr. Sara Norris, as featured in Healthline – Nail Health Chart
When these oils penetrate the nail plate, they deliver fatty acids and vitamins that increase the nail’s flexibility and moisture content from within. This internal plasticizing effect is what makes the nail less prone to brittleness, peeling, and breaking. A serum hydrates the skin around the nail; a good oil flexes the nail itself. For a comprehensive routine, you need both, but for deep nail strength, oil is the non-negotiable hero.
You now have the complete system. This isn’t about adding another chore to your day; it’s about installing a 5-minute, high-impact system that runs on autopilot. By understanding the ‘why’ behind each step—consistency, layering, prevention, and penetration—you are no longer just treating symptoms. You are building strong, healthy, resilient nails from the ground up. The power to break the cycle of dry, damaged cuticles is officially in your hands.