The secret to a flawless French tip on your non-dominant hand isn’t better brush control—it’s abandoning it entirely.
- The ‘rolling technique’ turns your finger into the moving part, making your non-dominant hand’s only job to hold a brush steady.
- Tools like stampers are helpful, but understanding the physics of creating a line by moving the ‘canvas’ (your nail) is the real game-changer.
Recommendation: Anchor your brush hand firmly and practice letting your nail do all the work. You’ll be amazed at the results.
The shaky hand, the wobbly line, the feeling of painting with your feet—we’ve all been there. You’ve just finished a flawless manicure on your dominant hand, and now comes the moment of truth: painting the other side. It’s the single greatest challenge for any at-home nail artist, a true test of patience that often ends in smudged, uneven smile lines and a trip back to the nail salon.
You’ve probably been told to ‘go slow,’ use nail art stickers, or just ‘clean up the mess later’ with a brush and acetone. While these tips have their place, they treat the symptom, not the cause. They assume your non-dominant hand is the problem, a clumsy apprentice that just needs more practice. But what if the entire approach is wrong? What if the struggle has nothing to do with how steady your hand is?
As a dexterity coach, I’m here to tell you the revolutionary truth: stop trying to move the brush. The real secret to a perfect, symmetrical French manicure is to flip the script entirely. It’s a principle of ‘static anchor, moving canvas’—a technique that relies on the controlled, simple movements you can easily make, rather than the complex, fine motor skills you’re struggling to learn. It’s about creating a dexterity illusion that delivers professional results.
In this guide, we will deconstruct the myths and master the techniques that pros use. We’ll explore why the viral stamper hack works (and why it fails), discover which French tip style actually makes your fingers look longer, and master the game-changing “rolling” technique that will finally give you the crisp, clean smile lines you’ve been dreaming of, on both hands. Forget practice makes perfect; the right technique makes it possible.
This article breaks down the essential techniques and style choices to master the French manicure with your non-dominant hand. Below is a summary of the key areas we will cover, from viral hacks to professional finishing touches.
Summary: Mastering the Non-Dominant Hand French Manicure
- The “Stamper French”: Is It Really as Easy as TikTok Says?
- Deep Smile vs. Straight Line: Which French Tip Suits Your Nail Shape?
- Micro-French: The Minimalist Trend Replacing the Classic White Tip
- How to Clean Up a Messy Smile Line Using a Brush and Acetone?
- The “Cuff” Manicure: Drawing the Line at the Cuticle Instead of the Tip
- The “Rolling” Technique: How to Load Gel Paint for Long Lines?
- What Nail Colors Are Considered “Unprofessional” in Conservative Sectors?
- How to Adapt Impractical Runway Nails for Office Clients?
The “Stamper French”: Is It Really as Easy as TikTok Says?
The nail stamper exploded onto the scene as a messiah for the French manicure-challenged. Viral videos show a perfect smile line appearing with a simple press into a squishy silicone tool. It seems too good to be true, and in many ways, it is. The technique is hailed for its ease of use, with some guides rating the stamper as the top tool for ‘zero skill’ users. While it can create instant lines, success is far from guaranteed and depends heavily on technique and materials.
The problem is that a simple press rarely works. The curve of your nail, the amount of polish, and the pressure you apply all dramatically affect the outcome. Too much polish and you get a thick, blobby line. Too little, and it’s patchy and incomplete. The real value of the stamper isn’t as a one-press solution, but as a guide that helps you place the polish evenly across the tip. It’s a tool, not a magic wand.
To get the most out of your stamper, you must learn to troubleshoot its common failures. It’s not about pressing your finger straight down, but often about gently rolling your nail into the polish-coated stamper at a specific angle. Understanding these nuances is key to turning this viral hack into a reliable technique in your arsenal. The following checklist addresses the most common issues you’ll encounter.
Action Plan: Troubleshooting Common Stamper Failures
- For thick lines: Don’t press hard. Use a lighter touch and apply less polish onto the stamper surface before pressing.
- For thin/incomplete lines: Ensure you’ve applied enough polish to the stamper and are rolling your finger at a consistent 45-degree angle.
- For polish not transferring: Check polish viscosity. Thicker gel polishes and stamping polishes work significantly better than thin, regular lacquer.
- For curve mismatch: Actively roll your finger from one side to the other into the stamper instead of just pressing straight down. This adapts the line to your nail’s unique curve.
- For messy edges: Apply a liquid latex barrier around your cuticles and fingertips before stamping. This makes cleanup a simple peel-off process.
Ultimately, the stamper is a fantastic starting point, but it’s just one piece of the puzzle. True mastery comes from understanding the principles behind the perfect line.
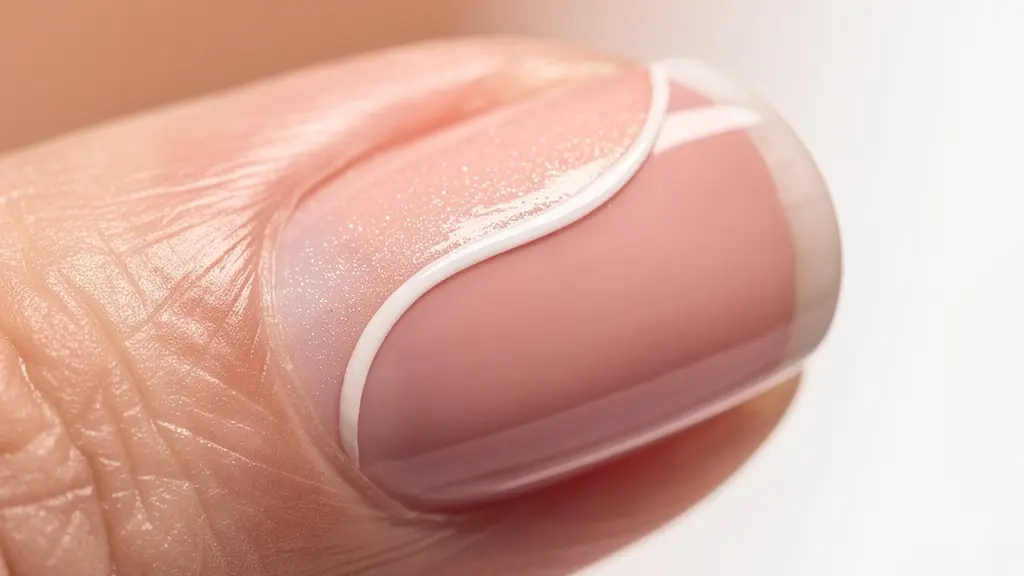
Deep Smile vs. Straight Line: Which French Tip Suits Your Nail Shape?
Not all French tips are created equal, and the shape of your smile line can dramatically alter the appearance of your hands. Choosing the right style is less about trends and more about understanding optical illusions. A deep, curved smile line can make short fingers appear longer and more elegant, while a straight, blunt line can add a modern, chic edge to longer nail beds. This isn’t just an aesthetic choice; it’s a strategic one.
For those with wider nail beds or shorter fingers, a deep “U” or even a “V” shape is a powerful tool. It draws the eye inward and down the length of the finger, creating an illusion of slenderness and length. Conversely, if you have naturally long, slender fingers and narrow nail beds, a very deep curve can sometimes look disproportionate. A flatter, straighter line or a subtle curve can help maintain a sense of balance and proportion, giving a clean and sophisticated look.
The key is to work with your anatomy, not against it. Before you even pick up a brush, analyze your nail shape, finger length, and what you want to achieve. Do you want to elongate, widen, or simply accentuate what you have? Answering this question will guide your choice and make the application process more intentional. The following table breaks down the best pairings for a flattering and personalized French manicure.
This selection process is crucial, as explained by a comparative analysis of nail shapes, which provides a framework for choosing the most flattering style.
| Nail Shape | Best French Style | Visual Effect | Application Method |
|---|---|---|---|
| Short Fingers | Deep Smile Line | Elongates fingers | Carve-out method |
| Wide Nail Beds | Diagonal/V-Shape | Creates illusion of length | Angled brush technique |
| Long Fingers | Straight Line | Maintains proportion | Nail vinyls/guides |
| Narrow Nails | Subtle Curve | Adds width visually | Rolling technique |
By tailoring the smile line to your specific hand shape, you transform the French manicure from a simple design into a bespoke enhancement.
Micro-French: The Minimalist Trend Replacing the Classic White Tip
If the thought of painting a thick, perfectly curved smile line still sends shivers down your spine, the Micro-French trend is your new best friend. This minimalist take on the classic has been gaining immense popularity, offering a chic, understated alternative that is significantly more forgiving for at-home application. As the name suggests, it involves painting an incredibly thin line just at the very edge of the nail tip.
This trend, featuring a design with a “thin ribbon of colour” on the nail tips, has been a favorite since early 2024. Its beauty lies in its subtlety. It gives the polished, finished look of a French manicure without the high stakes of a traditional thick tip. A slight wobble or imperfection in a micro-line is virtually invisible from a normal distance, making it the perfect entry point for practicing line work with your non-dominant hand. It’s about getting the ‘idea’ of a French tip without the pressure of perfection.
Mariela Bosnjak, a nail technician at Rawr Beauty, perfectly captures the essence of this look. Her description highlights the delicate and refined nature of this style:
[It’s] a thin ribbon of colour to the tips of your nails. Simple but so chic.
– Mariela Bosnjak, Rawr Beauty nail technician
To achieve this look, use the finest detailer brush you can find. The trick is to use a minimal amount of polish and let the brush just kiss the edge of the nail. You’re not painting a line so much as you are tracing the existing free edge. This technique is fantastic for building confidence and developing the light touch needed for more complex designs.
Embracing this trend allows you to enjoy a sophisticated look while honing the fundamental skills needed for more challenging nail art.
How to Clean Up a Messy Smile Line Using a Brush and Acetone?
Even with the best techniques, mistakes happen. This is where the cleanup brush becomes your most valuable tool. However, thinking of it as just “cleaning up a mess” is a beginner’s mindset. Professionals think of it as “carving the line.” This reframe changes the process from a reactive correction to a proactive sculpting step. You’re not erasing an error; you are defining the final, perfect shape.
The technique involves using a stiff, flat, or angled brush dipped lightly in acetone or alcohol (for gel polish) to meticulously sharpen the edge of your smile line. The key is to work from the center outwards. Professional technicians often draw a point in the center of the smile line and drag it down to create one side of the curve, then mirror the process on the other. This ensures symmetry and a deep, crisp “C” shape. Using this method, you can turn a wobbly, uneven line into a razor-sharp, salon-quality curve.
The type of brush you use matters immensely. Different brush shapes are designed for different sculpting jobs, allowing for greater precision and control. Choosing the right tool for the job is half the battle won. Here’s a breakdown of which brush to use for specific cleanup tasks:
- Angled brush: Best for sculpting the deep curves of a traditional smile line. The angle allows you to get right into the corners.
- Flat brush: Ideal for perfecting straight-line French tips or creating sharp, geometric designs.
- Filbert brush: With its rounded edge, this brush is perfect for smoothing the transition between the tip color and the base color.
- Pointed brush: Use this for ultra-precision work, like cleaning up the very corners of the smile line or fixing tiny smudges.
A pro tip is to use a dedicated gel brush lightly dipped in top coat when working with gel. This allows the brush to glide smoothly over the nail plate without dragging or smudging the underlying color, creating an even cleaner finish.
With the right brush and a “carving” mindset, you can achieve a flawless finish, regardless of any initial wobbles.
The “Cuff” Manicure: Drawing the Line at the Cuticle Instead of the Tip
What if you could sidestep the most difficult part of the French manicure—the free-edge tip—altogether? Enter the “Cuff” manicure, also known as a reverse French. This chic and modern design flips the script by placing the line at the cuticle instead of the tip. For anyone struggling with their non-dominant hand, this is a game-changing revelation.
The ergonomic advantage is immense. When painting the tip of your nail, your brush is floating in space, relying on the stability of both your hands. When painting a cuff, your brush hand can be braced against the same finger you are painting. The cuticle provides a natural, physical guide to follow. This creates a much more stable system, drastically reducing the shakes and wobbles associated with non-dominant hand painting. It’s a built-in guide rail that makes a crisp, clean line infinitely easier to achieve.
This technique is not just easier; it’s also incredibly versatile and sophisticated. A delicate metallic cuff can look like a piece of jewelry, while a bold, colorful cuff offers a modern pop of color. It’s a subtle yet impactful detail that looks intentional and high-fashion. You can apply the same “carving” cleanup technique discussed earlier to perfect the line along the cuticle for an immaculate finish.
As you can see in the detail above, the precision required is high, but the stability offered by working near the cuticle makes it far more achievable. You are no longer fighting gravity and an unsteady hand in mid-air; you are working on a grounded, stable surface.
By shifting the focus from the tip to the base, you bypass the biggest dexterity challenge and unlock a whole new world of elegant nail art.
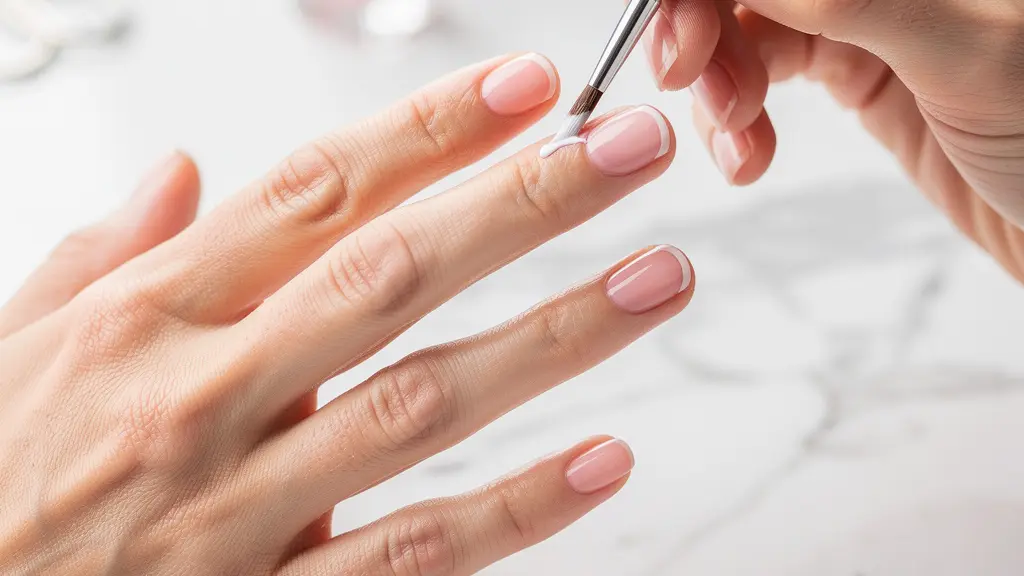
The “Rolling” Technique: How to Load Gel Paint for Long Lines?
This is it. The single most important technique you will ever learn for painting with your non-dominant hand. This is the secret that separates frustrated home artists from confident nail pros. The “rolling” technique, or what I call the “Static Anchor, Moving Canvas” method, completely removes the need for your non-dominant hand to perform fine motor movements.
The core principle is revolutionary in its simplicity: your brush hand does not move. It becomes a static anchor, held firmly in place. Your other hand, holding the finger you are painting, does all the work by slowly rolling the nail into the stationary brush. You are using the large, easily controlled muscles of your arm and shoulder to create the perfect curve, not the tiny, shaky muscles of your non-dominant wrist and fingers. It is the ultimate dexterity hack.
An expert on the Salon Geek professional forum laid out this very secret, a piece of advice that has been a cornerstone for nail technicians for years:
The secret is to move your finger, not the brush. Hold the brush completely still on the nail, and slowly rotate your finger from one side to the other.
– Salon Geek Forum Expert, Professional Nail Forum Discussion
To execute this, you must follow a precise set of steps. It will feel unnatural at first, but with a few tries, you’ll feel the “click” as your brain understands the new mechanics. Here is the breakdown:
- Step 1: Load your detailer brush with gel paint to create a small ‘bead’ of polish at the very tip.
- Step 2: Anchor your painting hand (your non-dominant one) firmly on your work surface. You can rest your wrist on the table and even use your pinky finger for extra stability.
- Step 3: Place the brush tip at the starting point of your smile line, on one side of the nail. Do not move the brush from this spot.
- Step 4: Using your dominant hand, take the finger you are painting and slowly, deliberately roll the nail into the static brush tip.
- Step 5: Maintain consistent pressure as you roll from one side of the nail to the other, letting the brush deposit a perfect, even line.
- Step 6: The brush stays completely still while the nail moves beneath it. Lift the brush only when the line is complete.
Mastering this technique is not just about painting a better French tip; it’s about fundamentally changing your relationship with your non-dominant hand, turning a source of frustration into a reliable partner.
What Nail Colors Are Considered “Unprofessional” in Conservative Sectors?
There’s a long-held belief that professional nail colors are limited to a narrow palette of nudes, pale pinks, and classic reds. In many conservative corporate environments, bold or “unconventional” colors are often seen as unprofessional. However, this conversation is becoming more nuanced, shifting from a focus on *color* to a focus on *execution*.
A chipped, messy, “safe” nude manicure looks far less professional than a flawlessly executed, crisp navy blue or deep burgundy design. The quality of the application—the clean cuticle line, the perfect shape, the high-gloss finish—speaks volumes more about your professionalism and attention to detail than the specific shade you choose. As luxury manicurist Claire Stark states, the hierarchy is clear:
A flawlessly executed, crisp navy blue or deep burgundy French tip appears more professional than a sloppy, chipped ‘safe’ nude manicure. Execution trumps color.
– Claire Stark, Luxury Manicurist, London
This is empowering. It means that once you’ve mastered the techniques in this guide, your options expand significantly. A dark-colored French tip, a Micro-French in a jewel tone, or even a subtle metallic cuff can be perfectly appropriate for many professional settings, provided the execution is impeccable. The key is understated elegance and pristine condition. Even the recent return to traditional French manicures shows a preference for softer, milky-white tips over stark, bright white ones, indicating a professional shift toward more subtle and refined looks.
Of course, context is everything. In extremely conservative fields like law or finance, the “safe” palette still largely rules. But for most modern workplaces, the new rule is simple: if it’s clean, crisp, and intentional, it’s professional. Your skill is your new dress code.
Focus on mastering your technique, and you’ll find that your definition of “work-appropriate” becomes much broader and more creative.
Key takeaways
- The ‘rolling technique’ (static brush, moving nail) is the most effective method for achieving a crisp line with your non-dominant hand.
- The style of your French tip (deep curve, straight, micro) is a tool for optical illusion that can be used to flatter your specific hand and nail shape.
- Execution trumps color: a flawlessly applied dark or unconventional manicure often appears more professional than a sloppy ‘safe’ nude.
How to Adapt Impractical Runway Nails for Office Clients?
Runway nail art is a fantastic source of inspiration, but its bold, often impractical designs rarely translate directly to an office environment. The key to making these trends work-friendly is translation, not imitation. It’s about capturing the essence of a trend—its color, texture, or shape—and toning it down into a wearable, sophisticated look. This is where your French manicure skills become an invaluable asset.
The French tip is the perfect canvas for trend adaptation. It allows you to incorporate a “risky” element in a small, controlled way. A full-chrome manicure might be too much for the boardroom, but a sharp, chrome French tip on a clean nude base is modern and chic. A wild, asymmetrical design can be translated into a subtle, diagonal French line. The nude base keeps it grounded and professional, while the tip provides a small window for creative expression. Celebrity manicurist Miss Pop notes that the French manicure is experiencing a “bold renaissance,” being reimagined with all sorts of modern finishes, proving its adaptability.
This approach allows you to stay current and express your personal style without sacrificing professionalism. It’s about finding the balance between trend and tradition. The following table offers some practical translations for turning high-fashion runway trends into office-appropriate French manicures.
This method of “translating” trends is detailed in a guide on alternative French manicures, showing how to distill a bold idea into a subtle statement.
| Runway Trend | Office Translation | Application Technique |
|---|---|---|
| Chrome Everything | Chrome French Tips Only | Metallic on tips, nude base |
| Asymmetrical Design | Diagonal French Line | Off-center smile line |
| 3D Textures | Matte Tip/Glossy Base | Texture contrast only |
| Bold Graphics | Micro Geometric Tips | Subtle line work at edge |
Now that you have the skills, start practicing the core ‘rolling’ technique. This is the foundation upon which all your future nail art masterpieces will be built.