Transitioning away from acrylics doesn’t mean sacrificing your nail length. The key isn’t just patience, but an active recovery strategy focused on understanding your nail’s structure. By prioritizing deep hydration, providing structural support for new growth, and learning to manage existing damage gently, you can cultivate strong, resilient natural nails and maintain the length you love throughout the entire process.
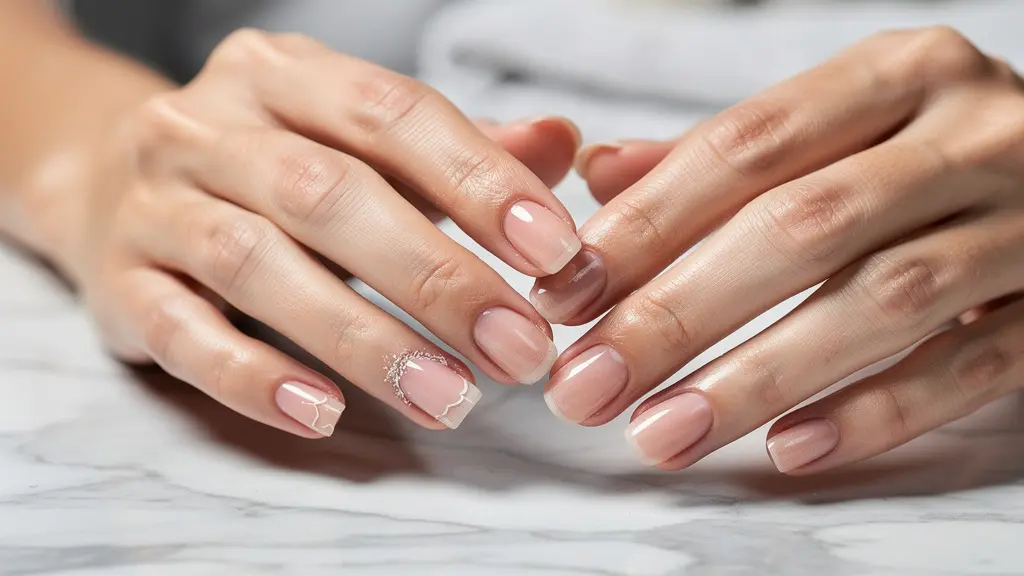
Making the decision to move on from acrylics is a significant step towards long-term nail health. Yet, for many long-term wearers, this decision is clouded by a major fear: the dreaded “big chop.” You’ve grown accustomed to long, perfectly shaped nails, and the thought of starting over with short, weak, and damaged beds can be disheartening. The common advice—to simply cut them off and wait—feels like a punishment, not a solution. It ignores your desire to maintain your aesthetic and confidence during this transition.
But what if the entire premise of “cut and wait” is flawed? What if the journey to healthy natural nails wasn’t a passive waiting game but an active, empowering process of recovery and rebuilding? The secret isn’t about nails “breathing,” a common myth, but about shifting your focus from concealing damage to truly understanding and healing it. This guide is your supportive counsel, moving beyond generic tips to explain the science behind nail recovery. We’ll explore the ‘why’ behind each step, from the cellular level of keratin layers to the biomechanics of a split nail.
This approach transforms you from a passive observer into an informed manager of your nail’s health. You will learn not just what to do, but why you’re doing it. We will cover how to diagnose common issues, the tools that help versus harm, the internal support your body needs, and the daily habits that build a foundation for resilient, salon-worthy nails that are entirely your own. Forget the “big chop”; it’s time for the big comeback.
This article will guide you through a structured, supportive process for transitioning back to healthy, long natural nails. Below is a summary of the key milestones we will cover on your recovery journey.
Summary: A Strategic Guide to Nail Recovery After Acrylics
- Do Nails Need to “Breathe” Oxygen or Just a Break from Filing?
- Greenies vs. Bruises: When to Cover Up and When to Treat?
- Using Silk Wraps to Save a Cracked Natural Nail During Growth
- Collagen Peptides: Do They Thicken the Plate or Just Speed Growth?
- How Many Layers of Keratin Do You Remove with a 240 Grit File?
- How Long Does It Take for a Buffer-Damaged Nail Plate to Regrow?
- Which Vitamin Deficiency Causes Vertical Ridges on Your Plate?
- How to Build a 5-Minute Evening Routine for Salon-Worthy Cuticles?
Do Nails Need to “Breathe” Oxygen or Just a Break from Filing?
One of the most persistent myths in nail care is the idea that nails need to “breathe.” Let’s be clear: your nails are made of dead keratin cells and receive all their oxygen and nutrients from the bloodstream via the nail bed, not the air. So, what do people mean when they say this? They are intuitively describing a need for a break not from polish, but from trauma. The constant cycle of filing, buffing, chemical exposure, and prying associated with acrylics is the real culprit behind weak, peeling nails.
The “breathing” period is actually an active recovery period. Your goal is to reintroduce intense hydration and flexibility to a nail plate that has been dehydrated and thinned. This is where the right kind of oil becomes your most powerful tool. As one beauty community member discovered during her own successful transition, the turning point is often abandoning harsh chemical strengtheners for consistent, deep hydration. She notes, “My best nails started the moment I gave up on strengtheners and started using cuticle oil daily. A base of jojoba oil is best, as that mimics our own natural sebum, and is the oil most easily absorbed by the nail plate.”
Well-hydrated nails are flexible nails. Flexibility is what prevents the snaps and breaks that force you to shorten them. Instead of a brittle, easily-chipped surface, you cultivate a nail that can bend slightly under pressure without fracturing. This is the foundation of growing out damage while maintaining length. The focus shifts from a temporary, hard “shield” to building genuine, internal resilience.
Greenies vs. Bruises: When to Cover Up and When to Treat?
As you transition, you might notice some discoloration on your nail bed. This can be alarming, but as your transition counselor, it’s my role to help you perform “damage triage.” It is crucial to distinguish between a harmless bruise and a potentially problematic bacterial issue, commonly known as “greenies.” A bruise, or subungual hematoma, is simply trapped blood from an injury—like catching your finger in a drawer. It will grow out with the nail and is safe to cover with a breathable polish.
A “greenie,” however, is caused by the Pseudomonas bacteria, which thrives in moist environments. It often appears under a nail enhancement that has lifted, trapping water between the acrylic and your natural nail plate. This is not something to cover up. Applying polish can trap moisture and worsen the situation. The affected nail must be kept clean, dry, and exposed to air. Using an antibacterial treatment is recommended, and if it’s severe or doesn’t improve, seeing a doctor is essential.
Distinguishing between the two is key for a safe and healthy transition. The following table provides a clear diagnostic guide to help you identify what you’re seeing and determine the correct course of action.
| Characteristic | Greenies (Pseudomonas) | Bruises (Subungual Hematoma) |
|---|---|---|
| Color Progression | Green to black | Red to purple to black |
| Location | Often under lifted nail area | Site of impact/trauma |
| Origin | Bacterial infection from moisture | Trapped blood from injury |
| Treatment | DO NOT cover; keep dry; use antibacterial | Safe to monitor and cover with breathable polish |
| Professional Help | Recommended immediately | Only if severe pain |
Visual identification is your first line of defense. The image below highlights the distinct visual differences between the greenish spread of a bacterial colony and the concentrated, trauma-induced appearance of a bruise.
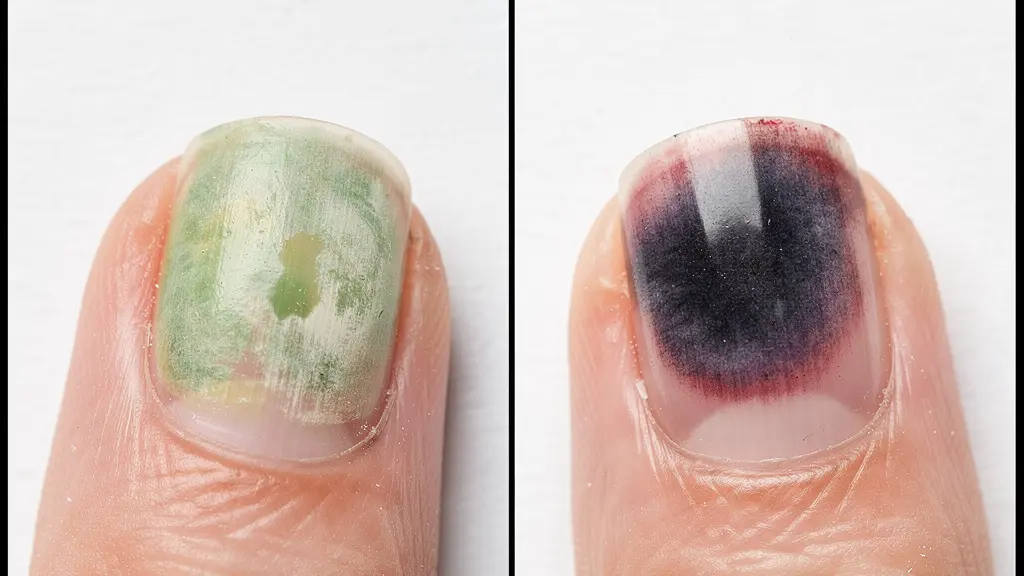
Understanding this distinction empowers you to react appropriately, ensuring a minor issue doesn’t become a major setback in your journey to healthy natural nails.
Using Silk Wraps to Save a Cracked Natural Nail During Growth
One of the most frustrating moments during the grow-out phase is getting a crack or split in your natural nail, especially once it has some length. Your immediate instinct might be to grab the clippers, but this is where a strategic repair can save your length and your morale. A silk wrap is a professional technique that acts as a flexible, durable patch, reinforcing the nail’s compromised structural integrity and allowing it to continue growing out past the point of damage.
Think of it as a sophisticated, nearly invisible cast for your nail. Unlike glue, which creates a brittle bond, the combination of a fine silk or fiberglass mesh with a special resin creates a repair that moves with your natural nail. This prevents further stress on the crack and distributes pressure away from the weak point. It’s an essential tool in the “active recovery” toolkit, allowing you to manage damage without sacrificing the length you’ve worked so hard to achieve.
The application requires a delicate touch to avoid causing more stress. The key is to “float” the resin over the nail with minimal pressure. Applying it correctly ensures the repair is strong yet doesn’t weigh down or put pressure on the fragile nail plate. This technique is a perfect example of working *with* the nail’s current state, rather than against it.
Your Action Plan: Applying a Silk Wrap Patch
- Clean and dehydrate the nail plate thoroughly to ensure proper adhesion.
- Cut the silk wrap to the exact size of the crack, ensuring no overhang.
- Apply a thin layer of resin adhesive, avoiding pressure on the fragile area.
- “Float” the resin with minimal pressure to prevent further stress.
- Position the silk wrap carefully, smoothing from the center outward to eliminate bubbles.
- Apply an activator spray from a 6-inch distance for even curing.
- Once dry, file the edges gently to blend the patch seamlessly with your natural nail.
Collagen Peptides: Do They Thicken the Plate or Just Speed Growth?
While external care is crucial for protecting the existing damaged nail, building a truly resilient, long natural nail starts from within. This is where “growth matrix support” comes into play, and supplements like collagen peptides become relevant. Many people wonder if collagen can magically thicken the thin, damaged nail plate they’re currently dealing with. The answer is no, but the real benefit is far more important.
Your nail plate is already formed and is composed of dead cells. You cannot change its existing thickness. However, you can significantly influence the quality of the *new* nail being produced in the nail matrix (the area under your cuticle). As a nail health expert explains, the mechanism is about providing the right raw materials:
Collagen provides specific amino acids (glycine, proline) which are the building blocks for keratin. It doesn’t magically thicken the existing damaged plate, but rather supports the quality and structural integrity of the new nail being formed in the nail matrix.
– Nail Health Expert, Nail Boss San Diego Recovery Guide
By supplementing with collagen or biotin, you are feeding your nail matrix the essential components it needs to build a stronger, more densely packed, and more flexible keratin structure. This new growth will be far less prone to the peeling and breakage you see in the acrylic-damaged sections. It’s a long-term investment in your nail’s future quality. However, this requires patience, as recovery studies indicate that it can take 4–8 weeks to show noticeable results in nail thickness and strength as the new, improved nail grows out.
How Many Layers of Keratin Do You Remove with a 240 Grit File?
After years of having your nails aggressively filed by e-files in a salon, developing a healthy relationship with a nail file is a critical part of your recovery. It’s essential to understand that any filing removes layers of keratin—the very substance you’re trying to preserve. The goal is to shift from aggressive shaping to a mindset of gentle, controlled intervention. A coarse file, like a 100 or 180 grit, is designed for acrylics and is far too aggressive for a natural nail, removing many layers of keratin with each pass and causing significant thinning.
For your transitioning nails, a 240 grit file should be your go-to tool. It’s fine enough to smooth peeling layers and gently shape the free edge without causing undue stress or removing excessive material. Think of it as a precision instrument, not a wood rasp. Using it correctly can help manage peeling and prevent snags that lead to major breaks. The key is minimal pressure and limited passes, as shown in the image below, to respect the nail’s fragile state.
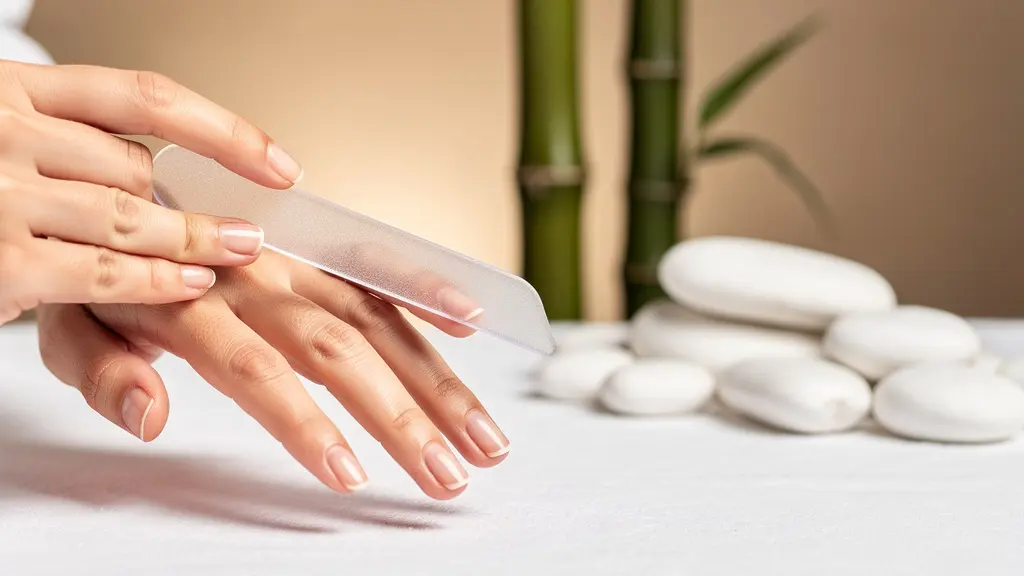
Understanding the impact of different file grits is a form of knowledge-based power in your nail care journey. It allows you to make conscious choices about the tools you use and to ensure that your efforts to maintain your nails aren’t inadvertently causing more damage. The following guide breaks down the purpose and impact of common file grits.
| Grit Number | Purpose | Layers Removed | Safe Usage |
|---|---|---|---|
| 100-120 | Acrylic removal only | 10-15 layers per pass | Never on natural nails |
| 180 | Shaping free edge only | 5-8 layers per pass | Edge work only |
| 240 | Smoothing peeling layers | 2-3 layers per pass | Gentle surface work |
| 400+ | High-shine buffing | 1 layer maximum | Final polish only |
How Long Does It Take for a Buffer-Damaged Nail Plate to Regrow?
This is the question that requires the most patience, but understanding the timeline can make the wait feel more manageable and less infinite. The red, sensitive, and thin nail plate you see after acrylic removal is damaged nail. Unfortunately, there is no way to “heal” this existing plate. The recovery process is one of complete replacement: growing an entirely new, healthy nail from the matrix to the fingertip.
So, how long does this take? On average, fingernails grow about 3.47 millimeters per month. For the average person, this means it takes approximately 6 months for the new nail to fully grow through and replace the old, damaged plate. Seeing that timeline can feel daunting, but breaking it down into a “Recovery Roadmap” can turn it into a series of achievable milestones rather than an endless wait.
Think of it as a six-month counseling program with your nails. Each month, you’ll notice distinct changes and have different care priorities. This roadmap helps you anticipate the challenges of each stage—like the “danger zone” around month three when the weak, damaged tip is most vulnerable—and celebrate the victories, like seeing that clear line of healthy growth emerge from your cuticle. This structured approach is the heart of active, long-term recovery.
Your 6-Month Nail Regrowth Roadmap
- Month 1-2: A visible, healthy growth line appears at the cuticle area. Focus on intense hydration.
- Month 3-4: The nail reaches its halfway point. This is the ‘danger zone’ where the weak tip is most prone to breaking. Be extra gentle.
- Month 4-5: You’re over the halfway hump! Continue with supplements and protective base coats. The end is in sight.
- Month 6: Congratulations! An entirely new, healthy nail plate has reached your fingertip.
- Throughout: Maintain your routine of applying cuticle oil 2-5 times daily and avoiding prolonged water exposure.
Which Vitamin Deficiency Causes Vertical Ridges on Your Plate?
As you pay closer attention to your natural nails, you might notice fine vertical ridges running from the cuticle to the tip. It’s common to immediately worry this is a sign of a serious vitamin deficiency. While it’s true that certain deficiencies can manifest in nail changes, in the vast majority of cases, these ridges are a perfectly normal part of the aging process. It’s crucial to differentiate between what’s normal and what might be a red flag.
Medical assessments of nail health consistently show that faint, uniform vertical ridges are most commonly a normal sign of aging, known as longitudinal striations. Think of them as the equivalent of fine lines on your skin. They occur because the cell turnover in the nail matrix becomes slightly less uniform over time. For most people, this is a cosmetic issue, not a medical one, and it’s not a sign that your transition is failing.
When should you be concerned? The key is the *nature and onset* of the ridges. Ridges that appear suddenly, are very deep, are accompanied by splitting or discoloration, or coincide with other symptoms like severe fatigue or hair loss, could indicate an underlying issue. Severe deficiencies in Iron (anemia), Zinc, Magnesium, or certain B vitamins can cause more pronounced nail ridging. However, these are distinct from the horizontal ridges (Beau’s lines) that indicate a temporary, systemic illness that paused nail growth. If your ridges are dramatic or you have other health concerns, consulting a doctor is always the best course of action. Otherwise, embrace them as a sign of your body’s natural progression.
Key Takeaways
- Active Recovery: Your primary role is to hydrate and protect nails from trauma, not wait for them to “breathe.”
- Nourish from Within: Support the quality of new growth with proper nutrition and supplements like collagen.
- Gentle Intervention: Use the right tools (like a 240 grit file) and techniques (like silk wraps) to manage damage without sacrificing length.
How to Build a 5-Minute Evening Routine for Salon-Worthy Cuticles?
If the nail plate is the shield, the cuticle is its guardian. It’s the living tissue that forms a protective seal, preventing bacteria and moisture from getting into the nail matrix where your new nail is formed. Neglecting it is one of the biggest mistakes in any nail care journey. In an interview with Refinery29, board-certified dermatologist Dr. Dana Stern explains the critical role of this often-overlooked area:
The cuticle is the nail’s natural protective seal. When it becomes dry and dehydrated, it’s compromised: When this happens, water and moisture can enter the nail unit. This causes all sorts of problems including redness and swelling, and eventually, the nail could grow irregularly.
– Dr. Dana Stern, board-certified dermatologist
Protecting this seal is non-negotiable for growing healthy nails. The good news is that it doesn’t require a huge time commitment. Building a simple, consistent 5-minute evening routine can completely transform the health and appearance of your cuticles, and by extension, your nails. This routine focuses on gentle exfoliation, deep hydration, and locking in moisture—the three pillars of excellent cuticle care.
Checklist: Your 5-Minute Evening Cuticle Routine
- Minute 1 (Exfoliate): Apply a glycolic acid toner to your nails and cuticles with a cotton swab. This gently dissolves dead skin without harsh scrubbing.
- Minute 2 (Hydrate): While cuticles are still damp, apply a humectant-based serum containing hyaluronic acid or glycerin to draw in moisture.
- Minute 3-4 (Nourish & Seal): Generously massage in a high-quality jojoba oil, ideally enriched with vitamin E. This mimics your skin’s natural sebum and locks in the hydration from the serum.
- Minute 5 (Gently Tidy): Use an orangewood stick wrapped in a bit of cotton to gently push back the now-softened cuticles. Never cut living tissue; you only want to manage the non-living eponychium.
- Weekly Boost: Once a week, after your routine, apply a thick occlusive balm (like a lanolin or petroleum-based product) and wear cotton gloves overnight for an intensive treatment.
This small, consistent ritual is one of the most impactful investments you can make in your nail health, directly supporting the foundation from which your beautiful, long, natural nails will grow.
Embrace this journey of active recovery. Your future healthy, long nails are not a distant dream but a direct result of the conscious, gentle, and knowledgeable care you provide them starting today.