In summary:
- Your bridal manicure isn’t a single appointment but a multi-phase project starting one month out.
- The key is a “wear test” trial manicure to calibrate color for photos and test for durability.
- Schedule the final manicure 1-2 days before the wedding, after your spray tan, to ensure peak freshness.
- Plan for the entire wedding party, including the groom, for perfectly coordinated ring and bouquet shots.
- A “risk mitigation” clutch kit with a top coat and file is non-negotiable for day-of emergencies.
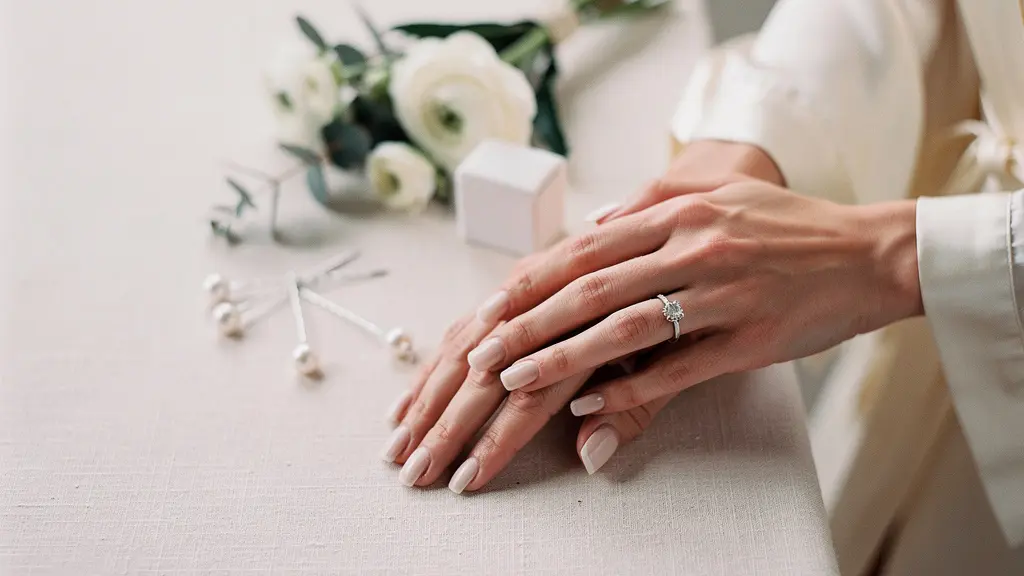
The question of when to get your wedding manicure seems simple, but for a bride-to-be, it’s a source of immense anxiety. You’re juggling spray tan appointments, rehearsal dinners, and the terrifying vision of a chipped nail in your close-up ring photos. The standard advice—”get them done a day or two before”—is a platitude that ignores the critical variables that can make or break your look. It doesn’t account for how a stark white polish can appear blue under a photographer’s flash, whether you can actually button your dress with two-inch stiletto nails, or what happens if a nail snags minutes before you walk down the aisle.
Most guides focus on picking a color, but they fail to address the strategic timeline. But what if the secret to perfect wedding nails wasn’t about the final appointment, but about a comprehensive “Nail Project Timeline” that starts a month in advance? The key isn’t just to schedule a manicure; it’s to de-risk every potential point of failure. This approach transforms the task from a last-minute beauty chore into a managed process, giving you complete control and peace of mind. It’s about calibrating your color for the camera, rehearsing daily tasks with your chosen nail length, and creating a system for flawless coordination.
This guide will walk you through that exact timeline. We will break down each critical checkpoint, from the essential one-month-out trial to building a day-of emergency kit and coordinating your entire bridal party for picture-perfect results. Consider this your definitive project plan for achieving hands that are not just beautiful, but completely worry-free.
For those who prefer a condensed format, this video raises important questions about manicure safety to keep in mind as you plan your pre-wedding nail care routine.
To navigate this detailed beauty strategy, we’ve organized the key decisions and timelines into a clear, step-by-step guide. Follow this structure to build your personalized plan for flawless wedding nails, ensuring every detail is accounted for.
Summary: Your Strategic Timeline for Perfect Wedding Nails
- Why “Stark White” Might Look Blue in Professional Wedding Photos?
- The Bridal Trial: Why Doing It 1 Month Before Is Crucial?
- What to Pack in Your Wedding Clutch for Instant Nail Fixes?
- Matching vs. Palette: How to Coordinate the Bridal Party Nails?
- Can You Handle Your Dress Buttons with 2-Inch Extensions?
- Hand Filing vs. E-File: Which Causes More Inflammation for Beginners?
- The “Claw” Hand: How to Coach Clients to Relax Their Fingers?
- How to Transform a Nude Office Manicure into a Party Look in 5 Minutes?
Why “Stark White” Might Look Blue in Professional Wedding Photos?
One of the most overlooked details in bridal beauty is how nail color interacts with professional lighting. That perfect, crisp white manicure you chose can suddenly appear icy blue or strangely dull in your wedding photos. This isn’t a flaw in your polish; it’s a phenomenon of color temperature and white balance. Professional photographers often manipulate light to create a specific mood, and your nail color will react to these shifts. A pure, stark white has cool undertones that can be exaggerated by camera flashes or overcast skies, pulling it into the blue spectrum.
To avoid this, your goal is “color calibration,” not just color selection. Instead of a harsh white, opt for off-whites, creamy nudes, or sheer pinks with warmer undertones. These shades are more forgiving and adaptable. They absorb and reflect light more neutrally, ensuring your hands look natural and elegant, not cold and clinical. During your trial, test your chosen shades in various lighting conditions: direct sunlight, indoor artificial light, and with a phone flash to simulate a camera’s flash. According to photography experts at Neurapix, photographers often aim to “warm the white balance to around 6000–7000K for that golden glow,” which can further alter how cool-toned colors appear.
The following table, based on an analysis of white balance, illustrates how different light sources affect color perception. Notice how cloudy skies and shade have a much cooler, bluer light temperature, which is a common scenario for outdoor wedding photos.
| Light source | Approx. Kelvin (K) | Appearance |
|---|---|---|
| Candlelight | 1,500 K | Very warm |
| Tungsten bulb | 2,700–3,200 K | Warm/yellowish |
| Sunrise/Sunset | 3,000–4,000 K | Golden tones |
| Fluorescent lights | 4,000–5,000 K | Neutral/cool |
| Daylight (noon) | 5,000–6,500 K | Neutral |
| Overcast/cloudy skies | 6,500–8,000 K | Cool/blue |
| Shade | 7,000–10,000 K | Very cool |
The most effective way to ensure your nails look perfect in every shot is to test shades that are known to be photo-safe. Start with a sheer pink or a soft neutral as your base, as these won’t skew icy in cooler lighting. A classic bridal nude is a reliable baseline, while a bright white should only be used for small details like French tips and tested specifically under flash photography. This diligent testing process is the only way to guarantee your color remains true from the ceremony to the final print.
The Bridal Trial: Why Doing It 1 Month Before Is Crucial?
Scheduling a manicure trial one month before your wedding is the single most important step in your Nail Project Timeline. This is not just a chance to pick a color; it is a full “wear test” designed to gather critical data. The one-month window is strategic: it allows you enough time to see how the manicure performs in real life and still have plenty of time to make changes without stress. This trial serves as your primary checkpoint for finalizing shape, length, and, most importantly, durability.
The scientific reason for the one-month timing is rooted in nail biology. A medically reviewed nail-growth explainer reports that average fingernail growth is about 3.47 mm per month. A four-week trial allows you to see exactly how the grow-out at the cuticle will look, whether the shape holds up, and if the polish is prone to chipping or staining with daily wear. This is your chance to discover that your chosen light pink polish yellows after a week or that the almond shape you love is impractical for your lifestyle. This real-world test is invaluable and simply cannot be simulated a few days before the wedding.
Professional salons like Art Nail NYC build their bridal timelines around this exact milestone. They frame the one-month-out window as the moment to finalize shaping and color, treating it as a practical “trial color” checkpoint. During this wear test, you should meticulously document everything: how the edges wear, if the color stains from food or makeup, and whether the undertone still looks right after two weeks. This information is the deliverable you bring to your nail technician for the final, pre-wedding appointment, ensuring they can execute a flawless, long-lasting manicure based on proven results, not guesswork.
What to Pack in Your Wedding Clutch for Instant Nail Fixes?
On your wedding day, the last thing you want to worry about is a snagged nail or a minor chip. Even the most durable gel manicure isn’t invincible. That’s why every bride needs a “Risk Mitigation Kit”—a tiny, curated set of essentials that fits discreetly into a wedding clutch. This isn’t about being pessimistic; it’s about being a prepared, organized coordinator of your own look. Having these items on hand means you can address a minor issue in seconds, ensuring your hands remain photo-ready from the first look to the last dance.
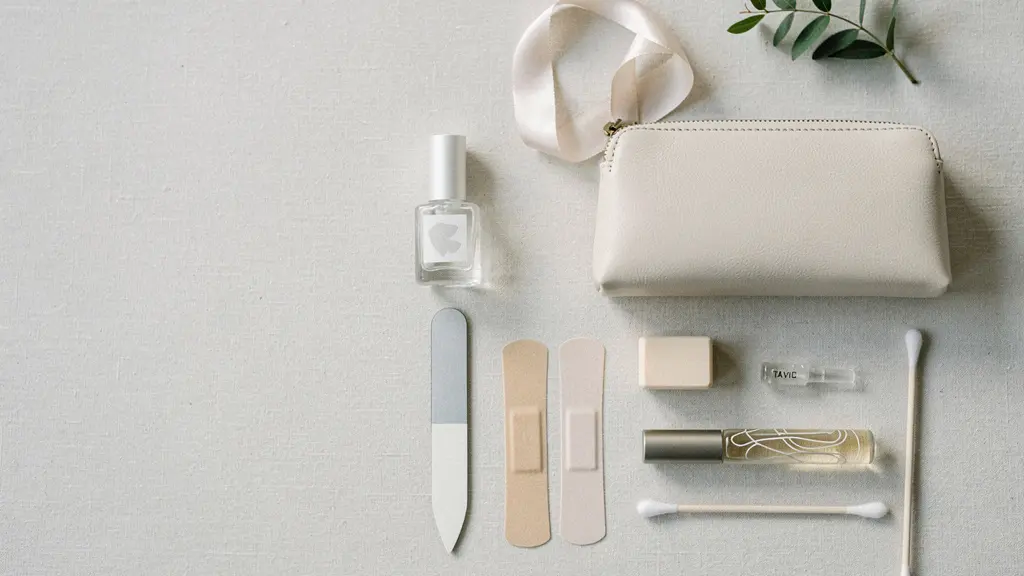
Your emergency kit should be minimalist yet effective. The absolute must-haves are a glass nail file to smooth any rough edges before they can catch on your dress, a bottle of clear top coat, and cuticle oil. The top coat is a multi-purpose hero: it can seal a small chip to prevent it from worsening, add a fresh layer of high-gloss shine right before photos, and even temporarily stop a run in a pair of stockings. Cuticle oil is essential for ensuring the skin around your nails looks hydrated and healthy in macro ring shots, as dry cuticles can be very noticeable in high-resolution photography.
If you’re wearing traditional lacquer (not gel), you should also include a small amount of your chosen polish color for micro-touch-ups. A pair of cuticle nippers can be a lifesaver for a painful hangnail, but they must be used with extreme care to avoid causing irritation or bleeding. The goal is a quick, invisible fix that restores your manicure’s perfection and your peace of mind. Assign this small kit to a trusted bridesmaid or your wedding planner so it’s always within reach.
Matching vs. Palette: How to Coordinate the Bridal Party Nails?
Coordinating your bridal party’s nails is a detail that elevates the overall aesthetic of your wedding photos, especially in shots featuring bouquets or the ring exchange. However, the old rule of forcing everyone to wear the exact same shade of nude is outdated and often unflattering. Skin tones vary dramatically, and a color that looks beautiful on one person may look washed out on another. The modern, more sophisticated approach is the “Palette Guideline.” Instead of a single matching color, you provide a curated palette of 5-6 approved shades and 1-2 finishes (e.g., cream or subtle pearl).
This method allows for individuality while maintaining a cohesive and harmonious look. A case study in Vogue’s roundup of bridesmaid nail ideas perfectly illustrates this. It showcases coordinated directions like classic French, barely-there sheers, and deeper neutrals that work together beautifully without being identical. Your palette could include a range of soft pinks, beiges, and taupes, giving your bridesmaids the freedom to choose the most flattering option for their skin tone. The key is to set clear boundaries: you can approve a range of neutrals while banning distracting elements like heavy glitter, neons, or bold nail art that might “upstage the bride,” as nail expert Erica Hipp wisely cautions in Allure.
This coordination extends beyond the bridesmaids. For truly impeccable ring shots, don’t forget the groom! A simple 10-minute groom’s manicure can make a world of difference. This doesn’t mean polish; it means clean, tidy, and moisturized hands. The process involves trimming and filing nails to a short, even length, cleaning under the nails, gently pushing back cuticles, and moisturizing thoroughly. Dry, ragged cuticles or uneven nails on the groom’s hand can be a major distraction in a close-up photo of the rings. By including this small step in your plan, you are ensuring every element of that iconic shot is perfect.
Can You Handle Your Dress Buttons with 2-Inch Extensions?
Long, elegant nail extensions can be a stunning bridal accessory, but they come with a major practical challenge: dexterity. The fear of being unable to handle tiny dress buttons, clasp a necklace, or even use your phone on your wedding day is very real. The solution is not to abandon your dream nails, but to schedule a “Dexterity Rehearsal.” This means actively practicing key wedding-day tasks with nails at your target length to retrain your fine-motor skills. You’ll quickly learn to adapt by using the pads of your fingers instead of the tips.
A fascinating case study on adapting to long nails comes from a tech review on The Verge about a keyboard accessory. It highlights the core ‘pad-first’ principle: skilled long-nail users rely on the fleshy pads of their fingertips, not the nail itself. The review noted that after an adjustment period of about a week, the user’s typing speed recovered significantly, demonstrating how quickly motor habits can be retrained. This is directly applicable to a bride. By doing a full dress rehearsal with temporary press-ons at your desired length, you can practice buttoning, zippering, and handling jewelry, turning awkward fumbling into a smooth, confident process.
Your rehearsal should be structured and intentional. Create a checklist of tasks and run through them. Can you comfortably hold a champagne flute? Can you unlock your phone? If some tasks remain difficult, that’s valuable data. It allows you to pre-assign “partner-assist” moments. Delegating the necklace clasp or the final back buttons to a bridesmaid or your mother transforms a potential moment of stress into a planned, calm, and even touching interaction. The goal is to eliminate any day-of surprises, ensuring your long nails are an asset, not a liability.
Action Plan: Mastering Your Wedding Day Dexterity
- Practice tasks involving key items: dress buttons, jewelry clasps, phone unlocking, and holding your bouquet.
- Gather your tools: temporary press-ons at your target length for a full dress rehearsal.
- Define your technique: consistently use finger pads (‘pad-first’) and knuckles, not nail tips.
- Identify assist moments: clearly pre-assign tasks like necklace clasps or corset ties to a partner for a calm, planned hand-off.
- Create a ‘no-fail’ toolkit: add a slim plastic card to your getting-ready area for lifting small items without risking your nails.
Hand Filing vs. E-File: Which Causes More Inflammation for Beginners?
The foundation of a beautiful manicure is healthy, undamaged skin and nails. Aggressive preparation, especially around the delicate cuticle area, can lead to redness, puffiness, and inflammation—the last thing you want on your wedding day. One of the biggest culprits of irritation is the improper use of an electric file (e-file). While a skilled technician can use an e-file with precision, for a beginner or in the hands of an inexperienced nail artist, it poses a significantly higher risk of causing inflammation compared to gentle hand filing.
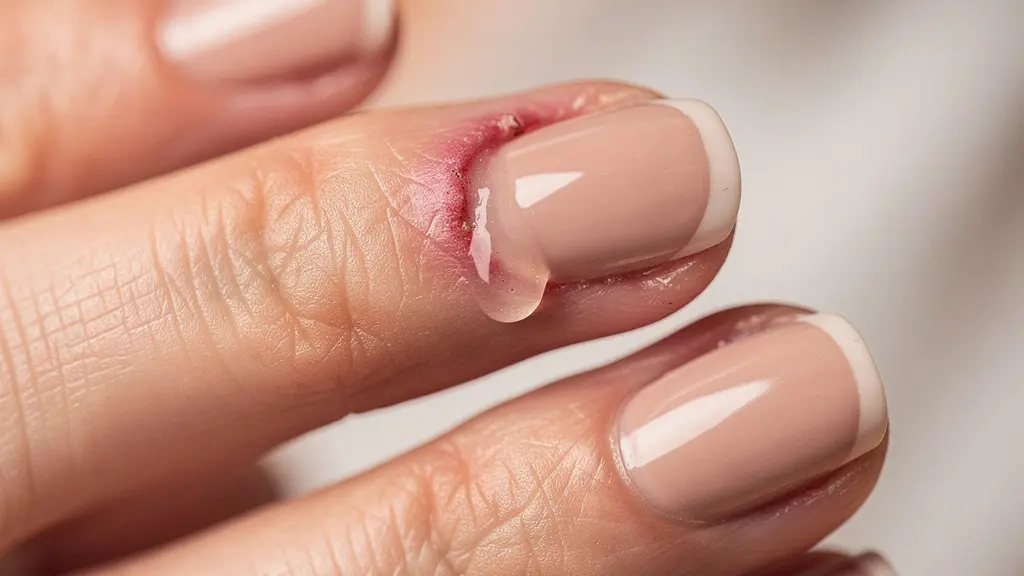
An e-file’s speed and power can easily abrade the skin, create friction burns, or over-file the natural nail plate, leading to a painful condition called paronychia (an infection of the skin around the nail). Even minor irritation can be a disaster for wedding photos, as macro shots will highlight any redness or swelling. Hand filing, when done correctly with a fine-grit file, offers far more control and is much gentler on the nail and surrounding skin. For your bridal manicure, insisting on minimal and gentle cuticle work and prioritizing hand filing over e-filing is a crucial risk-management strategy.
This is especially important because once inflammation occurs, it doesn’t disappear overnight. According to a clinician-reviewed overview from Harvard Health, an acute paronychia, even with proper treatment, usually takes 5 to 10 days to heal. This healing timeline is critical. If your final manicure is scheduled 1-2 days before the wedding, there is absolutely no buffer for recovery if your cuticles become inflamed. By opting for a gentler preparation method, you are protecting your nail health and ensuring a flawless canvas for your bridal polish.
The “Claw” Hand: How to Coach Clients to Relax Their Fingers?
After all the meticulous planning, the final piece of the puzzle is presentation. In photos, nervous energy often manifests in the hands, leading to the dreaded “claw”—tense, awkwardly curled fingers that look unnatural and stiff. As a bride, you will be holding a bouquet, your partner’s hand, and a champagne glass, all while being photographed. Learning to keep your hands relaxed and graceful is a skill that can be coached and practiced. The key is to break the tension before it sets in.
As wedding photographer Lucas T. of Lucas T Photography notes, “Stiffness is the enemy of a great photo. If you feel yourself freezing up, move.” The first step is awareness. When you feel your hands tensing, consciously shake them out for a few seconds and let them hang loosely. From there, focus on creating soft, gentle curves with your fingers rather than letting them be perfectly straight or tightly curled. A simple but effective technique is to think of your hands as “heavy” and let gravity do the work. Avoid interlocking your fingers tightly; instead, lightly rest one hand over the other.
A great way to practice this is with a 30-second pre-photo hand reset. Before a series of photos, take a deep breath and exhale, consciously softening the joints in your fingers. Pay attention to your thumb, as a clenched thumb is often the source of the claw-like appearance. Let it rest naturally alongside your hand. Finally, slightly bend your wrist and lower your shoulders to release any tension traveling down your arms and into your hands. Using a prop, like lightly touching the stems of your bouquet or your partner’s lapel, gives your hands a natural purpose and helps prevent stiffness. This small bit of coaching will result in photos that look effortless, elegant, and serene.
Key Takeaways
- Your bridal manicure is a project. Start planning with a “wear test” trial one month before the wedding.
- Choose warm, off-white, or sheer pink polishes over stark white to avoid color distortion in professional photos.
- A minimalist emergency kit in your clutch is non-negotiable for fixing chips or snags on the day.
How to Transform a Nude Office Manicure into a Party Look in 5 Minutes?
A wedding is rarely a single-day event. It’s often a weekend-long celebration, including a rehearsal dinner, the ceremony, a reception, and a next-day brunch. Your manicure needs to be versatile enough to look elegant and appropriate for each occasion. The most strategic approach is to start with a classic, neutral base for the ceremony and then quickly elevate it for the party. This allows your nails to be timeless and chic for the formal photos, then fun and festive for the reception, all without a full polish change.
The secret is the “reception layer.” After the ceremony, you or a bridesmaid can apply a single coat of a special effects top coat in minutes. A great example highlighted by Woman&Home is the use of a sheer, sparkly finish that can be layered for intensity. This “one-polish upgrade” is the perfect strategy for a bride. A fine, holographic glitter topcoat or a pearlescent “glazed donut” finish adds a beautiful dimension under evening lights without overpowering your look. This quick transformation ensures your manicure evolves with the energy of the celebration.
This technique, sometimes called “Naked Disco,” is all about adding a controlled sparkle over a clean base. You can apply a glitter topcoat to all nails, just an accent nail, or as a soft gradient on the tips. For a more precise touch of glamour, a few tiny crystals placed near the cuticle line on one or two nails can add a sophisticated sparkle that won’t snag on your dress. Always finish with a quick-dry, high-shine top coat to seal the deal and smooth any texture. This five-minute upgrade is the final, brilliant step in a perfectly executed Nail Project Timeline.
Your 5-Minute Reception Glam-Up Plan
- Keep your base neutral (sheer pink, beige, or peach) so it remains ceremony-appropriate.
- Add a glitter topcoat as a ‘reception layer’ on an accent nail or as a soft gradient at the tips.
- If using crystals, place a tiny cluster near the cuticle line on 1–2 nails only for a controlled sparkle.
- Seal with a smooth, quick-dry top coat to prevent texture from catching on fabrics.
- For a multi-event weekend, remove only the sparkle layer after the party to return to a clean neutral for brunch photos.
By reframing your bridal manicure as a strategic project, you eliminate anxiety and take control of every detail. From color calibration and dexterity rehearsals to a planned-for emergency kit, this timeline ensures your hands will be flawless, confident, and perfectly ready for that iconic ring shot. To begin building your own timeline, the first logical step is to book your one-month-out trial appointment today.