That red, itchy reaction is not just ‘sensitive skin’; it’s a forensic clue pointing to a systemic breakdown in the manicure process, creating a lifelong allergy.
- Physical trauma from filing creates a “trauma gateway” for allergens to penetrate the skin.
- Chemical exposure from flooded cuticles and undercured gel dramatically increases the “exposure dosage” of irritants.
Recommendation: Shift your focus from simply buying ‘hypoallergenic’ products to mastering a safe, precise application technique to prevent sensitization.
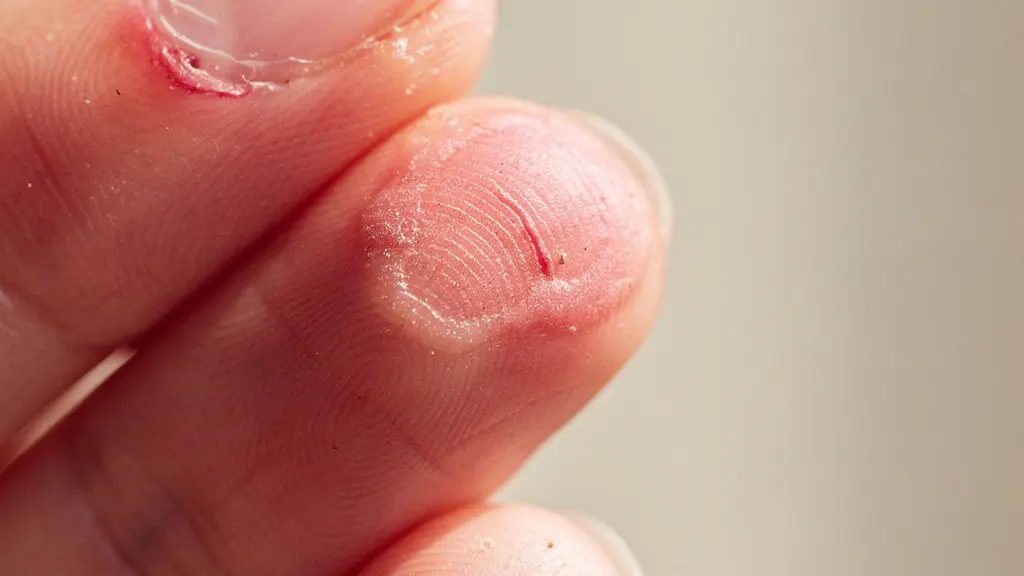
The familiar scenario unfolds hours or days after a seemingly perfect gel manicure: a persistent, maddening itch begins around the nails. Soon, the skin becomes red, swollen, and may even develop tiny, fluid-filled blisters. The common assumption is a simple allergic reaction to the polish itself, leading to a frustrating cycle of switching brands with little success. This response, however, is rarely a simple, isolated incident. It is the final, visible symptom of a deeper issue—a failure in the application process that systematically breaks down the skin’s defenses and triggers a permanent immune response.
This reaction is often a form of allergic contact dermatitis (ACD), frequently caused by chemicals called acrylates, with one of the most common being HEMA (2-hydroxyethyl methacrylate). While simply avoiding HEMA is a common recommendation, it overlooks the critical contributing factors: physical trauma from aggressive filing, prolonged skin contact from “flooded” cuticles, and most critically, the presence of unreacted, highly allergenic monomers from undercured gel. These elements work in concert, creating a perfect storm for sensitization. According to a survey on gel nail polish reactions, while 21.2% of respondents reported side effects while wearing a gel manicure, a staggering 75.2% experienced them after removal, indicating the long-tail impact of the process.
Understanding this is not about assigning blame but about reclaiming control. This investigative guide deconstructs the process failures that lead to sensitization. We will move beyond the surface-level diagnosis and examine the precise mechanisms at play—from preparation to removal. By treating the application process with the precision it demands, you can protect yourself from developing a lifelong allergy and understand the true source of the irritation.
This article provides an in-depth analysis of the key procedural errors that contribute to cuticle inflammation and allergic reactions. The following sections will equip you with the knowledge to identify warning signs, implement preventative techniques, and properly care for your skin.
Summary: Understanding and Preventing Gel Manicure Reactions
- HEMA Allergy: How to Recognize the First Signs of Reaction?
- How to Clean Up Flooded Cuticles Before Curing to Prevent Sensitization?
- Hand Filing vs. E-File: Which Causes More Inflammation for Beginners?
- What to Apply Immediately on Red Cuticles to Reduce Swelling?
- The 3-Month Detox: When Should You Go Bare to Heal Inflammation?
- The Dental Acrylic Danger: How to Test Your Liquid for MMA?
- How Undercured Gel Leads to Lifelong Acrylate Allergies?
- How to Repair a Damaged Skin Barrier Around the Nails Caused by Acetone?
HEMA Allergy: How to Recognize the First Signs of Reaction?
An allergy to acrylates like HEMA is not an event; it’s a process known as a sensitization cascade. It rarely appears with full force on the first exposure. Instead, your immune system builds a “memory” of the allergen over time, with each subsequent contact triggering a progressively stronger reaction. Recognizing the subtle, early warning signs is critical to preventing a full-blown, lifelong allergy. The initial symptoms are often dismissed as minor irritation or a normal part of the gel application process, which is a dangerous misconception.
The progression typically follows a distinct pattern:
- Day 1 (During/After Application): You might feel a mild, unusual warmth or a slight tingle around the cuticles while the gel is being applied or cured. This is the first signal that your skin is reacting to chemical contact.
- Day 2-3: The area begins to feel hot and itchy, particularly at night. The skin may appear slightly pink or feel tight.
- 48-72 hours Later: The reaction intensifies significantly. The itching becomes severe, accompanied by visible redness, swelling, and sometimes the formation of small blisters (vesicles) on the skin surrounding the nail. The nail itself may feel loose or lift from the nail bed (onycholysis).
- With the Next Manicure: Even if you use the exact same products, the reaction will likely appear faster and be far more severe. The sensitization has been established.
The most serious consequence of developing an acrylate allergy is cross-reactivity. Once sensitized, your immune system may react to other acrylate-based materials. As studies show, this allergy can have significant medical implications, as acrylates are used in dental glue for braces, orthodontic molds, and even bone cements used in knee or hip replacements. What begins as an aesthetic issue can become a serious, lifelong medical concern.
How to Clean Up Flooded Cuticles Before Curing to Prevent Sensitization?
One of the most significant factors in the sensitization cascade is the “exposure dosage”—the amount and duration of contact between the uncured gel and your skin. When gel polish “floods” the cuticle and surrounding skin and is not meticulously cleaned before curing, it allows potent allergens to penetrate the epidermis. Curing the gel while it’s touching the skin effectively seals these allergens in, initiating an immune response. Preventing this requires a shift from casual application to a mindset of surgical precision.
The goal is to create an “invisible gap” of about 1mm between the edge of the gel and the skin. This ensures no contact occurs. Achieving this requires the right tools and a strict cleanup protocol. A standard bottle brush is often too large and clumsy for this level of detail. Instead, a fine liner brush allows for precise placement of the gel away from the skin folds. If any product does touch the skin, it must be removed immediately and completely before any curing takes place.
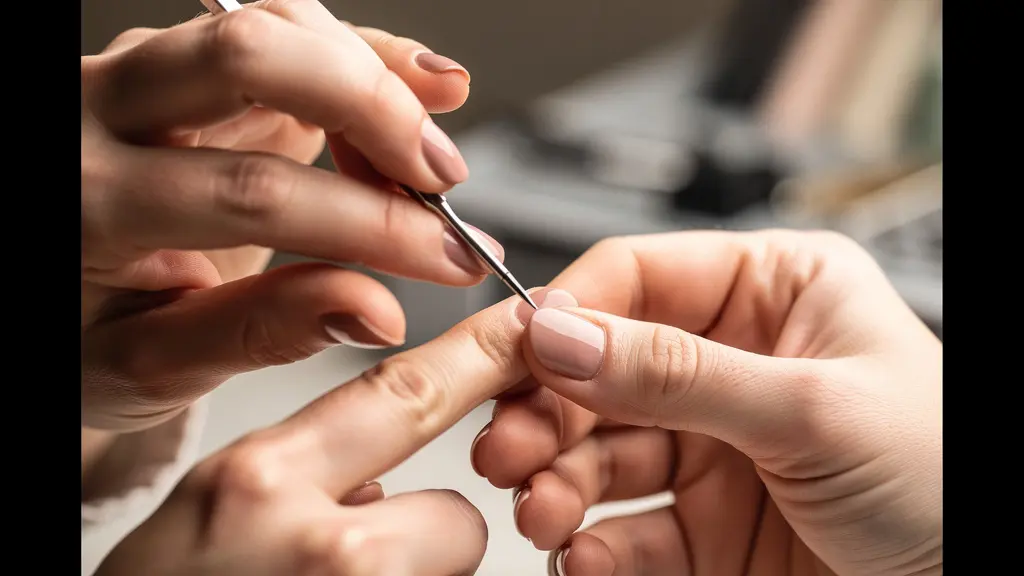
As this image demonstrates, precision is paramount. The cleanup process itself has rules. Never use a “gel cleanser” or tack remover for this task, as these often contain other chemicals that can add to the irritation. The only appropriate tool is a lint-free wipe or a clean brush lightly dampened with at least 90% isopropyl alcohol. This solvent effectively removes the uncured monomer without leaving a residue. For those highly prone to reactions, flash-curing each nail for 10 seconds immediately after application can help “freeze” the gel in place and prevent it from migrating toward the skin before the full cure.
Hand Filing vs. E-File: Which Causes More Inflammation for Beginners?
Before any chemical even touches the nail, the preparation stage can create the primary vulnerability: the “trauma gateway.” Both hand files and electric files (e-files) are used to shape the nail and remove shine, but improper technique creates microscopic tears and abrasions in the surrounding skin. This physical damage compromises the skin’s protective barrier, essentially opening a door for chemical allergens in the gel polish to penetrate deep into the epidermis and trigger an immune response. For beginners, the tool choice significantly impacts the level of risk.
While an e-file is faster in trained hands, it presents a dual threat of both mechanical damage and thermal burns. The friction from a high-speed bit can create “rings of fire”—painful, red friction burns around the cuticle—if the pressure, speed (RPM), or bit type is incorrect. For a novice, this risk is exceptionally high. A hand file, by contrast, is far easier to control. The primary risk is mechanical, caused by a “seesawing” motion or using a grit that is too aggressive for the natural nail (anything below 240-grit). While it can still cause invisible skin tears, it eliminates the risk of heat damage.
This is crucial because, as research into nail stylist occupational health highlights, physical damage is a direct pathway to sensitization. One study notes that “overfilling nails and making them weak will open up a likely cause for nails to develop an allergic reaction because a thin nail plate will cause the product to easily enter the nail bed.” The same principle applies to the skin barrier around it.
To better understand the risks, this table compares the two methods for a beginner’s context.
| Factor | Hand File | E-File |
|---|---|---|
| Primary Risk | Mechanical damage only | Both thermal burns and mechanical damage |
| Common Errors | Seesawing motion, aggressive grit | Wrong bit, high RPM, excessive pressure |
| Beginner Safety | Safer with 240-grit file | Higher risk of ‘rings of fire’ friction burns |
| Skin Barrier Impact | Creates invisible tears | Creates tears plus heat damage |
| Learning Curve | Easier to control | Requires extensive training |
What to Apply Immediately on Red Cuticles to Reduce Swelling?
If a reaction has already occurred, the immediate priority is to de-escalate the inflammation and soothe the skin. Swift and correct action can significantly reduce the severity and duration of the symptoms. The first and most critical step is to remove any uncured or partially cured gel product. However, it is vital to do this with isopropyl alcohol, not acetone. Acetone is a harsh solvent that will further strip the already compromised skin barrier, worsening the irritation and inflammation.
Once the area is clean, an emergency first-aid protocol should be initiated to manage the symptoms. The goal is to calm the immune response, reduce itching, and begin the process of barrier repair. As the Allermi Medical Team advises in their treatment guide, “Topical corticosteroid creams or ointments can reduce inflammation, redness, and itching.” This is a key component of the initial response.
Topical corticosteroid creams or ointments can reduce inflammation, redness, and itching.
– Allermi Medical Team, Gel Nail Allergy Treatment Guide
Follow a structured first-aid plan:
- Cool Compress: Apply a clean, cool compress to the affected area for 10-15 minutes at a time, several times a day. This helps constrict blood vessels and reduce both swelling and itching.
- Hydrocortisone Cream: Sparingly apply a 1% hydrocortisone cream directly to the red, inflamed skin (not the nail itself) two to three times a day. This is a mild corticosteroid that directly targets inflammation.
- Oral Antihistamine: Taking an over-the-counter oral antihistamine, such as cetirizine or loratadine, can help control the systemic itching.
- Barrier Protection: Apply a thick, fragrance-free barrier cream like CeraVe, or a simple occlusive like Vaseline, to protect the skin and prevent further moisture loss.
- Avoid Irritants: Do not apply any products containing fragrances, essential oils, or vitamin E oil, as these can act as additional allergens and worsen the reaction.
The 3-Month Detox: When Should You Go Bare to Heal Inflammation?
Once an acute allergic reaction is under control, the journey to recovery begins. This is not a quick fix; it requires a dedicated period of ‘detox’ where the nails and surrounding skin are left completely bare to allow the skin’s protective barrier to fully heal. Attempting to apply any nail product, even a so-called “hypoallergenic” one, too soon will only re-trigger the inflammation and worsen the sensitization. Experts recommend waiting at least 4 to 6 weeks after all symptoms have completely subsided before even considering another manicure. For a full barrier rehabilitation, a 3-month break is the gold standard.
This detox period should follow a structured protocol focused on soothing, repairing, and fortifying the skin. The process can be broken down into phases:
- Weeks 1-2 (Soothe Phase): The primary focus is on calming any residual inflammation. Continue with cool compresses as needed and apply pure aloe vera gel to reduce redness. Keep the area clean and protected with a simple barrier cream.
- Weeks 3-8 (Repair Phase): The skin is now ready to be rebuilt. Introduce products containing ingredients that support barrier function, such as ceramides, niacinamide, and panthenol (Vitamin B5). Apply these daily to the skin around the nails.
- Weeks 9-12 (Fortify Phase): In this final phase, the goal is to strengthen the newly healed skin. Introduce nourishing, non-irritating oils like squalane or high-quality jojoba oil to improve the skin’s elasticity and resilience.
Re-entry into the world of manicures must be cautious. The non-negotiable prerequisite is the complete resolution of all symptoms (no redness, itching, swelling, or blistering) for several weeks, ideally confirmed by a dermatologist via a patch test to identify the specific acrylate allergen. During the detox period, if you desire some nail enhancement, consider safer alternatives like ’10-free’ traditional polishes (applied carefully to avoid skin contact) or breathable nail wraps that do not involve chemical curing.
The Dental Acrylic Danger: How to Test Your Liquid for MMA?
While HEMA and other acrylates in gel polish are common culprits, a far more dangerous chemical may be at play in some acrylic systems: Methyl Methacrylate (MMA). Banned for use in nail products by the FDA in the 1970s due to its severe health risks, this industrial-grade monomer is still found in some discount nail salons because it is incredibly cheap and creates exceptionally hard, durable nails. However, it is not designed for human contact; it’s a known sensitizer that can cause severe allergic reactions, permanent nail damage, and respiratory issues. In fact, environmental testing in the US shows that MMA continues to be detected in California nail salon indoor air despite regulations, highlighting its persistent presence.
MMA is structurally different from the much safer Ethyl Methacrylate (EMA), the standard for professional nail liquids. MMA molecules are smaller and penetrate the nail plate more easily, creating a rigid bond that can rip the natural nail from the bed if subjected to trauma. Its removal requires aggressive, forceful filing, often with a drill, which further damages the nail and surrounding skin. As a consumer, you have the right to know what is being used on your nails. If you frequent a salon that uses an unlabeled liquid monomer or if the price seems too good to be true, you can perform simple tests to detect MMA.
Here are several red flags and detection tests:
- Odor: MMA has an unusually strong, sharp, and fruity chemical smell that is distinctly different and more irritating than traditional EMA acrylics.
- Hardness and Filing: MMA nails set rock-hard and are almost impossible to file down with a normal hand file. Technicians often rely exclusively on e-files to shape them.
- Acetone Test: The most definitive test. Safe EMA-based acrylics will become gummy and can be scraped off after soaking in 100% acetone for a few minutes. MMA will remain rock-hard and will not dissolve.
- Styrofoam Test: Ask the technician to place a small drop of the monomer liquid on a piece of styrofoam. MMA is a powerful solvent that will melt and dissolve the styrofoam within seconds. EMA will have no effect.
How Undercured Gel Leads to Lifelong Acrylate Allergies?
Perhaps the most insidious cause of acrylate sensitization is a lack of curing integrity. Gel polish feels hard to the touch long before it is fully polymerized. When a gel is undercured, it means that a significant amount of unreacted, free-floating monomers remain within the polish. These monomers are small, highly mobile, and intensely allergenic. They can easily leach out of the hardened gel, travel through the nail plate, and make contact with the underlying skin and nail bed, triggering a severe immune response over time. The problem has become more widespread with the proliferation of low-cost, low-quality generic curing lamps.
Many users assume that if the gel is hard, the lamp has done its job. This is incorrect. A professional-grade lamp is calibrated to emit UV/LED light at a specific wavelength and intensity required by a specific brand’s photoinitiators. A cheap, underpowered, or old lamp may not provide enough energy to complete the chemical reaction, especially with dark or highly pigmented colors that block light penetration. This leaves behind a chemical reservoir of allergens. A 2024 market survey revealed that this is a widespread concern, as HEMA was present in nearly 60% of 394 investigated nail cosmetics, making proper curing essential to neutralize this common allergen.
The solution is to ensure curing integrity by addressing all potential points of failure. This means using a high-quality lamp (at least 36-48 watts) and, ideally, using the specific lamp recommended by the manufacturer of your gel polish system. These systems are designed to work together to guarantee a full cure.
Your Action Plan: Auditing for Hidden Under-Curing Risks
- Lamp & Power: Verify your lamp is at least 36W and check its recommended lifespan. Diodes weaken over time.
- Application Thickness: Apply thin, even coats. Thick layers prevent light from reaching the bottom of the polish.
- Pigmentation Check: Be extra vigilant with opaque or dark colors; they require a longer, more thorough cure time.
- Hand Placement: Ensure your hand is positioned flat and centered inside the lamp, so all nails receive direct light exposure.
- System Compatibility: Check if your gel brand requires a specific UV/LED wavelength and ensure your lamp matches it.
Key Takeaways
- Allergic reactions are a process, not a single event, caused by a “sensitization cascade” from repeated exposure.
- The core cause is often procedural failure: physical trauma from filing combined with chemical exposure from flooded cuticles and undercured gel.
- Lifelong acrylate allergies have serious cross-reactivity risks with essential medical materials used in dentistry and surgery.
How to Repair a Damaged Skin Barrier Around the Nails Caused by Acetone?
The final assault on your skin’s defenses often occurs during the removal process. Soaking nails in 100% acetone is effective for removing gel, but it is also an aggressive degreasing agent. It strips the skin of its natural lipids and oils, causing a state of barrier collapse. This leaves the skin dry, brittle, and extremely vulnerable to irritation and further sensitization, especially for professionals who are exposed frequently. A Greek study found the occupational risk to be significant, revealing that nearly 40% of nail technicians experienced ACD within their first year of work, with solvents like acetone being a major contributing factor.
This damage is not irreversible, but it requires an immediate and diligent post-removal recovery ritual to restore the skin’s protective function. The moments directly following acetone exposure are critical for mitigating the damage. The goal is to gently cleanse, rehydrate, and lock in moisture as quickly as possible. Rather than using the “soaking bowl” method, which submerges the entire fingertip, consider using foil wraps with acetone-soaked cotton. This targeted approach minimizes the skin’s overall contact with the solvent.
Your post-acetone recovery ritual should include these essential steps:
- Gentle Cleansing: Immediately after removal, wash your hands with a gentle, sulfate-free soap and cool or lukewarm water to remove any acetone residue. Pat the skin dry gently; do not rub.
- Replenish Oils: While the skin is still slightly damp, apply a biomimetic oil. These are oils whose structures closely mimic the skin’s natural sebum. Jojoba oil and squalane are excellent choices. Massage a few drops into the cuticles and surrounding skin.
- Lock in Moisture: Immediately follow the oil with a thick, restorative cream containing ceramides. Ceramides are lipids that are a fundamental component of the skin barrier. This creates an occlusive layer that seals in the oil and water, allowing the skin to begin its repair process.
For those already sensitized, a completely acetone-free removal process using an e-file (performed by a trained and experienced professional) may be a safer long-term strategy, as it avoids chemical solvents altogether.
Ultimately, preventing the red, itchy reaction of contact dermatitis is less about finding a magical “safe” product and more about adopting a forensic, safety-first mindset. By recognizing the early signs of sensitization, respecting the skin barrier during preparation, ensuring precise application, guaranteeing a full and proper cure, and performing gentle removal and aftercare, you are addressing the root causes of the problem. This diligent, process-oriented approach is the only true way to protect yourself from developing a lifelong sensitivity to acrylates.