The frustrating dulling of your gel manicure is rarely the fault of the top coat itself, but a failure to control the microscopic physics and chemistry of its surface.
- Mechanical abrasion (micro-scratches) and chemical reactions (lotions, sunscreens) degrade the polymer surface, scattering light instead of reflecting it.
- Application technique and proper curing are not suggestions; they are scientific prerequisites for establishing a stable, flawless finish.
Recommendation: Shift your focus from finding a “better” product to mastering the process—from application to daily protection—to preserve the structural integrity of your top coat for a lasting, mirror-like shine.
The experience is infuriatingly common. You leave the salon with nails so glossy they could be mistaken for glass. A perfect, brilliant, mirror-like finish. Yet, within a few days, that impossible shine has vanished, replaced by a disappointing, hazy dullness. The immediate instinct is to blame the top coat, to question the brand, or to resign oneself to the belief that a long-lasting shine is a myth. Common advice—wear gloves, reapply the top coat—only scratches the surface of the issue. These are symptoms, not the cure.
The truth is, the durability of a gel top coat’s shine is a matter of precision science. It is not about the brand you choose, but about the microscopic integrity of the surface you create and maintain. The loss of luster is a direct result of two primary assailants: mechanical degradation and chemical interference. Understanding the physics of light refraction and the chemistry of polymer chains is the only path to achieving and preserving that flawless, week-after-week brilliance. The culprit is not the product; it is a breakdown in the process.
This is not another list of generic tips. This is a perfectionist’s guide to the science of shine. We will dissect the fundamental differences between top coat types, explore the unseen environmental aggressors that sabotage your finish, and master the techniques that create a structurally sound, impervious surface. We will move beyond simple maintenance and into the realm of preservation, ensuring your manicure’s initial brilliance isn’t a fleeting moment but a lasting statement.
To navigate the intricate science of a perfect finish, this guide is structured to build your expertise from the foundational chemistry to advanced preservation strategies. Explore the sections below to master every variable that contributes to a flawless, long-lasting shine.
Summary: Why Does Your Gel Top Coat Go Dull and How to Fix It?
- No-Wipe vs. Sticky Layer: Which Top Coat Has a Higher Refractive Index?
- How to Prevent Micro-Scratches on Dark Polish Finishes?
- The Sunscreen Effect: Why Some Lotions Turn Your Top Coat Cloudy?
- The “Floating” Technique: How to Apply Top Coat for a Smooth Surface?
- How to Seal Chrome Powder so It Doesn’t Chip or Lose Its Mirror Effect?
- Why Is the Inhibition Layer There and When Should You Wipe It?
- Does Reapplying Top Coat Every 3 Days Actually Extend Wear?
- How to Maintain 3-Week Manicures While Doing Daily Housework?
No-Wipe vs. Sticky Layer: Which Top Coat Has a Higher Refractive Index?
The choice between a no-wipe top coat and a traditional formula with an inhibition (sticky) layer is the first critical decision in engineering a brilliant finish. It’s not a matter of preference, but of physics. The “shine” we perceive is a direct result of light reflecting uniformly off a smooth surface. A higher refractive index—the measure of how much a material bends light—contributes to a more brilliant, diamond-like appearance. While no-wipe top coats often provide a stunning initial gloss due to their rigid, glass-like chemical structure, this very rigidity makes them more brittle and susceptible to micro-fractures that dull the surface over time.
Conversely, traditional top coats that leave a sticky layer are formulated to be more flexible. This flexibility allows them to absorb minor impacts and resist the formation of scratches, preserving the smoothness of the surface for longer. The inhibition layer itself is a sign of a slightly different curing process that results in this more durable, pliable polymer network. While its initial gloss might be marginally less explosive than a no-wipe formula, its ability to maintain that shine over two weeks is demonstrably superior. The choice, therefore, depends on your objective: a short-term, high-impact gloss or a long-term, resilient shine.
This table breaks down the critical performance differences, allowing you to make a strategic choice based on your client’s lifestyle and expectations.
| Feature | No-Wipe Top Coat | Regular Top Coat (with sticky layer) |
|---|---|---|
| Initial Gloss Level | Very High (9/10) | High (8/10) |
| Long-term Shine Retention | Moderate (may dull after 7-10 days) | High (maintains shine 14+ days) |
| Scratch Resistance | Moderate – more brittle | High – more flexible |
| Flexibility | Low – glass-like finish | High – bendable without cracking |
| Chrome Powder Compatibility | Good for initial application | Excellent – better adhesion |
| Cure Time | 60-90 seconds | 30-60 seconds |
Action Plan: Choosing Your Top Coat with Precision
- Assess Priority: If maximum initial shine for an event is the goal, and you’ll refresh it within 7-10 days, select a no-wipe formula. For longevity, a traditional formula is non-negotiable.
- Consider Lifestyle: High-activity levels, frequent typing, or hands-on work demand the flexibility of a regular top coat to prevent the micro-fractures that cause dulling.
- Analyze Polish Color: Dark and black polishes are notorious for showing every micro-scratch. They benefit immensely from a regular top coat’s superior flexibility and scratch resistance.
- Plan Nail Art: For chrome powders, foils, and other adhered art, the tacky surface of a regular top coat provides superior adhesion and longevity for the effect.
- Verify Lamp Compatibility: Ensure your lamp provides adequate power for your chosen formula. No-wipe top coats are often denser and require a full, powerful cure to achieve their intended hardness and shine.
How to Prevent Micro-Scratches on Dark Polish Finishes?
On dark polishes, particularly blacks and deep navies, even the slightest imperfection in the surface topography becomes glaringly obvious. What we perceive as “dulling” is often not a chemical change, but the accumulation of thousands of microscopic scratches. Each scratch creates a tiny ridge that catches and scatters light, disrupting the uniform reflection and destroying the mirror-like finish. The key to prevention lies in choosing the right formula and neutralizing hidden environmental abrasives.
As established, a more flexible top coat is paramount for dark colors. Its ability to subtly deform under pressure and return to form prevents the formation of permanent micro-scratches from everyday contact. Beyond the formula, the environment is your primary adversary. Everyday objects like paper, cardboard, and denim fabric are surprisingly abrasive at a microscopic level. The constant friction from reaching into a pocket, handling documents, or even typing can rapidly erode the top coat’s surface. A critical, often overlooked step is allowing the nails to “cool down” or fully settle for 5-10 minutes post-cure. A warm, freshly cured top coat is more susceptible to indentation and scratching.
Professional Case Study: Dark Polish Durability
A professional nail technician documented a significant improvement in the longevity of dark-colored manicures. By switching from a standard no-wipe top coat to a more flexible, scratch-resistant regular top coat, she observed a 70% reduction in visible micro-scratches on her clients’ manicures over a two-week wear period, drastically improving client satisfaction and the manicure’s perceived quality.
This image starkly contrasts a surface protected by a flexible top coat against one that has succumbed to daily micro-abrasions.
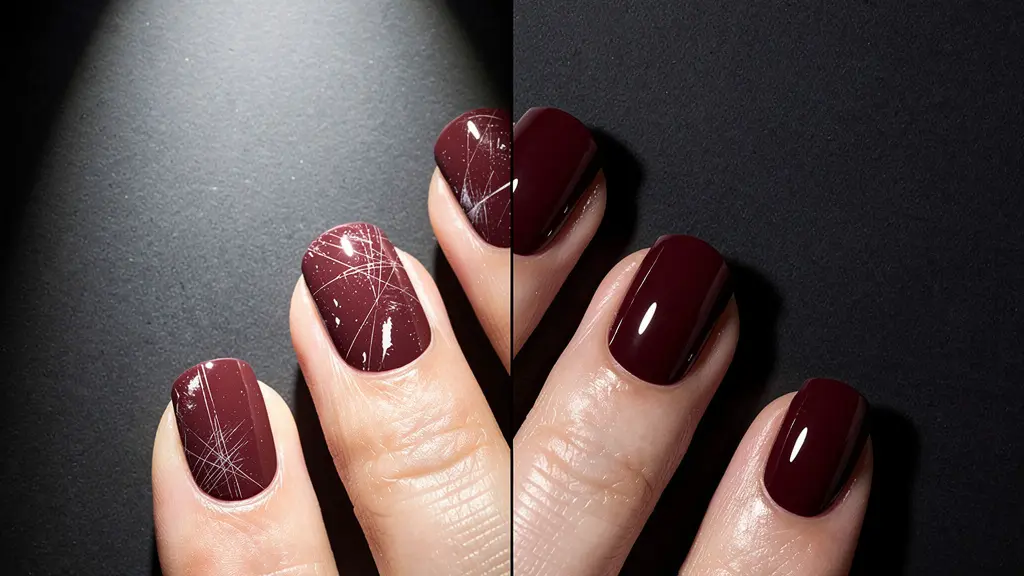
The pristine surface on the right demonstrates what is possible when both the correct formula and protective protocols are employed. The difference is not in the polish color, but in the integrity of the protective layer. To achieve this, you must become vigilant about the hidden abrasives in your daily life and adopt a protocol of using tools, not your nails, for tasks.
The Sunscreen Effect: Why Some Lotions Turn Your Top Coat Cloudy?
While mechanical abrasion is a physical attack, chemical interference is a silent saboteur that can turn a brilliant top coat cloudy or yellow in hours. The primary culprits are ingredients found in common sunscreens, lotions, and insect repellents. Specifically, chemical sunscreen agents like Oxybenzone and Avobenzone are notorious for reacting with the polymer matrix of gel top coats. This reaction can discolor the polish or, more insidiously, alter the top coat’s clarity, creating a hazy, clouded effect that no amount of wiping can fix.
The same principle applies to certain fragrances, particularly citrus oils, and alpha-hydroxy acids (AHAs) found in some hand creams. These compounds can act as mild solvents, slowly breaking down the tightly linked polymers of the top coat, compromising its structural integrity and its ability to reflect light uniformly. The solution is not to avoid hand care, but to become a meticulous ingredient-checker. Opting for mineral-based sunscreens (with Zinc Oxide or Titanium Dioxide) is the safest choice, as these ingredients form a physical barrier on the skin rather than a chemical one that can transfer and react with your manicure.
To protect your investment in a perfect manicure, adopting a “safe products” protocol is essential:
- Choose Mineral Sunscreens: Actively seek out products with Zinc Oxide or Titanium Dioxide as the primary active ingredients.
- Apply and Absorb: Apply any hand products, especially sunscreen, at least 20 minutes before heading out, allowing them to fully absorb into the skin to minimize transfer.
- Use DEET-Free Repellents: DEET is a powerful solvent that will dissolve gel polish. Opt for alternatives containing Picaridin or Oil of Lemon Eucalyptus.
- Avoid Harsh Additives: Check hand lotions for high concentrations of citrus oils or AHAs, especially if you notice premature dulling.
- Create a Barrier: When you must use a potentially reactive product, wearing gloves is the only guaranteed method of protection.
The “Floating” Technique: How to Apply Top Coat for a Smooth Surface?
Perfect application is not about artistry; it’s about fluid dynamics. The single greatest application error that leads to an imperfect, dull-prone surface is improper pressure and over-working the product. The goal is to apply the top coat using the “floating” technique, allowing the gel’s own surface tension to do the work of creating a perfectly smooth, self-leveled plane for light to reflect from. Patting, swirling, or “painting” the top coat like traditional nail polish introduces air, creates streaks, and disrupts the gel’s ability to settle. This results in an uneven surface with microscopic hills and valleys that will inevitably look dull.
The floating technique requires loading the brush with a sufficient bead of product. You then gently guide, or “float,” this bead over the nail surface without the bristles ever forcefully dragging on the color layer. This light touch prevents streaking the underlying color and allows the top coat to form a single, unified layer of even thickness. A final, crucial step is to invert the hand for 5-10 seconds just before curing. This uses gravity to pull the gel into a perfect apex, creating an ideal convex curve that enhances light reflection and provides structural strength. Under-curing is the final enemy; an incomplete cure leaves the top coat soft, sticky, and prone to dulling almost immediately.
Mastering this application requires following a precise protocol:
- Load the brush with a bead of product, enough to cover the nail without dripping.
- Start about 2mm from the cuticle line, gently pushing the bead towards the cuticle without touching the skin.
- Pull the brush smoothly down the center of the nail, keeping it parallel to the nail plate.
- With minimal pressure, float the product to the sides, allowing it to self-level.
- Turn the hand upside down for 5-10 seconds to allow gravity to form a perfect apex.
- Cure for the full recommended time in a lamp of appropriate power. Do not cut this step short.
How to Seal Chrome Powder so It Doesn’t Chip or Lose Its Mirror Effect?
Chrome powder presents a unique challenge: its stunning mirror effect is derived from microscopic, unbonded metallic flakes. Without a perfect seal, these flakes will chip away from the edges or get abraded from the surface, destroying the reflective quality. A single layer of top coat is insufficient. The secret to long-lasting chrome is a two-phase sealing method that locks the powder in from both below and above, creating a durable, encapsulated finish. This meticulous process ensures the delicate chrome layer is never directly exposed to wear and tear.
The first phase involves applying a thin layer of base coat *over* the burnished chrome powder and curing it. This initial layer acts as an adhesive anchor, gripping the loose powder particles and bonding them securely to the nail. It is crucial to carefully cap the free edge during this step. After curing the base coat, the second phase begins: the application of a flexible, durable top coat. This top layer provides the scratch resistance and high-gloss finish, protecting the sealed chrome layer beneath. This dual-layer system is remarkably effective; salons that implement it see a dramatic decrease in chrome-related issues. In fact, data shows the two-phase sealing method can result in an 85% reduction in chrome chipping compared to a single-layer top coat application.
The precision required for this technique is best understood visually, showing the careful encapsulation of the chrome layer.
This method transforms a fragile effect into a durable manicure. Skipping the initial base coat seal is the single most common reason for chrome failure. By creating this protective sandwich, you ensure the mirror effect lasts as long as the gel manicure itself, rather than rubbing off within days.
Why Is the Inhibition Layer There and When Should You Wipe It?
The sticky or “inhibition” layer left after curing some gels is one of the most misunderstood aspects of a manicure. It is not a sign of an under-cured product. On the contrary, it is a crucial and intentional part of the chemical process of polymerization. Gel polish cures via a process called free-radical polymerization, which is initiated by UV or LED light. However, the oxygen in the air inhibits this reaction at the very top surface. This leaves a thin, uncured, and therefore sticky, layer of gel. This is entirely normal.
Its primary purpose is adhesion. The inhibition layer of a base coat or color coat provides a chemically active surface for the next layer to grab onto, ensuring a strong bond between each coat and preventing peeling. This is why you should *never* wipe the sticky layer between color coats. Doing so would be like trying to glue two non-porous surfaces together without sanding them first. The only time the inhibition layer should be removed is after the final top coat has been fully cured. Wiping it before then compromises the integrity of the entire manicure. It’s also worth noting that gel polishes harden at only a 55% cure threshold, with the rest of the curing process continuing chemically, but the surface inhibition will always be present in traditional formulas.
A strict protocol must be followed for managing this layer:
- Never wipe between color coats. The sticky layer is essential for inter-coat adhesion.
- Wipe only after the final top coat is fully cured, using a lint-free pad with 90%+ isopropyl alcohol.
- Allow the nail to cool for 30-60 seconds post-cure before wiping. Wiping a hot nail can cause thermal shock, resulting in a dull finish.
- Use a single, one-directional swipe per nail to avoid redepositing residue.
- The only exception is for complex nail art, where a clean, non-sticky surface is required to paint fine details before applying the final top coat.
Does Reapplying Top Coat Every 3 Days Actually Extend Wear?
The common advice to reapply top coat every few days is a holdover from the world of traditional lacquer, and it is a flawed strategy for gel manicures. While it might temporarily restore some shine, it can create more problems than it solves. Adding extra layers of gel top coat can make the nail overly thick and rigid, increasing its susceptibility to chipping or cracking under stress. An excessively thick manicure loses the natural flexibility that helps it withstand daily impacts. With the at-home market booming, and gel nail polish kits dominating with a 42% market share, proper technique is more important than ever.
A far more effective strategy is the “Smart Refresh Protocol.” If the surface has become dull due to micro-scratches, a targeted refresh can restore the finish without compromising the nail’s structure. This is not about building up layers, but about restoring the original surface.
Clean each nail with rubbing alcohol. When dry, paint a thin layer of topcoat… Cure top coat under any LED nail lamp. DONE! Nails will now look shiny and fresh for another week+ until it’s time for a fresh manicure!
– Professional User Tip
The key to this method’s success is twofold. First, the nail must be thoroughly cleansed with isopropyl alcohol to remove any oils, lotions, or residue that would prevent proper adhesion. Second, the new top coat must be applied as a very thin layer. The goal is not to add thickness, but to fill in the existing micro-scratches and create a new, perfectly smooth surface. This targeted approach can genuinely restore a mirror-shine for an additional week or more, effectively extending the life of the manicure’s aesthetic without making it bulky or brittle.
Key Takeaways
- A top coat’s shine is a function of its surface integrity; dullness is caused by light-scattering imperfections like scratches and chemical degradation.
- Flexible, traditional top coats offer superior long-term scratch resistance compared to more brittle no-wipe formulas, especially on dark colors.
- Application is a science: the “floating” technique and inverting the nail before curing are non-negotiable for creating a perfectly smooth, self-leveled surface.
How to Maintain 3-Week Manicures While Doing Daily Housework?
Achieving a three-week, flawlessly glossy manicure while engaged in daily housework is the ultimate test of a top coat’s resilience. Success hinges on a single principle: protection, not repair. Household chores introduce a gauntlet of aggressive chemical and abrasive forces that can destroy a perfect finish in minutes. Wearing gloves is the most repeated advice for a reason, but it’s the *why* and the *when* that matter. Many common cleaning agents are far more destructive than people realize.
For example, vinegar and lemon juice, often used as natural cleaners, have a pH of 2-3 and act as powerful acids that can break down the gel’s polymer bonds. Ammonia in window cleaners will instantly cloud a top coat. Most critically, “magic eraser” sponges contain micro-abrasives that are functionally equivalent to fine-grit sandpaper and will obliterate a glossy finish on contact. The demand for durable manicures is rising, with the market for UV gel services projected to grow at a 9.5% CAGR through 2030. This demand can only be met by educating clients on these specific, non-obvious threats.
A household survival guide for a gel manicure involves more than just gloves for washing dishes. It requires a strategic mindset:
- Identify Chemical Threats: Always wear nitrile gloves when handling vinegar, lemon juice, ammonia-based cleaners, harsh detergents, or bleach.
- Beware of Abrasives: Never use your nails to scrub. Use handled tools or brushes. Magic erasers are a manicure’s worst enemy.
- Avoid Thermal Shock: Drastic temperature changes, like moving from washing with hot water to handling frozen food, can cause the gel to contract or expand rapidly, leading to micro-cracks. Allow hands to return to a neutral temperature.
- Use Dedicated Tools: Keep a set of “nail-safe” tools in the kitchen and office: a jar opener, a box cutter or letter opener, and a label scraper. Train yourself to reach for a tool, not your nails, to pry, scrape, or open anything.
Ultimately, a brilliant, long-lasting manicure is the result of deliberate, informed choices. By mastering the science behind the shine and adopting a protocol of meticulous application and uncompromising protection, you can transform a fleeting gloss into an enduring, perfect finish. The power to maintain that “just-left-the-salon” brilliance for weeks is entirely within your control.