True aquarium nail artistry isn’t achieved by simply stacking layers, but by mastering the structural architecture and material science to create genuine optical depth.
- Dimension comes from a deliberate three-layer structure—background, mid-ground, and foreground—not random placement.
- A slender, elegant profile is maintained by using an “inlay” technique for chunky elements, preventing the bulkiness common with traditional layering.
Recommendation: Shift your focus from merely filling space to designing it, treating each nail as a miniature, multi-faceted glass diorama.
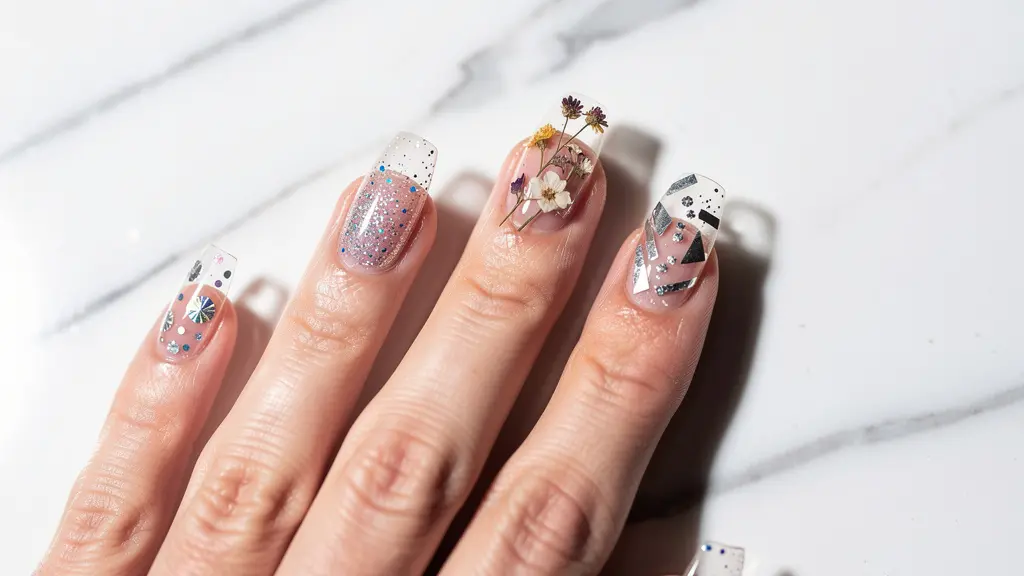
The desire to capture a moment in time, a miniature world suspended in crystal, is the driving force behind the aquarium nail trend. For the creative technician, the goal is not just to embed glitter or dried flowers into acrylic, but to create a sense of genuine depth and dimension that captivates the eye. This art form has become a significant force in the beauty industry, and the artificial nails market analysis shows a projected growth of $408.7 million between 2024 and 2029, fueled by such innovative and artistic applications. Many tutorials focus on the basic premise: layer acrylic, add objects, and cap it. This often leads to cloudy, bulky, or flat results that lack the magic of a true diorama.
The common frustration is a nail that looks more like a cluttered snow globe than a pristine aquarium. Bubbles obscure the clarity, chunky glitter creates unwanted thickness, and the final structure feels heavy and unbalanced. The conventional wisdom of just “adding more layers” or “filing it down” misses the fundamental point. It treats the symptom, not the cause. But what if the secret wasn’t in the *amount* of material used, but in the *architecture* of its application? What if creating depth was less about stacking and more about understanding the physics of light and the science of the materials themselves?
This guide moves beyond the surface-level advice. It reframes the process from one of simple encapsulation to one of deliberate artistic construction. We will deconstruct the science behind clarity, structure, and dimension. You will learn not just the “how” but the critical “why”—why bubbles form, why C-curves flatten, and how a base color can fundamentally alter the perception of depth. By mastering these principles, you will be able to suspend elements flawlessly, creating breathtaking optical depth without sacrificing the nail’s elegant and durable structure.
This article provides a complete roadmap for the visionary technician. Explore the following sections to transform your approach and master the art of the clear acrylic aquarium effect.
Summary: How to Create Deep Aquarium Effects in Clear Acrylic?
- The 3-Layer Rule: How to Stack Elements for a 3D Look?
- Why Do Air Bubbles Ruin Your Clear Cap and How to Avoid Them?
- How to Encapsulate Chunky Glitter Without Making the Nail Too Thick?
- Which Objects Can You Safely Encapsulate Without Fungal Risk?
- Is Builder Gel Clearer Than Acrylic for Glass-Effect Nails?
- Why Does Your C-Curve Flatten Out After Curing and How to Fix It?
- Black vs. White Base: How It Changes the Holographic Depth?
- How to Mold 3D Flowers Before the Acrylic Sets Too Hard?
The 3-Layer Rule: How to Stack Elements for a 3D Look?
Creating genuine optical depth is not an accident; it’s an act of architectural design. The most common mistake technicians make is randomly placing decorative elements, hoping for a 3D effect. The result is often a flat, chaotic composition. The key is to think like a diorama artist and adopt the 3-Layer Rule. This principle involves intentionally dividing your design into a background, a middle ground, and a foreground, with each layer serving a distinct visual purpose. This methodical approach transforms a simple encapsulation into a structured, multi-dimensional piece of art.
The background layer is your foundation for depth. This is where you place the finest particles, such as micro-glitter or subtle pigments. These elements create a distant visual plane, tricking the eye into perceiving a far-off horizon within the nail. The middle ground is your main stage. Here, you position your primary objects—larger glitter pieces, small charms, or dried flowers. These are the focal points of your design, and their placement in this layer gives them presence and importance. Finally, the foreground layer is for creating immediate visual impact. This is where you add light-reflecting elements like mylar flakes or chrome shards. Placed closest to the surface, they catch the light first, creating flashes and highlights that complete the illusion of three-dimensional space.
Each layer must be applied thinly, typically between 0.5mm and 1mm, and cured individually. This not only prevents excessive heat during polymerization but also ensures each layer remains distinct and crisp. By strategically separating elements based on their size and reflective properties, you are not just filling space—you are engineering an optical illusion. This structured method is the fundamental difference between a nail with “stuff in it” and a nail that contains a miniature, breathtaking world.
Why Do Air Bubbles Ruin Your Clear Cap and How to Avoid Them?
There is no greater enemy to the glass-like finish of an aquarium nail than the tiny, trapped air bubble. A single bubble can fracture the light, create a cloudy imperfection, and shatter the illusion of a flawless, crystal-clear encapsulation. While many blame shaky hands or a wet brush, the true culprit often lies in the fundamental chemistry and application technique. Bubbles are typically introduced either through an incorrect monomer-to-polymer ratio or improper bead handling, which disrupts the polymerization process.
To achieve a bubble-free application, you must master the art of the perfect bead. As a professional guide from Belle Beauty demonstrates, this begins with fully saturating your brush in monomer, ensuring no air is trapped in the bristles, then wiping one side on the edge of your dappen dish. This controlled saturation prevents a dripping, overly wet bead that can lead to excessive shrinkage and air pockets. The goal is a bead that is self-leveling but firm enough to be guided. The application itself is just as critical. Instead of “patting” or “dabbing” the acrylic, which can trap air, use a gentle “slide and press” motion. This technique allows the acrylic to flow and settle naturally, pushing any potential air out as you work.
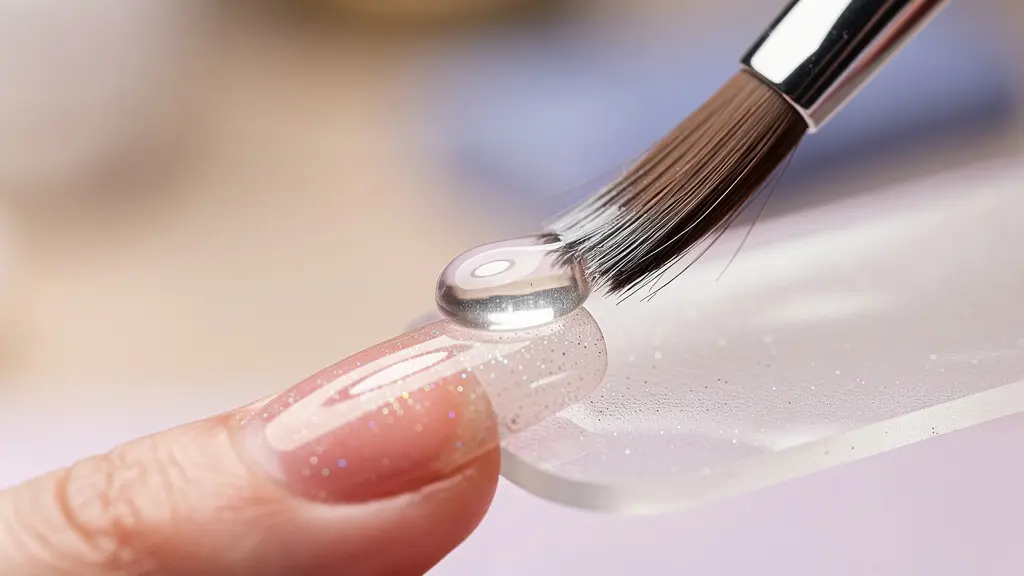
As the illustration shows, this method involves placing the bead and then using the belly of the brush to gently press and glide it into place. This smooth, deliberate movement maintains the chemical balance and structural integrity of the acrylic as it cures. A consistent, controlled technique ensures that the polymer chains link together in an orderly fashion, resulting in a dense, transparent, and bubble-free structure. It transforms the acrylic application from a race against time into a controlled, artistic process, yielding the pristine clarity your aquarium nail deserves.
How to Encapsulate Chunky Glitter Without Making the Nail Too Thick?
Encapsulating chunky glitter or larger decorative elements presents a significant structural challenge: how to achieve a dramatic look without creating a thick, bulky, and unbalanced nail. The traditional method of simply layering acrylic over the top of the glitter almost always results in excessive thickness, requiring aggressive and time-consuming filing that can compromise the encapsulation and even damage the design. The visionary technician’s solution lies in a more intelligent approach: the Inlay or Recessed Method. This technique is about creating space for the element rather than building on top of it.
Instead of applying glitter onto a flat base, you first build a thin, clear acrylic foundation. Then, using an e-file with a small barrel bit or by hand-filing, you carefully carve out a shallow “well” or recess where you intend to place the chunky glitter. The glitter is then placed inside this well, allowing it to sit flush with or even slightly below the surface of the acrylic foundation. This single step is revolutionary. It contains the bulky element within the nail’s core structure. From there, all that is needed is a thin, final clear cap to seal the design, resulting in a perfectly smooth surface with minimal bulk.
This table illustrates the profound difference between the two methods. The Inlay technique not only preserves a slender profile but also enhances the nail’s structural integrity, as shown in an insightful guide on aquarium nail tips.
| Aspect | Traditional Method | Inlay/Recessed Method |
|---|---|---|
| Thickness Added | 3-4mm total | 1.5-2mm total |
| Technique | Layer glitter on top, cover with acrylic | Create well, place glitter flush, cap thin |
| Structural Integrity | Bulk adds weight, prone to lifting | Maintains natural apex, stronger adhesion |
| Filing Required | Heavy filing to reduce bulk | Minimal filing, preserves encapsulation |
| Longevity | 2-3 weeks average | 3-4 weeks with proper technique |
By adopting the Inlay Method, you shift from fighting against bulk to designing with intent. The result is a nail that is not only visually stunning, with its encapsulated treasures beautifully displayed, but also structurally sound, comfortable for the client, and far more durable over time. It is the epitome of working smarter, not harder.
Which Objects Can You Safely Encapsulate Without Fungal Risk?
The creative impulse to encapsulate unique objects is strong, but an artist’s first responsibility is to the health and safety of their client. Not all materials are created equal, and embedding the wrong object can lead to discoloration, product breakdown, or worse, create a breeding ground for bacteria and fungus. The primary risk comes from two properties: porosity and chemical instability. Porous materials, like untreated paper or organic matter, can absorb moisture over time, even within the acrylic, creating a potential environment for microbial growth. Chemically unstable materials can react with the acrylic monomer or the heat from a UV/LED lamp, causing them to bleed color, melt, or degrade.
Therefore, a safety framework is essential before attempting to encapsulate any new or untested object. Safe materials are generally non-porous and chemically inert. These include items specifically designed for nail art, such as metal foils, mylar shards, and pre-baked polymer clay slices. These have been manufactured to be stable and colorfast. However, for more adventurous objects like dried flowers or delicate fabrics, pre-treatment is non-negotiable. Semi-porous items must be completely sealed with a thin layer of base coat or builder gel and fully cured before they are introduced into the acrylic. This creates an impermeable barrier, locking out moisture and preventing any potential interaction with the monomer.
Before encapsulating any object not specifically made for nails, a rigorous pre-testing process is a professional requirement. This ensures the final artwork is not only beautiful but also safe and durable for the duration of the wear.
Your Action Plan: The Encapsulation Safety Testing Framework
- Test for Porosity: Place a drop of monomer on the object. If it absorbs quickly, it is highly porous and must be pre-sealed with a thin layer of gel.
- Check Colorfastness: Wipe a small, inconspicuous area of the object with a brush dipped in acetone. If any color transfers, it will bleed into the acrylic.
- Verify Chemical Inertness: Place the object on a form and flash cure it under your lamp for 10-15 seconds to ensure it does not melt, warp, or release fumes.
- Assess Thickness and Rigidity: Ensure the object is thin and flexible enough to be encapsulated without creating excessive bulk or compromising the nail’s structure.
- Plan for Sealing: For any semi-porous item (e.g., dried flowers, delicate paper), apply a very thin layer of builder gel or base coat and cure fully before encapsulation to create a non-porous shield.
By internalizing this safety-first mindset, you protect your client, uphold your professional integrity, and ensure the longevity of your art. True artistry is born from a foundation of safety and material knowledge.
Is Builder Gel Clearer Than Acrylic for Glass-Effect Nails?
The quest for ultimate clarity in encapsulation art often leads to a critical question: which material offers a more pristine, glass-like finish? While traditional acrylic has been the workhorse for decades, modern builder gels have emerged as a serious contender, particularly when optical perfection is the primary goal. The answer isn’t a simple one-or-the-other, but a nuanced understanding of each material’s properties. Generally, high-quality builder gels offer superior initial clarity and a higher-gloss finish straight after curing.
A professional comparison of the two materials reveals that builder gel’s key advantage is its self-leveling nature. This property creates an exceptionally smooth surface that requires minimal to no filing, thus preserving the material’s inherent transparency. Acrylic, on the other hand, requires shaping and buffing, which can introduce microscopic scratches that slightly diffuse light, reducing its “wet look” clarity. Furthermore, some EMA-based acrylics can be prone to a subtle yellowing or clouding over time, while many modern builder gels are formulated with UV inhibitors that maintain their crystal-clear appearance for longer.
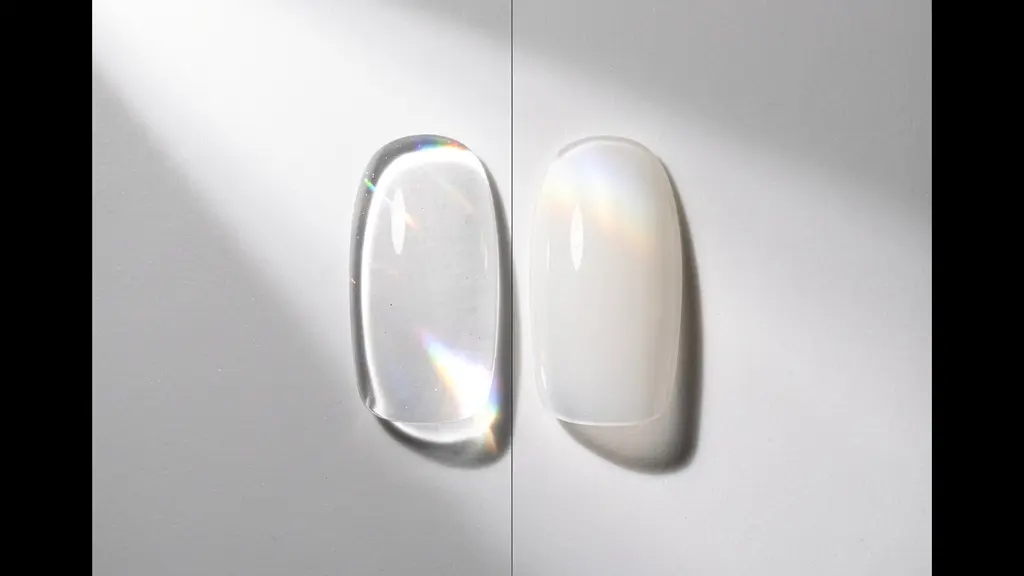
As this visual comparison suggests, the way light travels through the material is different. Builder gel often provides a more direct, lens-like refraction. However, this clarity comes with a trade-off in structural rigidity. Acrylic is typically stronger and more durable, making it ideal for creating foundational structures and extensions. This has led to the rise of a hybrid technique favored by expert technicians. This method uses the strength of acrylic to build the nail’s core structure and apex, and then uses a crystal-clear, self-leveling builder gel as the final “top coat” or encapsulating layer. This approach harnesses the best of both worlds: acrylic’s robust architecture and builder gel’s unmatched optical clarity, resulting in a durable, lightweight, and flawlessly transparent finish.
Why Does Your C-Curve Flatten Out After Curing and How to Fix It?
One of the most disheartening moments for a nail technician is creating a perfect, deep C-curve, only to see it relax and flatten after curing. This loss of structural integrity not only weakens the nail’s apex but also distorts the carefully constructed aquarium effect. This phenomenon is not a result of poor technique alone; it is a direct consequence of the physics of polymerization. As nail expert Dani Bailey explains in a guide for Scratch Magazine on nail product polymerization, the process involves a powerful chemical reaction.
The chemical reaction of polymerisation causes acrylic molecules to pull together as they cure, creating an initial tight curve that can then ‘relax’ if not properly supported.
– Dani Bailey, Scratch Magazine – Nail Product Polymerisation Guide
This “pulling together” is what creates the initial shrinkage and tight curve. However, once the most intense phase of curing is complete, the polymer structure can slightly expand or “relax” into a more stable state, causing the C-curve to widen. To combat this, the structure must be physically supported during this critical phase. The two primary methods are using high-quality, rigid nail forms and employing a pinching technique. A quality form acts as a steadfast mold, resisting the acrylic’s tendency to flatten. A flimsy form will simply flex along with the relaxing acrylic, rendering it useless.
The pinching technique, when timed correctly, provides the ultimate reinforcement. After the acrylic has set to a firm but still pliable state (it will make a light clicking sound when tapped), a pinching tool or your fingers are used to apply gentle, consistent pressure to the sidewalls of the nail. This physically re-establishes the deep C-curve and holds it in place as the polymerization process fully completes. While either method helps, combining them yields near-perfect results.
| Method | Effectiveness | Skill Required | Best For |
|---|---|---|---|
| Pinching Tools Only | 70% curve retention | High – timing critical | Experienced technicians |
| Quality Forms Only | 60% curve retention | Low – form does the work | Beginners |
| Combined Technique | 95% curve retention | Medium – best of both | All skill levels seeking perfection |
By understanding that the C-curve flattens due to natural chemical relaxation, you can proactively use forms and pinching to counteract this force. This ensures your nail’s architecture remains strong, slender, and structurally perfect, preserving the integrity of your internal diorama.
Black vs. White Base: How It Changes the Holographic Depth?
The base color beneath your clear encapsulation is not merely a background; it is an active participant in the physics of light. Its properties of absorption and reflection can dramatically alter the perception of depth and the intensity of any holographic or iridescent elements you embed. Choosing between a black or white base is a strategic artistic decision that yields profoundly different optical outcomes. A black base acts as a light void, while a white base acts as a light scatterer.
When you place holographic elements over a black base, you create the most dramatic and deep effect. According to a 2024 trend analysis on the physics of nail applications, a black background absorbs any stray or ambient light that passes through the clear acrylic. This means the only light that reaches the viewer’s eye is the pure, direct reflection from the holographic particles themselves. This creates a stark, high-contrast effect where the holographic colors appear to float in a deep, infinite void. The depth is perceived as greater because there is no visual information coming from behind the particles.
Conversely, a white base creates an ethereal, glowing effect. White reflects and scatters light in all directions. When light passes through the holographic particles, it hits the white base and bounces back up, illuminating the particles from behind. This “backlighting” effect causes the entire encapsulation to glow softly and reduces the perceived depth. The effect is brighter and more angelic, but less stark and defined. For the most intense holographic payoff, however, neither black nor white is the ultimate choice. Using a mirrored silver or chrome base acts as a perfect reflector, effectively doubling the light that hits the holographic foils through a dual-reflection mechanism, creating an almost blindingly brilliant and dynamic effect.
Key Takeaways
- True 3D effects rely on an architectural 3-layer system (background, middle ground, foreground), not random placement.
- Avoiding bulk with chunky glitter is achieved with an “inlay” technique—carving a well for the element rather than layering over it.
- The ultimate clarity comes from mastering material science: choosing between acrylic and builder gel (or a hybrid) and controlling the monomer-to-polymer ratio to prevent bubbles.
How to Mold 3D Flowers Before the Acrylic Sets Too Hard?
Molding intricate 3D elements like flower petals directly on the nail is a race against the clock. The acrylic begins to polymerize the moment liquid touches powder, giving you a very short window to sculpt before it becomes unworkably hard. The pressure to work quickly often leads to clumsy, poorly defined shapes. The secret to extending your working time and achieving delicate, detailed results lies not in rushing, but in controlling your environment and your materials. By manipulating temperature and application methods, you can gain precious extra minutes to perfect your art.
The primary factor governing acrylic’s setting time is temperature. A warmer environment accelerates polymerization, while a cooler one slows it down. Working in a cool room (ideally 68-72°F or 20-22°C) is the first step. For an even greater advantage, you can pre-chill your monomer liquid by placing it in a refrigerator for about 10 minutes before use. This significantly slows the initial chemical reaction. Additionally, many brands offer “slow-set” monomer formulations specifically designed for 3D art, which are an invaluable tool for complex designs.
Perhaps the most effective technique is to abandon the “one large bead” method. Instead of placing a single, large bead of acrylic on the nail and frantically trying to shape it, work with multiple, smaller beads on a non-absorbent surface, like a glass palette or a tile. This is the Palette Method. You can create several small beads at once, and because they are not on the warm nail bed, their curing time is extended. You can then form one petal at a time, pick it up with your brush, and place it on the nail, giving you complete control over the composition without the pressure of a rapidly curing mass. This methodical approach transforms a stressful race into a calm, controlled, and creative sculpting session, allowing for a level of detail that is impossible to achieve when working under pressure.
By shifting your perspective from that of a technician to that of an architect and an optical artist, you unlock a new realm of creative possibility. Apply these principles not as rigid rules, but as a framework for your own unique vision. The next step is to experiment and begin building your own miniature worlds.