In summary:
- Mastering 3D acrylics is about controlling the polymerization “clock,” not just the physical motion.
- Choose a slow-setting monomer to buy yourself crucial molding time for complex designs.
- The “drain” technique and achieving the perfect bead consistency are non-negotiable for control.
- Protect color integrity by working with drier beads and sealing the base color first.
- Understand when to press for lace effects versus when to stack for height by reading the bead’s lifecycle.
Tick-tock. The clock is running from the moment your brush touches the powder. For a nail artist, the race against acrylic polymerization is the heart of 3D sculpting. You pick up a perfect bead, place it on the nail, and begin to shape a delicate petal. But in seconds, it’s no longer pliable. It’s a hardened, unworkable lump, and the intricate design in your mind is lost. This frustration is universal. Many tutorials focus on the motion—the patting, the pressing—but they miss the fundamental secret. They teach you how to move, but not when to move.
The common advice is to “work faster” or to adjust your liquid-to-powder ratio, but these are just fragments of a larger picture. The real issue isn’t your speed; it’s your misunderstanding of the material’s lifecycle. You’re treating the acrylic bead as a static piece of clay, when in reality, it’s a dynamic chemical reaction unfolding in real-time. The key to unlocking breathtaking 3D art isn’t in fighting the clock, but in mastering it. It’s about learning to read the subtle cues of the bead as it transitions from liquid to solid.
But what if the solution wasn’t about rushing, but about intentionally slowing things down? What if you could control the very pace of the polymerization to suit your artistic vision? This guide shifts the focus from frantic movement to strategic timing. We will deconstruct the acrylic bead’s lifecycle, from the initial wet “slump” to the perfect, malleable “gummy” stage, and finally, the point of no return. You will learn not just how to form a petal, but how to understand the precise moment it’s ready to be shaped, flattened for lace, or stacked for dimension.
By the end, you will no longer be a victim of your acrylic. You will be its conductor, orchestrating the timing of each element to create flawless, intricate 3D flowers that look as if they bloomed directly on the nail.
This article provides a structured path to mastering the timing of 3D acrylics. Explore the sections below to gain full control over your sculpting process.
Summary: A Nail Artist’s Guide to Controlling Acrylic Polymerization
- Fast vs. Slow Setting Monomer: Which Is Best for 3D Art?
- The “Drain” Technique: How Much Liquid Should Be in Your 3D Brush?
- How to Sculpt White on Red Without staining the Petals?
- When to Flatten the Bead for Lace Effects vs. Building Height?
- Can You Mix Eyeshadow into Clear Acrylic for 3D Molding?
- The Liquid-to-Powder Ratio Mistake That Causes Lifting in 3 Days
- Why Does Thicker Gel Burn More When Curing?
- How to Keep Liner Brushes Straight for Razor-Sharp Lines?
Fast vs. Slow Setting Monomer: Which Is Best for 3D Art?
The first step in controlling the polymerization clock is choosing your timeline. Not all monomers are created equal; their formulation directly dictates your working window. For basic applications, a fast-setting monomer is efficient. But for the intricate, multi-layered petals of 3D art, it’s a race you can’t win. You need more time to nudge, press, and perfect each element before it locks into place. This is where a slow-setting monomer becomes your most valuable ally.
Think of it as choosing between a sprint and a marathon. A fast-set monomer demands you finish the race in seconds, forcing simple, rushed shapes. In contrast, slow-setting monomers are designed for the endurance of artistry. According to a professional 3D nail art guide, slow-setting monomers allow significantly more molding time compared to their standard counterparts. This extended pliability is not a luxury; it’s a necessity for creating depth, overlapping petals, and delicate details. It gives you the freedom to work methodically, ensuring each part of your design is perfect before moving to the next.
Switching to a slow-set formula is the single most impactful change you can make to reduce the stress of 3D work. It transforms the process from a frantic rush into a deliberate, controlled sculpting session, allowing your creativity, not the chemical reaction, to lead the way.
By making this simple switch, you’re not cheating; you’re strategically managing the environment to favor artistry over speed.
The “Drain” Technique: How Much Liquid Should Be in Your 3D Brush?
Once you’ve chosen the right monomer, your next point of control is the brush. The amount of liquid it holds determines the consistency of your bead, and therefore, its behavior. Too wet, and the bead will slump into a puddle, losing all potential for height. Too dry, and it will be a grainy, unworkable clump. The “drain” technique is your method for achieving that perfect, self-leveling bead every single time. It involves dipping your brush into the dappen dish, then pressing one side of the brush against the inner edge to release excess liquid. Some artists then give it a final, quick tap on a paper towel.
This action isn’t just about removing liquid; it’s about calibrating your tool for the perfect pickup. For advanced control, some nail technicians even work with a custom liquid blend. A technique discussed by professionals involves using a mix of 50% monomer and 50% acetone on the brush. The acetone evaporates rapidly, leaving the perfect amount of monomer for a firm, easily moldable 3D bead. However, this is an advanced method that requires speed and precision. For most artists, mastering the drain with pure monomer is the key.
The goal is to create a bead that is neither flowing nor crumbly. The table below illustrates the different states you’ll encounter and which one you’re aiming for.
| Bead State | Liquid Level | Visual Cue | Best Use |
|---|---|---|---|
| Slumping Bead | Too wet | Flows immediately | Not suitable for 3D |
| Self-Leveling Bead | Perfect | Consistency ‘not too wet and not too dry’, requiring quick work before acrylic sets | Ideal for 3D flowers |
| Grainy Bead | Too dry | Crumbly texture | Difficult to mold |
Achieving this “self-leveling” state consistently is the true mark of a pro. It’s the starting point from which all successful 3D art grows.
How to Sculpt White on Red Without staining the Petals?
Creating a crisp white flower on a vibrant red base is a classic challenge. The moment your wet white bead touches the red, the pigments can bleed, staining your pristine petals with a pinkish hue. This problem, known as color contamination, is another timing and control issue. A bead that is too wet will have excess monomer that acts as a solvent, leaching pigment from the base layer. The secret is to create a barrier and work with a slightly drier consistency.
The most effective method is to seal the canvas before you begin to paint. After the red base is fully cured and filed, apply a micro-thin layer of clear acrylic over the entire nail. This acts as an invisible shield, preventing the monomer from your white bead from ever touching the red pigment. Additionally, when you pick up your white bead, ensure it’s on the drier side of the “perfect” consistency. A firmer bead has less mobile monomer, drastically reducing the risk of bleeding.
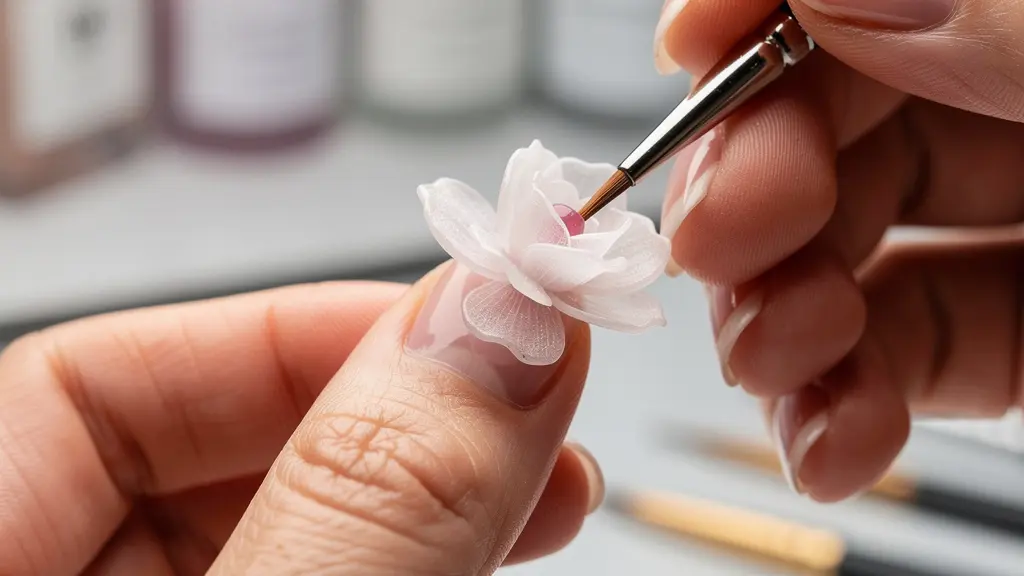
This disciplined approach ensures your colors remain true and your details sharp. Nail artist Bethany Denby offers a crucial tip for the sculpting motion itself. As she explained to Professional Beauty UK, you should use the tip of the brush to work from the inside of the bead. For roses, she advises to “create a croissant shape before pressing the product down for a good base.” This technique minimizes the contact area and helps maintain color purity.
Action Plan: Preventing Color Bleed in 3D Art
- Isolate the Base: Apply and fully cure a micro-thin layer of clear acrylic over the red base before starting your 3D work.
- Use Separate Dishes: Dedicate two separate dappen dishes—one for any clear or base work, and a clean one exclusively for your white acrylic.
- Control Your Bead: Work with a slightly drier white acrylic bead to minimize the amount of free monomer that can cause pigment leaching.
- Sculpt Strategically: When shaping petals, keep the lighter color to the outside of the bead, which also enhances realism.
- Invest in Quality: Use professional-grade colored acrylics with stable, high-quality pigments that are less prone to bleeding.
Ultimately, preventing color staining is a testament to your control over both your materials and your technique.
When to Flatten the Bead for Lace Effects vs. Building Height?
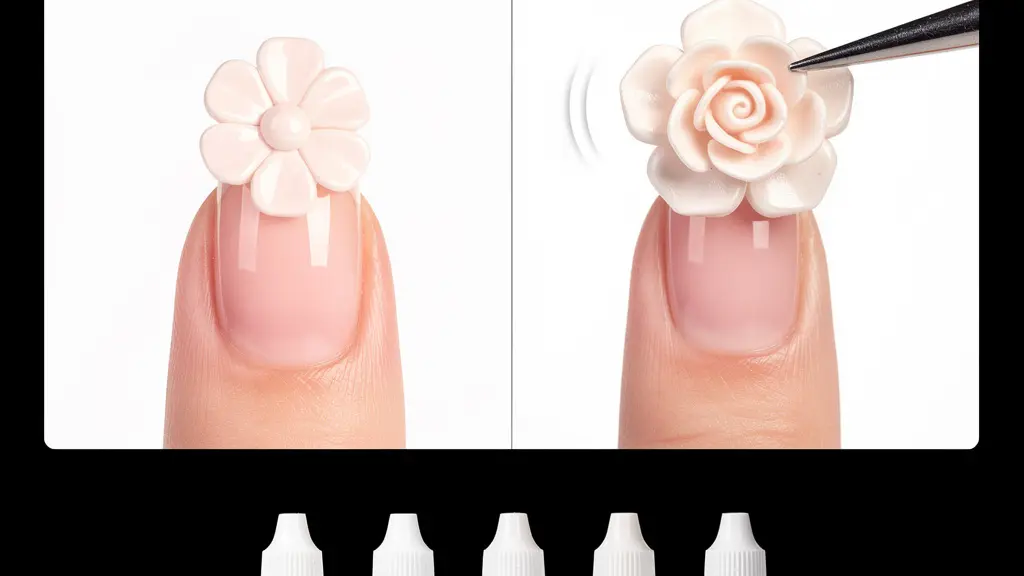
The versatility of a single acrylic bead is immense—it can be flattened into a delicate, translucent lace or stacked to create a robust, dimensional flower. The difference lies entirely in timing and pressure. This is where you truly interact with the “gummy” stage of the polymerization clock. To create a lace effect, you must act when the bead is still relatively fresh and pliable. Place the bead and apply wide, even pressure almost immediately to spread it thinly and evenly across the surface. The goal is to create a semi-transparent film.
Building height, however, requires patience. It’s a game of layering, and it hinges on the concept of moisture reactivation. You cannot simply place a large bead and hope for the best; this leads to an under-cured center and a bulky shape. Instead, you must build in stages. The key is to let the foundational bead partially set until it reaches a firm, “gummy” texture—it should no longer be shiny or moving. Once it reaches this state, place a slightly smaller, wetter bead on top. The moisture from the new bead will reactivate the surface of the one below, creating a seamless chemical bond without losing the structure you’ve already built.
This stacking method allows you to create incredible height and complex, multi-layered petals that are structurally sound. According to one professional tutorial, the key is a light, confident stroke—don’t overwork the material. Whether you’re flattening or stacking, the principle is the same: read the state of the bead and apply the right technique at the right moment.
This mastery over the bead’s lifecycle is what separates a good nail artist from a great one.
Can You Mix Eyeshadow into Clear Acrylic for 3D Molding?
In the quest for custom colors, it’s tempting to reach for readily available pigments, like a vibrant eyeshadow. The internet is full of “hacks” suggesting you can crush it up and mix it into your clear acrylic powder. This is a critical mistake that compromises the very chemistry you’re trying to control. While it might seem to work at first, you are introducing foreign materials that were never meant to polymerize.
The problem lies in the binders and fillers present in cosmetic eyeshadows. These ingredients interfere with the cross-linking process of the acrylic’s polymers and monomers. As industry experts warn, this can have disastrous consequences for your work.
Eyeshadows contain binders like magnesium stearate or talc that are not designed to polymerize. Mixing them can compromise the structural integrity of the acrylic, leading to brittleness or a gummy texture that never fully cures.
– Industry Expert Consensus, Professional Nail Chemistry Guidelines
Instead of a strong, durable enhancement, you create a weak, unstable structure that is prone to chipping, breaking, or never fully hardening. This not only ruins your art but also poses a risk of allergic reactions from uncured material. The correct way to create custom colors is to use pigments that are designed for compatibility with acrylic systems. Pure, cosmetic-grade mica powders or specialized acrylic pigments are the professional standard. These materials are inert and will not interfere with the polymerization, ensuring your 3D art is both beautiful and structurally sound.
To safely create custom colors, you can mix these pure pigments with your monomer to create a colored liquid or “slurry,” then use this liquid to pick up your clear acrylic powder. You can even mix in a drop of permanent polish, but remember to adjust curing times accordingly. Always test your custom mix on a practice tip first.
Respecting the chemistry of your materials is the foundation of professional, long-lasting nail art.
The Liquid-to-Powder Ratio Mistake That Causes Lifting in 3 Days
Lifting within days of application is the ultimate nightmare, and more often than not, the culprit is a faulty liquid-to-powder ratio. While this is a foundational skill, its connection to 3D art is profound. An incorrect ratio doesn’t just affect adhesion; it completely sabotages your ability to sculpt. A bead that is too wet will not only be difficult to control, but it will also shrink excessively as it cures. This shrinkage is a primary cause of premature lifting.
When the acrylic mix has too much monomer, it creates a watery consistency that can flow into the cuticle area and along the nail walls. This contact with the skin is a guaranteed recipe for lifting. Furthermore, as the excess monomer evaporates during the curing process, the acrylic shrinks unevenly. This process can be so significant that it literally pulls the enhancement away from the edges of the natural nail, creating micro-gaps where lifting begins. According to professional nail technicians, working with proper liquid control is essential for preventing the product from self-leveling uncontrollably and losing its intended shape.
For 3D art, this is a double failure. Not only do you lose adhesion, but you also lose the sculpted form you worked so hard to create. You must be able to recognize the warning signs of a bead that is too wet before it even fully leaves your brush.
| Visual Cue | Problem | Result |
|---|---|---|
| Bead flows into cuticles | Too much monomer | Immediate lifting risk |
| Watery ‘wake’ behind brush | Excessive liquid | Weak bond formation |
| Excessive shrinkage | Wet application | Acrylic shrinks unevenly as it cures, pulling away from nail edges |
Mastering this balance ensures that your beautiful 3D creations remain firmly attached, just as you intended.
Why Does Thicker Gel Burn More When Curing?
While this guide focuses on acrylics, many artists work with both systems, and understanding the chemistry of one illuminates the other. The burning sensation sometimes felt when curing gel, especially a thick layer, is caused by an exothermic reaction. This is the same fundamental process that hardens acrylics, but it happens much faster and more intensely under a UV or LED lamp. Polymerization is a chemical reaction that releases energy in the form of heat. The more product you have curing at once, the more molecules are reacting, and the more heat is generated.
A thicker layer of gel means a larger volume of product is undergoing this rapid, heat-releasing reaction in a concentrated area. The heat has nowhere to go but into the nail bed, which is rich in nerve endings, causing that sharp “heat spike.” While acrylics also produce an exothermic reaction, it’s a much slower process that occurs in open air. The heat dissipates gradually, which is why you typically don’t feel a burn. However, the principle remains the same: more product equals more heat.
For gel users, the solution is to work in thinner layers or to use a “flash curing” technique. This involves curing the gel for just a few seconds (5-10), pulling the hand out of the lamp to let the initial heat spike dissipate, and then finishing with the full curing cycle. When modifying materials, such as adding nail polish to polygel, it’s often recommended to increase the curing time to ensure a full cure, for example, moving from 30 seconds to 1 minute in an LED lamp. This ensures the product hardens completely without overwhelming the client with heat.
This knowledge reinforces the idea that you are not just an artist, but also a practical chemist, managing reactions on a tiny canvas.
Key Takeaways
- Mastering 3D acrylics is a matter of controlling time and chemistry, not just physical technique.
- Your choice of monomer (fast vs. slow-setting) is your primary tool for managing your working window.
- The perfect “self-leveling” bead, achieved through precise liquid control, is the foundation for all successful sculpting.
How to Keep Liner Brushes Straight for Razor-Sharp Lines?
Your control over the acrylic bead is only as good as the tool you use to manipulate it. For 3D art, a brush with a fine, sharp point is non-negotiable. It allows you to press into the center of the bead, define crisp petal edges, and add delicate, linear details. However, these precision instruments are fragile. Improper cleaning and storage can cause the hairs to splay, bend, or curl, rendering the brush useless for fine work. Maintaining that razor-sharp point is a discipline in itself.
First, invest in quality. As nail pro Bethany Denby notes, a good brush gives you more control over the product. She recommends a brush with a long handle and a sharp point, like a #4 or #6, for intricate art. Once you have the right tool, maintenance is paramount. The number one rule is to never scrub your brush. Aggressive cleaning forces monomer and acrylic particles deep into the ferrule (the metal part), causing the hairs to separate and harden from the inside out.
The correct method is a gentle “soak and roll.” After use, soak the brush in monomer or a dedicated brush cleaner for about a minute. Then, gently roll the brush on a clean paper towel to draw out the remaining product. Once clean, the final step is to shape and protect it for storage. Dip the very tip of the brush into a no-wipe top coat, shape it to a perfect point with your fingers, and cure it for 10 seconds. This creates a hard, protective “cast” that keeps the bristles perfectly straight and safe from damage until its next use.
Invest in a brush with a sharp point, such as a #4 or #6, as it will make it easier to create intricate art. I like NSI’s secrets 3D Brush because it’s long, giving me plenty of control over my product.
– Bethany Denby, Professional Beauty UK
A well-maintained brush is an extension of your hand, translating your vision into reality with precision and grace.