You’re damaging your nails because you treat gel removal as a fight, resorting to peeling and scraping. This is a fundamental misunderstanding. The key to safe removal is not force, but science. This guide reframes the process as one of chemical persuasion and thermal assistance, teaching you how to make the gel polish surrender willingly, leaving your natural nail plate intact and ready for recovery.
There’s a moment of destructive satisfaction in peeling off a lifting sheet of gel polish. We’ve all been there. You see a lifted edge, and the impulse to pick, peel, and pull is overwhelming. You tell yourself it’s just this one time, but it’s a habit that leads directly to thin, weak, and damaged nails. The common advice—”just soak it in acetone”—is dangerously incomplete. It ignores the science of the process and often leads to impatience, which culminates in the one thing you must avoid at all costs: aggressive scraping.
As a nail rehabilitation specialist, I’m here to tell you to stop fighting your manicure. Removing gel polish is not a battle of brute force against a stubborn product. It is a controlled process of chemical dissolution, and your role is to facilitate it, not force it. The scraping, scratching, and peeling is what we call mechanical trauma, and it’s the primary reason your nails are in a state of distress. This guide will teach you the professional methodology, focusing on the principles of chemistry and heat, to ensure the gel slides off with minimal persuasion, leaving your nail health uncompromised.
For those who prefer a visual demonstration, the following video offers a complete walkthrough of the soak-off and nail restoration process, complementing the detailed scientific principles we’ll discuss below.
To achieve a truly non-damaging removal, you must understand each component of the process—from the type of solvent you use to the temperature at which you work. The following sections break down the science and strategy behind each step, providing a clear path to freeing your nails without causing harm.
Summary: A Scientific Approach to Safe Gel Polish Removal
- 100% Acetone vs. Remover with Oils: Which Is Faster?
- Foil vs. Silicon Clips: Which Traps Heat Better for Removal?
- Are Steam Removal Machines Less Damaging Than Direct Soaking?
- What to Apply Immediately After Acetone to Rebalance the Plate?
- How to Know When the Product Is Truly Ready to Push Off?
- Why Placing Acetone in a Warm Water Bowl Speeds Up Removal Safely?
- Which Removal Process Is Least Damaging: Soak-Off or File-Off?
- How to Transition from Acrylics to Natural Nails Without cutting Them Short?
100% Acetone vs. Remover with Oils: Which Is Faster?
Let’s be clear: 100% pure acetone is the fastest and most effective solvent for breaking down gel polish. There is no debate on its efficacy. However, that speed comes at a price. Acetone is a powerful solvent that does not discriminate; while dissolving your gel manicure, it also strips the natural oils (lipids) and moisture from your nail plate and surrounding skin, leading to significant dehydration and brittleness. This is why nails often feel weak and dry post-removal.
Removers conditioned with oils are formulated to mitigate this harshness. The oils are intended to counteract some of the dehydration, but this addition inherently dilutes the acetone’s power. Consequently, you must trade time for comfort: expect to add 5 to 10 minutes to your soak time when using a conditioned remover. The choice depends on your priority and the product you’re removing.
Your selection should be strategic:
- For regular gel polish: A standard 70-90% acetone solution provides a good balance between effectiveness and kindness to the nail.
- For stubborn glitter or builder gels: The effectiveness of 100% pure acetone is non-negotiable. Conditioned removers will struggle, leading to frustration and the temptation to scrape.
- For sensitive or already damaged nails: Opt for a conditioned remover and accept the longer soak time. Patience here will prevent further damage.
Ultimately, pure acetone is the most reliable tool, but its use must be followed by an immediate and intensive rehydration protocol, which we will cover in detail.
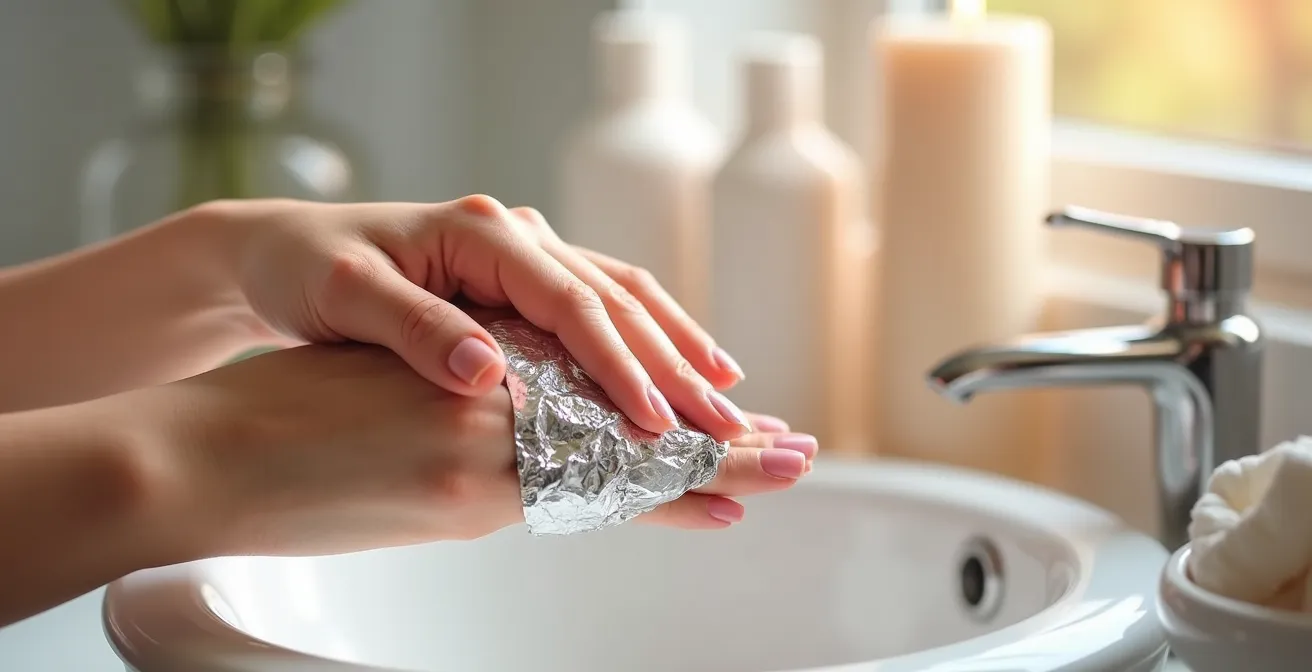
Foil vs. Silicon Clips: Which Traps Heat Better for Removal?
The goal of wrapping your acetone-soaked cotton is twofold: to keep the acetone in constant contact with the gel and, crucially, to trap heat. Heat is a catalyst that dramatically accelerates the chemical reaction, making the removal process faster and more effective. Both foil and silicone clips serve this purpose, but they do so with different levels of efficiency.
Foil is the traditional method. It’s cheap and readily available. However, it can be clumsy to apply, and it often fails to create a perfect seal. This allows heat to escape and acetone vapor to evaporate, slowing down the process. Silicone clips are a modern, reusable alternative designed specifically for this task. They provide firm, consistent pressure, creating a much tighter seal around the nail and finger.
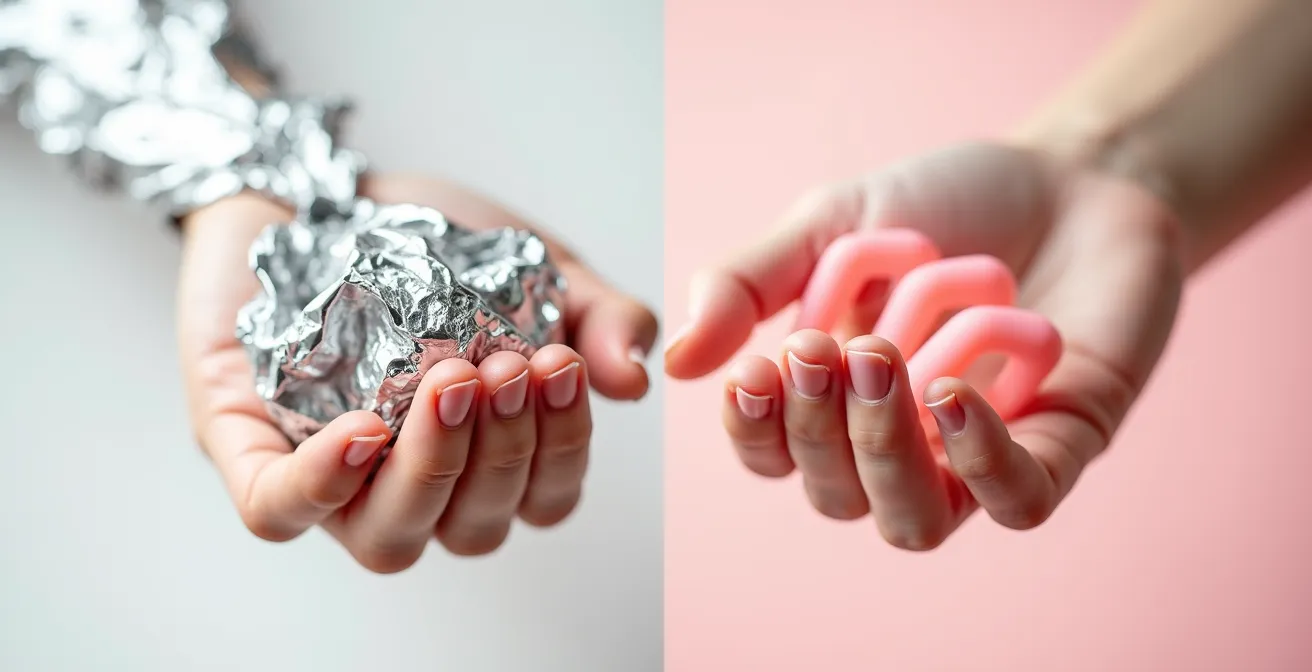
This superior seal is the key to their effectiveness. As dermatologist Dr. Shari Lipner points out, the physics are simple. A tighter seal is more effective at preventing the solvent from escaping and at trapping the body heat that speeds up the reaction. The American Academy of Dermatology highlights this benefit in their professional guidance, as explained by Dr. Lipner:
When wrapped around your nails, plastic creates a tighter seal than foil, so the acetone is less likely to drip.
– Dr. Shari Lipner, MD, PhD, FAAD, American Academy of Dermatology
While both methods work, silicone clips offer a more efficient, less messy, and environmentally friendlier (reusable) solution. By trapping heat and acetone more effectively, they shorten the required soak time, which in turn minimizes the nail’s exposure to the dehydrating effects of acetone.
Are Steam Removal Machines Less Damaging Than Direct Soaking?
Steam removal machines represent a significant evolution in gel removal technology. Instead of soaking your entire fingertip in a bowl of acetone, these devices gently warm a small amount of acetone, creating a vapor that permeates the gel polish. This method offers several distinct advantages, primarily by minimizing direct skin contact with the harsh solvent, thereby reducing overall dehydration and irritation.
However, the question of which method is “less damaging” is nuanced. The damage from soaking is primarily chemical (dehydration), while the risk with steamers can become mechanical if the user becomes impatient. A steamer’s speed can be its own liability; because it works faster, you might be tempted to start pushing the gel before it has fully released, leading to scraping. The following comparison breaks down the risk profiles.
This table, based on an analysis of professional removal techniques, outlines the core differences between the methods.
| Method | Primary Damage Risk | Removal Time | Cost Factor |
|---|---|---|---|
| Direct Soaking | Chemical dehydration to nail and skin | 10-15 minutes | $0.50 per removal |
| Steam Machines | Mechanical damage if rushed | 5-8 minutes | $80-150 one-time investment |
| Fume Exposure | Lower with steamers (contained) | N/A | Health benefit |
For the disciplined user, a steam remover is objectively superior. It is faster, uses less product, and significantly reduces the chemical exposure to the skin. But for the impatient user, it presents a new temptation. The key takeaway is that no technology can replace patience. Whether soaking or steaming, the gel must be allowed to fully dissolve before you attempt to remove it.
What to Apply Immediately After Acetone to Rebalance the Plate?
This is the most critical and most frequently ignored step in nail rehabilitation. The moment the acetone is wiped away, your nail plate is at its most vulnerable state. It has been stripped of its protective lipid layer and is severely dehydrated. Do not wash your hands. Do not apply lotion. Your immediate, non-negotiable first action is to begin an intensive lipid replenishment process.
The goal is to restore the oils that were just stripped away. A simple lotion won’t do; you need a penetrative oil. Jojoba oil is the gold standard because its molecular structure is remarkably similar to the natural sebum your skin produces, allowing it to penetrate the nail plate deeply. Apply a generous amount to the entire nail, cuticle, and surrounding skin. Massage it in. Your nails will essentially “drink” it up.
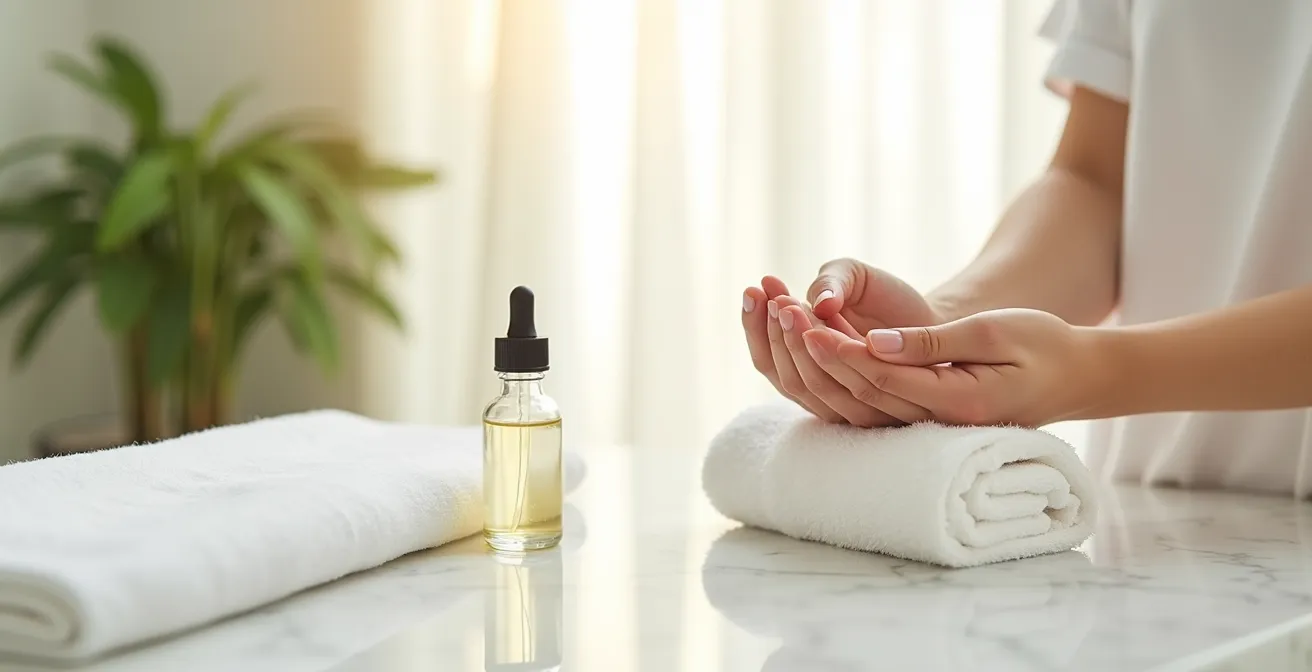
Following this initial oil saturation, you can proceed with a structured recovery protocol. This is not a one-and-done step; it’s the beginning of a 24-hour intensive care period for your nails. The following plan provides a clear, actionable sequence for post-removal recovery.
Your Immediate Nail Recovery Protocol
- Step 1 – Immediate (0-10 minutes): Apply penetrative oil like jojoba to replenish lipids stripped by acetone.
- Step 2 – Short-term (10-30 minutes): Use a hydrolyzed protein or biotin treatment to support the weakened keratin structure.
- Step 3 – Overnight: Create a ‘nail slugging’ effect by applying a thick, occlusive layer of a lanolin-based balm over the oil.
- Step 4 – Next 24-48 hours: Maintain a ‘nail rest’ period. This means no polish, repeated oil application, and avoiding prolonged contact with water and harsh soaps.
Following this protocol diligently will make a significant difference in preventing the brittleness, peeling, and breakage that is often blamed on gel polish but is actually the result of improper removal and aftercare.
How to Know When the Product Is Truly Ready to Push Off?
This is the moment where most damage occurs. Impatience takes over, and you start scraping at a product that hasn’t fully surrendered. The number one rule of safe removal is this: if you have to apply pressure, it is not ready. A fully dissolved gel should require almost no force to remove. It should crumble and slide off the nail plate with a gentle nudge from an orangewood stick or a plastic pusher.
Your senses are your best guide. First, look for visual cues. The polish should appear wrinkled, shriveled, and be visibly lifting away from the nail plate at the edges. It will look like it’s already given up. Then, use tactile and auditory feedback. Professional nail technicians are trained to listen to their tools, a practice you must adopt at home.
A ready gel is silent when pushed. If they hear a ‘scratching’ or ‘scraping’ sound, it’s the sound of their tool grating against their natural nail plate—an immediate signal to stop and soak longer.
– Professional Nail Technician Guidelines, Paola Ponce Nails Professional Training
Use this multi-sensory checklist to determine readiness:
- Visual Test: The gel appears wrinkled and is lifting at the edges without any prompting.
- No-Tool Test: Gently nudge a corner with the pad of another finger. It should feel soft and crumbly.
- Sound Check: When you use your pusher, listen intently. You should hear silence. Any scratching noise is the sound of your tool damaging your natural nail. Stop immediately.
- Stubborn Spot Management: It’s common for some areas to dissolve slower. Gently remove the parts that are ready, then re-wrap only the stubborn spots for another 5 minutes. Do not attack the whole nail because of one difficult patch.
Waiting an extra five minutes is infinitely better than spending the next three months growing out a damaged, scraped nail. Let the acetone do the work.
Why Placing Acetone in a Warm Water Bowl Speeds Up Removal Safely?
Heat is the single most effective, non-damaging accelerator for gel polish removal. All chemical reactions, including the dissolution of gel by acetone, happen faster at warmer temperatures. By gently warming your acetone, you can significantly reduce your soak time—often by as much as 30-50%—which means less overall exposure for your nails and skin. However, this must be done with extreme caution, as acetone is highly flammable.
The only safe way to do this at home is the “bain-marie” method. Never, under any circumstances, should you microwave acetone or place it near an open flame. To do this safely, you will need two bowls. Pour your acetone into a small, ceramic or glass bowl. Then, place that small bowl into a larger bowl filled with warm water. The water should be warm to the touch, like a comfortable bath, not hot.
This gentle, indirect heat will transfer to the acetone, raising its temperature safely and evenly. The target temperature is crucial for both safety and effectiveness. According to professional nail chemistry experts who recommend keeping acetone at a maximum of 103°F (40°C), this is often described as “Jacuzzi temperature.” Any hotter and you increase the risk of skin irritation and increase the volatility of the acetone fumes.
Using this method of a warm water bath is a professional secret that transforms the removal process. It respects the chemistry of the products, making the acetone work smarter, not harder. This simple piece of science allows for a quicker, more pleasant, and ultimately safer removal experience, reducing the temptation to get impatient and start scraping.
Which Removal Process Is Least Damaging: Soak-Off or File-Off?
For the at-home user, the answer is unequivocal: a patient soak-off process is infinitely less damaging than an amateur file-off. While professionals often use an e-file to remove the bulk of a manicure, this is a skill that takes hundreds of hours to master. Without proper training, it is almost impossible for an amateur to gauge the correct pressure and depth, leading to the filing of not just the product, but the natural nail plate itself.
This is the definition of mechanical trauma. Improper filing can thin the nail plate, create rings of fire (dips and grooves), and lead to serious, long-term damage like onycholysis, a condition where the nail plate separates from the underlying nail bed. The recovery from this kind of damage is not measured in days or weeks, but in the months it takes for a new, healthy nail to grow out completely.
The damage from a chemical soak-off, on the other hand, is primarily temporary dehydration. As we’ve established, this is a serious issue that must be addressed with immediate aftercare, but it is reversible. As long as you allow the acetone to do the work and refuse to scrape, the structural integrity of your nail plate remains intact. The choice for at-home removal is clear: chemical dissolution is safer than mechanical abrasion in untrained hands.
Your goal is to preserve the integrity of your natural nail. Filing carries a high risk of permanent damage, while soaking carries a manageable risk of temporary dryness. Choose the path that prioritizes the long-term health of your nails over the speed of removal.
Key Takeaways
- Heat is Your Ally: Safely warming acetone in a water bath is the key to reducing removal time and minimizing chemical exposure.
- Patience is the Tool: The gel is ready when it slides off without force. Any scratching sound means you must stop and soak longer to avoid mechanical damage.
- Recovery is Mandatory: Immediate and intensive application of penetrative oil (like jojoba) after acetone is non-negotiable for preventing dehydration and brittleness.
How to Transition from Acrylics to Natural Nails Without cutting Them Short?
Transitioning away from acrylics presents a unique challenge. The natural nail underneath has been protected and is often weak, thin, and unaccustomed to the stresses of the outside world. The common advice to cut them all off and start over is disheartening. A more strategic, gradual approach—the “grow and fill” method—allows you to maintain length while rehabilitating the new nail growth.
This process involves slowly filing away the acrylic over several appointments while simultaneously reinforcing the new growth with a structured gel overlay. The gel acts as a protective shield, or an “invisible cast,” giving your natural nail a chance to grow in stronger without being subjected to immediate stress and breakage. This requires commitment and a skilled technician but is the most effective way to transition without sacrificing all your length.
The structured transition plan looks like this:
- Weeks 1-2: Your technician files the acrylic overlay as thin as possible and applies a protective, structured gel over the top.
- Weeks 3-4: At your fill appointment, more of the old acrylic is filed away from underneath the gel, which is then rebalanced and filled.
- Weeks 5-8: This process continues. With each appointment, more acrylic is removed, and your natural nail grows out, protected by the gel.
- Weeks 9-12: By now, most or all of the acrylic should be gone. Your technician can switch to a flexible base coat to act as a shock absorber for the now-exposed but stronger natural nails.
- Ongoing Care: Daily use of a keratin-based strengthener and 3-5 daily applications of nail oil are critical. You must also wear gloves for any task involving water or cleaning chemicals.
You must be patient and realistic with your expectations. According to dermatologists, it takes a long time for the nail plate to fully renew itself. Managing your expectations is key, as a full nail replacement, according to the American Academy of Dermatology, takes about 6 months for fingernails. This structured transition bridges the gap, protecting your nails while they regain their innate strength.
Your journey to stronger, healthier natural nails starts not with a drastic chop, but with the decision to follow a patient, structured removal and recovery process. Begin that process today by committing to the right techniques and abandoning the destructive habit of peeling and scraping for good.