The frustrating blur of magnetic nail art is not a failure of technique, but a loss of control over particle physics in the moments before curing.
- The precision of your lines is dictated by magnetic field geometry and the crucial, narrow temporal window you have before gel viscosity causes particle drift.
- Immediate, single-finger flash curing is the only way to arrest this drift and achieve permanent stabilization of the design.
Recommendation: Stop treating magnetic polish as an art form and start treating it as a time-sensitive scientific procedure; your results will transform.
You’ve executed the perfect pass with the magnet. The line is crisp, the holographic shimmer is dancing, and the depth is mesmerizing. You move on to the next finger, then the next, and by the time you’re ready for a full cure, you glance back at the first nail. The sharp, defined line has bled into a muddy, diffused cloud. This is a universal moment of frustration for any nail technician dedicated to precision. It feels like a race against an invisible force, one that undoes your best work before it can be preserved.
The common advice is to « work faster » or to use a « better top coat. » Many technicians explore different base colors or polish brands, hoping a product change will solve what is fundamentally a process problem. But these are shots in the dark. They fail to address the core variables at play: the physics of particle suspension, the thermal dynamics of gel polish, and the geometry of magnetic fields. The issue isn’t your speed or your polish quality alone; it’s your manipulation of the physical forces within a critical temporal window.
This guide reframes the entire process. The key to sharp, lasting magnetic designs is not artistry, but the precise control of physical phenomena. We will deconstruct the process, moving beyond simple « how-to » steps to explain the underlying « why. » You will learn to think like a physics manipulator, controlling time, temperature, and magnetic fields to achieve a perfect « quantum lock » on your design. It’s about turning a moment of chance into an act of deliberate, repeatable control.
This article provides a complete operational framework, from selecting the right tools for specific effects to the final, critical curing process. By understanding these principles, you will gain the ability to consistently create and preserve the sharp, dynamic magnetic art your clients demand.
Summary: The Physics of Perfect Magnetic Nail Art
- Round vs. Rectangular Magnets: Which Creates the « Velvet » Effect?
- The « Freeze » Method: Why You Must Cure Each Finger Immediately?
- Double Magnet Technique: Creating a Galaxy Effect
- Why Cheap Magnetic Polish Doesn’t React to the Wand?
- Does Floating Top Coat Disturb the Magnetic Particles?
- Using Magnetic Toppers to Upgrade a Creme Polish Instantly
- Black vs. White Base: How It Changes the Holographic Depth?
- LED vs. UV Lamps: Which One Cures Your Specific Gel Polish Brand?
Round vs. Rectangular Magnets: Which Creates the « Velvet » Effect?
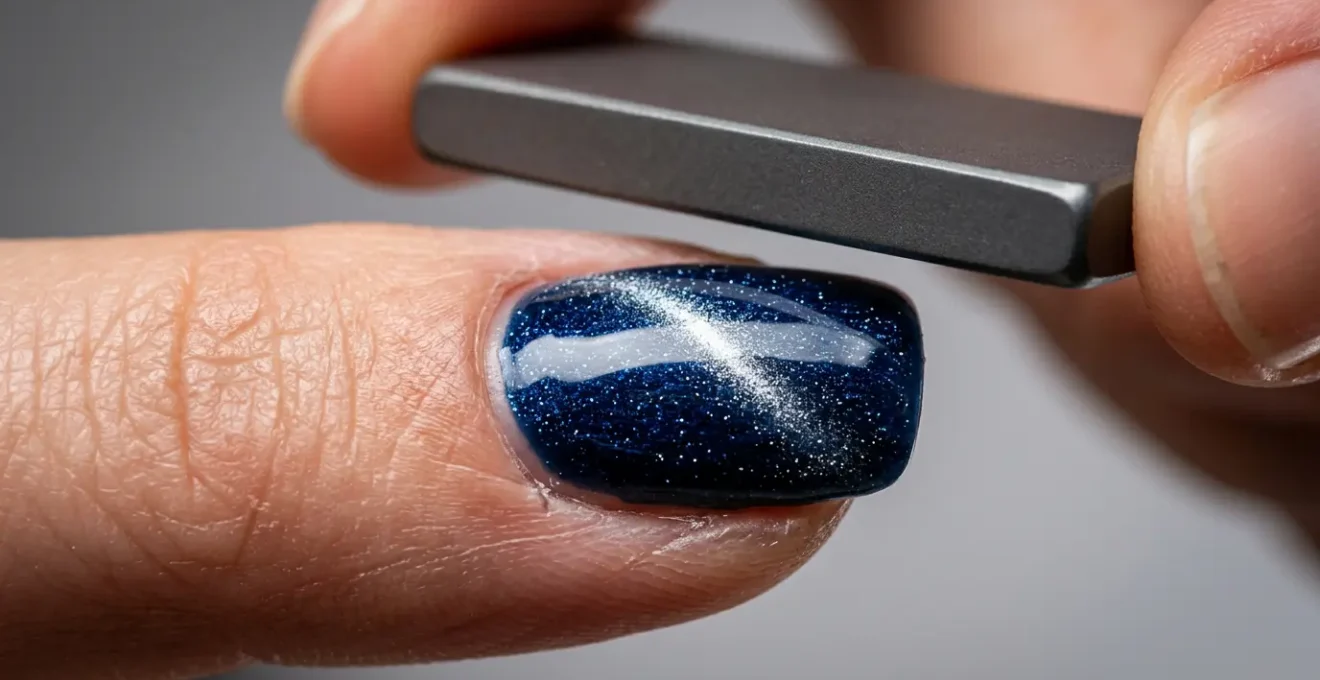
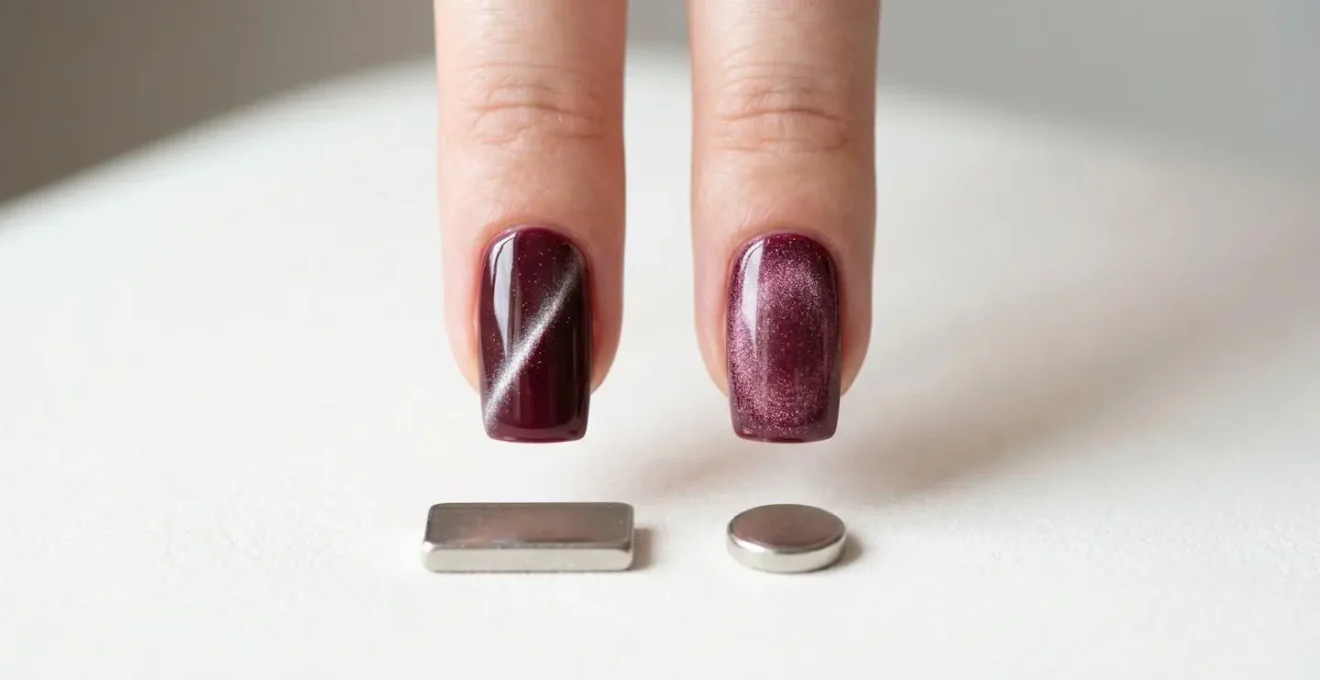
The choice of magnet is not a matter of preference but a calculated decision about field geometry. Your magnet is the primary tool for manipulating ferrous particles, and its shape dictates the final aesthetic. A rectangular bar magnet concentrates magnetic flux into a linear path, forcing particles into a tight, sharp line. This is the required geometry for a classic, high-contrast cat-eye effect. The particles are pulled from the surrounding polish and stacked densely, creating maximum light reflection along a singular axis.
A round magnet, by contrast, generates a radial magnetic field. Instead of forcing particles into a line, it repels them outwards from the center in all directions. This uniform dispersion is what creates the « velvet » or « aura » effect. The particles are pushed towards the periphery of the nail, leaving a soft, dark, non-reflective area in the center and a glowing halo around the edges. Understanding this fundamental difference is the first step in controlling your outcome. You cannot create a sharp line with a round magnet, nor a diffused velvet glow with a rectangular one.
The visual evidence is irrefutable. The magnet’s shape directly engineers the particle alignment and, therefore, the visual texture. This control over field geometry is the foundation of intentional magnetic design. The magnetic polish market has seen a significant 40% rise in sales since 2021, and a large part of this growth is driven by the diverse effects now possible through the deliberate use of different magnet shapes. Choosing the right tool for the job is not just advice; it’s a physical imperative.
The « Freeze » Method: Why You Must Cure Each Finger Immediately?
The single greatest cause of blurred magnetic lines is viscosity drift. Once you remove the magnet, the suspended iron oxide particles are no longer held in a forced alignment. The gel polish, a viscous fluid, immediately begins to reclaim its equilibrium. The particles, which are denser than the surrounding medium, start to disperse and settle due to gravity and Brownian motion. This process begins the instant the magnetic field is removed. Working on multiple fingers before curing gives this dispersion minutes to occur, guaranteeing a soft, blurred result.
The « Freeze » method, or flash curing, is the only effective countermeasure. It is a non-negotiable step for achieving sharp lines. By applying the magnetic effect to one nail and immediately flash curing it for 10-15 seconds, you initiate the polymerization process just enough to dramatically increase the gel’s viscosity. This « freezes » the particles in their precise, sharp alignment, preventing any further drift. You are not fully curing the nail, but creating a stabilized matrix that locks the design in place while you work on the other fingers. This temporal window—between removing the magnet and initiating the cure—is the most critical phase of the entire process.
The Impact of Temperature on Viscosity Drift
The rate of viscosity drift is highly dependent on ambient temperature. As professional nail educators confirm, gel polish becomes significantly more fluid in warmer conditions. An analysis of gel polish viscosity shows that in environments above 23°C (73°F), the working time before lines blur is drastically reduced. The ideal workspace temperature for maximum control and particle stability is between 20-23°C (68-73°F). Colder temperatures slow down drift but can negatively affect cure times, highlighting the need for a controlled environment.
Action Plan: Implementing the Flash Cure Workflow
- Target Nail: Apply magnetic gel polish to a single nail. Isolate your work to one finger at a time to minimize the temporal window for viscosity drift.
- Magnetic Activation: Immediately position the magnet 3-5mm above the wet polish for 5-10 seconds to create the desired particle alignment.
- Particle Stabilization: Without delay, flash cure the single nail for 10-15 seconds. This action serves as the « quantum lock, » arresting particle movement.
- Sequential Repetition: Move to the next finger and repeat the apply-magnetize-freeze sequence until all nails on the hand are stabilized.
- Final Curing Protocol: Once all individual designs are locked, perform a full 60-second cure on the entire hand to ensure complete and durable polymerization.
Double Magnet Technique: Creating a Galaxy Effect
For technicians seeking to push beyond the standard cat-eye, the double magnet technique offers a method for creating unparalleled depth and precision. This advanced procedure involves using two rectangular magnets simultaneously, positioned on opposite sides of the nail. The principle here is the creation of a highly concentrated and controlled magnetic field. Instead of pulling particles to one side, you are creating a powerful « push-pull » dynamic that forces them into an exceptionally sharp, bright line directly between the two magnetic poles.
The technique requires precision. The two magnets are held parallel to the nail’s side walls, creating a channel of magnetic force. This corrals the particles from both sides, evacuating them from the periphery and concentrating them in the center. The result is a line that appears to float in a void of dark, particle-free polish, achieving a three-dimensional « galaxy » or « deep space » effect. The contrast is far more intense than what can be achieved with a single magnet.
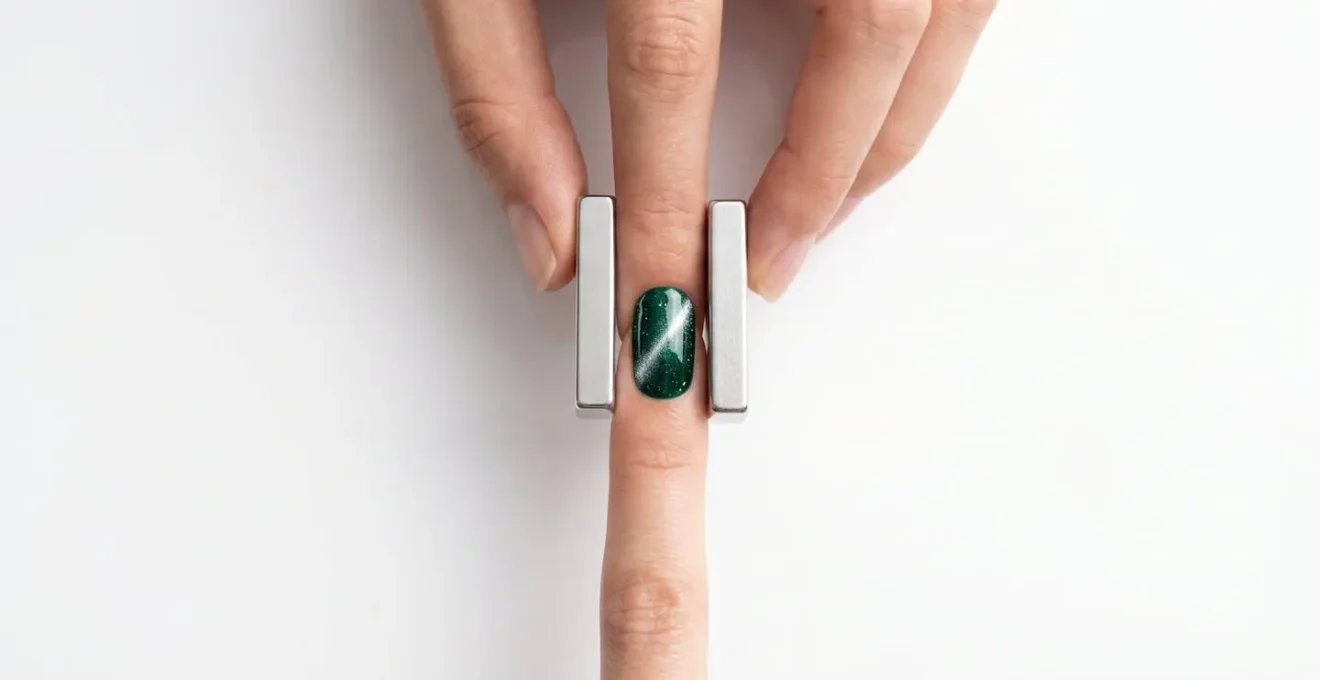
This method also amplifies the visual feedback during application. As described by educators at Izabelle Hammon Professional Nail Education, when the dual magnets are applied, you can physically observe the effect with extreme clarity. They note, « The magnetic pigment will start to activate – you will see them glow and the sparkle will start to disappear along the side wall. » This immediate visual confirmation is a sign that the particle evacuation is successful, creating the clean, dark background necessary for the galaxy effect to pop. This technique is a masterclass in manipulating field geometry for maximum artistic impact.
Why Cheap Magnetic Polish Doesn’t React to the Wand?
The failure of a magnetic polish to react is rarely an issue with the magnet; it’s a direct consequence of the polish formulation itself. A high-quality magnetic gel relies on two key factors: a high density of uniformly sized ferrous particles and a carrier base with the correct viscosity. The most commonly used pigment is a specific form of iron oxide known as magnetite. According to dermatology research on cosmetic components, the quality and concentration of this iron oxide (magnetite) is the primary determinant of a polish’s magnetic reactivity.
Inexpensive or poorly formulated polishes cut corners in precisely these areas. They may use a lower density of magnetic pigment, meaning there are simply not enough particles to form a crisp, reflective line. Worse, they often use inconsistently sized or lower-grade iron particles that have a weaker magnetic response. When you apply the magnet, these sluggish, sparse particles struggle to move through the viscous gel, resulting in a weak, cloudy, or non-existent effect. It’s a matter of raw material quality.
Protocol for Testing Polish Reactivity
You can objectively test a polish’s quality before applying it to a client. Place a single drop of the magnetic polish on a non-porous palette. Bring your standard magnet wand close to the drop. A high-quality formula will show immediate and dramatic particle movement. The particles will snap into alignment, forming a sharp, brilliant line within the droplet. A low-quality formula will exhibit a slow, mushy, or weak response. This simple test exposes the density and responsiveness of the particles, saving you from failed applications.
The strength of your magnet and its proximity to the nail are also variables, but they cannot compensate for a deficient formula. A powerful magnet might elicit a weak response from a cheap polish, but it will never achieve the sharp, dynamic result of a premium formula that is saturated with high-grade, uniformly-sized magnetite particles. Investing in professional-grade polish is investing in predictable results.
Does Floating Top Coat Disturb the Magnetic Particles?
Yes, applying a top coat improperly is one of the most common ways to ruin a perfectly executed magnetic design, even after flash curing. The mechanical action of the brush bristles dragging across the nail surface will physically displace the carefully aligned particles, causing immediate streaking and blurring. This is not a chemical reaction but a physical disturbance. To prevent this, the « floating » technique is not just recommended; it is mandatory.
Floating involves loading your brush with a generous bead of top coat and holding it parallel to the nail. You then guide the bead across the nail surface, letting it flow and self-level without the bristles ever touching the design layer. You are leveraging the top coat’s surface tension and hydrostatic pressure to achieve coverage. This zero-contact application ensures the underlying particle structure remains completely undisturbed. A thin, scraped-on layer of top coat will always result in a smeared design.
Most topcoats will allow the magnetic particles to continue to move away over time. It can take up to a full 24 hours for all layers of nail lacquer to fully cure and because the magnetic pigments are heavier than the other ingredients, they will continue to move and settle during this drying time which is what causes the lines to blur.
– EmilydeMolly Professional Nail Art, Fiery Attraction – Magnetic Polish Application Guide
Furthermore, even with a perfect float, some particle movement is inevitable as the new fluid layer is introduced. To counteract this final, subtle drift, a crucial pro-technique is to re-apply the magnet *after* floating the top coat and hold it in place during the first 30 seconds of the final cure. This re-aligns any disturbed particles and locks them into their final, permanent position as the top coat polymerizes. It is the final insurance policy for a razor-sharp finish.
Using Magnetic Toppers to Upgrade a Creme Polish Instantly
Magnetic toppers represent a significant evolution in nail art, decoupling the magnetic effect from a specific colored base. These are essentially clear or lightly tinted gel polishes saturated with magnetic particles. Applied over any standard creme gel polish, they instantly transform a simple manicure into a dynamic, multi-dimensional design. This unlocks limitless creative potential, allowing technicians to create a cat-eye or velvet effect over any color in their collection, from pastels to neons.
The key to success with toppers is opacity control. A single, thin layer of a magnetic topper over a dark creme base will produce a classic, high-contrast cat-eye. The same topper applied over a light or white base will yield a softer, more ethereal and pearlescent effect. By layering the topper, you can increase the density of the magnetic particles, intensifying the final look. This versatility is what makes them such a powerful and cost-effective tool in a professional’s kit.
The commercial viability of this approach was proven by the Korean gel brand F Gel. In 2020, their launch of a collection of soft, modern magnetic gels designed to be used as toppers was a transformative moment for the K-Beauty industry. According to their primary distributor, they sold a record-breaking 50,000 sets in the first month. This demonstrated a massive consumer demand for versatile magnetic formulas that work beyond the traditional dark, heavy aesthetic, proving that toppers are not just a niche product but a mainstream salon service.
Black vs. White Base: How It Changes the Holographic Depth?
The base color beneath a magnetic polish is not just a background; it is an active component in the physics of light interaction that determines the final perception of depth. The difference between a black and a white base is a lesson in light absorption versus reflection. A black base is the ultimate tool for creating maximum contrast and the illusion of depth.
Because black absorbs almost all light that hits it, any stray light that penetrates the magnetic particle layer is trapped by the base. This creates a void-like background. The bright, reflective line of aligned magnetic particles appears to float in this darkness, producing a dramatic, sharp, and intensely three-dimensional effect. This is the standard for professional, high-impact cat-eye looks where depth perception is the primary goal.
A white base, conversely, reflects almost all light. When light passes through the magnetic layer, it hits the white base and is scattered back up through the polish. This sub-surface scattering creates a soft, luminous glow from within. The magnetic line appears less sharp and more diffused, integrated into a brighter, more ethereal overall look. It sacrifices stark depth for a romantic, hazy aesthetic. Neither is « better, » but they serve entirely different artistic intentions.
| Base Color | Light Behavior | Visual Effect | Best Use Case |
|---|---|---|---|
| Black Base | Absorbs stray light wavelengths | High contrast, sharp line floating in void, intense depth perception | Dramatic cat-eye, maximum 3D illusion, professional salon looks |
| White Base | Reflects all light including sub-surface scatter | Soft luminous glow, wider diffused line, ethereal hazy effect | Subtle everyday wear, romantic aesthetic, bridal nails |
| Gradient Base (White to Black) | Progressive light absorption/reflection spectrum | Demonstrates full range of magnetic effects in single application | Educational tool, creative exploration, Instagram-worthy design |
Key Takeaways
- The shape of your magnet (field geometry) is a deliberate choice that dictates the effect: rectangular for sharp lines, round for diffused velvet.
- Immediate, single-finger flash curing is the only non-negotiable method to « freeze » particles and prevent viscosity drift, which is the primary cause of blurred designs.
- A « floating » top coat application is mandatory to prevent mechanical disruption of the design, followed by re-magnetizing during the initial cure to lock the final alignment.
LED vs. UV Lamps: Which One Cures Your Specific Gel Polish Brand?
The final « quantum lock » of your design is executed by your curing lamp, and the type of lamp you use has a direct impact on the stability of your magnetic art. The primary difference between LED and UV lamps is speed and heat generation, both of which are critical variables in our process. A traditional UV lamp takes roughly 2-3 minutes for a full cure, whereas a modern LED lamp can achieve a superior cure in 30-60 seconds.
This speed is a significant advantage when working with magnetic polish. According to professional nail equipment analysis, the fact that an LED cures in 30 seconds vs UV’s 2 minutes is paramount. This faster polymerization means the particles have significantly less time to drift or settle while the gel is still in a semi-liquid state. Furthermore, LED lamps run much cooler than UV lamps. The excess heat from a UV lamp can temporarily decrease the gel’s viscosity, promoting the very particle drift you worked so hard to prevent. The cooler, faster cure of an LED lamp provides a more stable environment for locking in sharp lines.
While most modern gel polishes are formulated to be compatible with both lamp types, it is crucial to check the manufacturer’s specifications. Some « UV-only » gels exist that require the broader spectrum of wavelengths produced by a traditional UV lamp to cure properly. However, for the specific task of preserving sharp magnetic lines, an LED-compatible polish cured in a high-quality LED lamp offers the most control and the highest probability of a perfect, drift-free outcome.
| Feature | LED Lamp | UV Lamp | Impact on Cat-Eye Lines |
|---|---|---|---|
| Curing Speed | 30-60 seconds per coat | 2-3 minutes per coat | Faster LED curing freezes magnetic particles quicker, preventing dispersion |
| Heat Generation | Runs cooler, minimal ambient heat | Generates more heat during operation | Cooler LED prevents gel viscosity reduction that causes particle drift |
| Bulb Lifespan | 20,000-50,000 hours | 4,000 hours; replacement every 6 months | Consistent LED output maintains reliable curing; dimming UV bulbs cause under-curing |
| Wavelength Range | Narrow, targeted UV-A wavelengths | Broader UV spectrum | Targeted LED wavelengths provide more efficient photoinitiator activation |
| Polish Compatibility | Most modern gels; check formula | Cures all gel types universally | LED-compatible formulas often engineered for faster stabilization |
To implement these principles, the next logical step is to audit your current workflow for timing and temperature control, ensuring every action is a deliberate manipulation of the forces at play.