The secret to successful maximalist nail art isn’t random creativity, but deliberate visual curation.
- Unify disparate designs by anchoring them with a strict, professionally defined color palette.
- Use intentional negative space and a hierarchy of matte vs. glossy finishes to create clarity, separation, and depth.
Recommendation: Treat your ten nails as a single, cohesive collection, not ten individual canvases.
You’ve seen it scrolling through your feed: a breathtaking manicure where every nail is a unique universe of pattern and texture, yet the entire hand looks like a cohesive work of art. Inspired, you spend hours with your polishes, decals, and gems. The result? Less of a curated gallery and more of a chaotic jumble. This frustration is common for any DIYer venturing into the world of maximalism. The impulse to layer prints, mix finishes, and add 3D elements is strong, but the line between « bold » and « busy » is perilously thin.
The standard advice often feels too simplistic. « Just have one accent nail » feels like a cop-out, a retreat from the very « more is more » philosophy you’re trying to embrace. Others suggest merely « using a unifying color, » but offer no framework for how to select that palette. This leaves you staring at a color wheel, no closer to a solution. True maximalism isn’t about limiting your vision; it’s about giving it structure. The art of layering is a skill, governed by the same principles of composition that guide fashion stylists and interior designers.
But what if the key wasn’t about *simplifying* your designs, but about *curating* them with intent? This guide reframes maximalism from an act of random adornment to a deliberate exercise in visual composition. We will move beyond generic tips to explore the professional techniques that create harmony out of chaos. It’s time to stop fighting the clutter and start orchestrating it.
By treating your ten fingers as a single, curated collection, you can unlock the power of maximalist expression. This article breaks down the core principles of visual curation for nail art, from building a foundational color story to ensuring your final creation is both stunning and wearable. We will explore how to manage space, texture, and hardware to achieve that polished, high-end look.
Summary: A Stylist’s Guide to Curating Maximalist Nails
- Using a Limited Palette to Unify Different Patterns
- The « Breathing Room »: Where to Leave Bare Space in Maximalism?
- Matte vs. Glossy: Using Finish to Separate Elements
- Should Every Finger Be Different or Should One Stand Out?
- Testing for Snags: Ensuring Maximalist Art Is Smooth
- Gold or Silver: How to Match Your Hardware to Your Nail Art?
- The « Caulking » Method: How to Seal Edges Around 3D Art?
- How to Wear 2-Inch Stilettos Without Losing Daily Functionality?
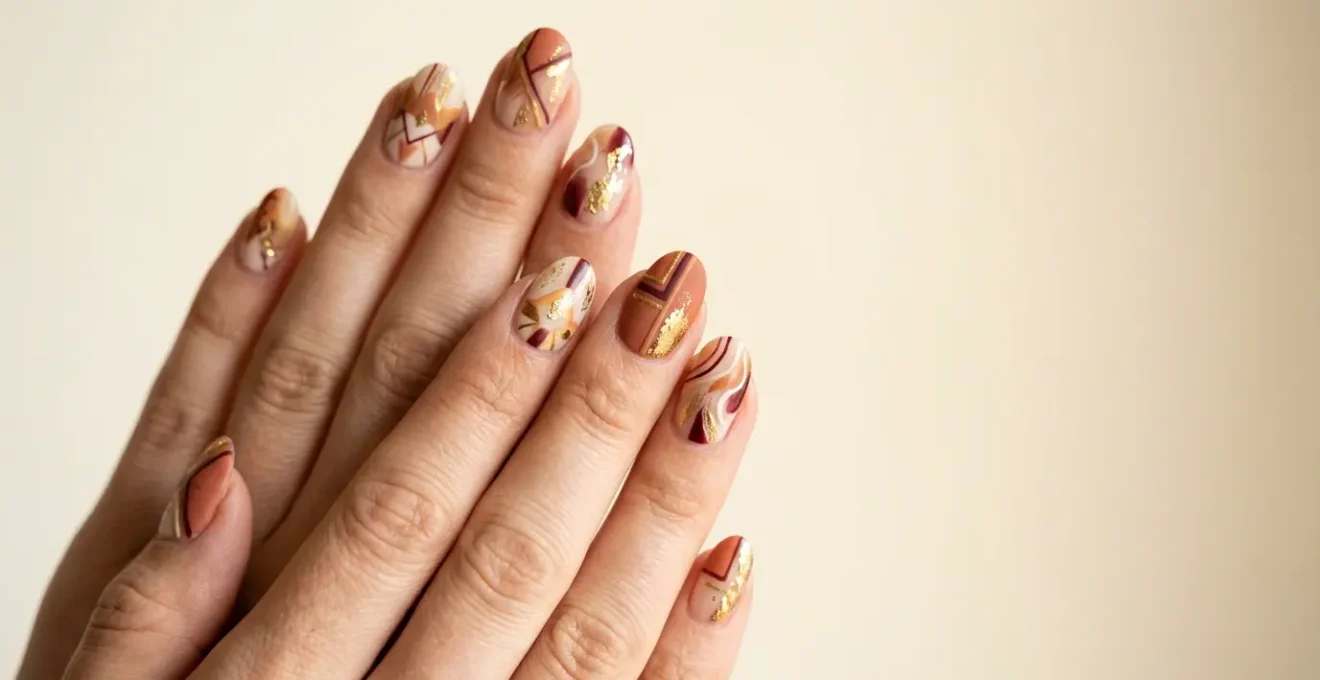
Using a Limited Palette to Unify Different Patterns
The single most important rule in maximalist curation is this: color is your anchor. A chaotic mix of patterns can instantly feel intentional and sophisticated if they all draw from the same disciplined color story. Before you even think about prints, you must act as a curator and define your palette. This framework provides the « visual DNA » that will tie every nail together, allowing you the freedom to explore wildly different motifs without the result looking accidental. Instead of randomly picking colors you like, commit to a professional color harmony scheme.
Thinking in terms of established schemes elevates your process from guessing to designing. For instance, an analogous palette—using colors that sit next to each other on the color wheel, like blue, blue-green, and green—creates an intrinsically serene and cohesive look, no matter how complex the patterns are. A triadic scheme, which uses three evenly spaced colors, offers high contrast but with guaranteed balance. These are not restrictive rules but professional tools for achieving compositional harmony.
Your chosen palette acts as the foundation for your entire « ten-piece collection. » Even with different prints on each finger—stripes, dots, florals, and abstracts—the shared color language ensures they speak to each other. As detailed in professional color harmony guides, you can build a sophisticated look with just a few well-chosen hues.
- Analogous Elegance: Choose 2-4 colors directly next to each other on the wheel for a refined, cohesive look.
- Analogous + 1 Accent: Use three adjacent colors plus one complementary accent for sophisticated harmony.
- Split-Complementary Scheme: Select a base color and the two colors adjacent to its complement for vibrant yet balanced designs.
- Triadic Harmony: Select three colors equally spaced on the wheel for a perfectly balanced and dynamic look.
- Consider Temperature Matching: Use all warm tones (reds, oranges) or all cool tones (blues, purples) for natural cohesion.
The « Breathing Room »: Where to Leave Bare Space in Maximalism?
In a « more is more » aesthetic, the most powerful element can often be nothing at all. Negative space, or « breathing room, » is not an empty area; it is a deliberate and active component of your design. For a DIYer whose attempts at maximalism end in chaos, the uncontrolled application of pattern across the entire nail surface is often the primary culprit. By strategically leaving parts of the nail bare, you create visual relief, define shapes, and guide the viewer’s eye. This makes the composition feel intentional and curated, rather than overwhelming.
Think of it like hanging art in a gallery. You wouldn’t cram paintings edge-to-edge on a wall. The space around each piece is what allows it to be seen and appreciated. The same principle applies to your nails. Professional artists often use compositional techniques like the ‘Rule of Thirds’ to create dynamic balance. By placing focal points along invisible grid lines, they ensure the negative space feels purposeful. This technique can make a simple half-moon at the cuticle or a diagonal slash of bare nail look incredibly chic and professional.
Incorporating this breathing room is a practical skill. By using tape or stencils, you can create crisp, clean lines that frame your patterns and make the negative space an integral part of the art itself. According to guides on creating negative space nail art, the key is careful preparation and execution.
- Prepare nails with a clear or neutral base coat and let it dry completely.
- Use striping tape or stencils to mark off areas you want to keep bare.
- Apply your chosen polish over the taped areas with minimal product to avoid bleeding.
- Carefully remove tape or stencils while the polish is still wet to reveal clean lines.
- Frame negative space as an intentional design element—use diagonal voids, half-moon shapes, or vertical bare strips.
- Seal the entire design with a top coat to protect and add shine.
Matte vs. Glossy: Using Finish to Separate Elements
Beyond color and space, texture is the third pillar of successful maximalist curation. Varying the finish of your polish is a sophisticated, low-effort way to create separation and depth between different patterns, even when they are placed right next to each other. A single nail can feature both a matte and a glossy element, creating a subtle textural hierarchy that adds immense visual interest without adding any physical bulk. This technique allows you to layer « more » without making the design feel flat or messy.
The principle is based on light interaction. As formulation guides explain that matte finishes absorb light rather than reflecting it, they create a soft, velvety effect that makes them recede visually. Glossy finishes do the opposite, reflecting light and « popping » forward. You can use this contrast to your advantage. For example, a matte floral pattern with glossy « dew drops » on the petals instantly creates a 3D effect. Or, a nail with alternating matte and glossy stripes feels far more dynamic than a single-finish design.
This « selective shine » method is a secret weapon for adding a layer of complexity that feels expensive and intentional. It’s about controlling where the eye is drawn. By making a key part of your pattern glossy against a matte background, you’re telling the viewer, « Look here. » This is visual curation at its most granular level. The process is straightforward and relies on a good matte top coat and a fine brush for precision.
- Paint your nails with your base color and apply a matte top coat over the entire nail.
- Allow the matte finish to dry completely.
- Use a fine liner brush or dotting tool to apply glossy top coat only to specific design elements you want to highlight.
- For drip effects, place dots of glossy top coat and connect them to the tip in a squiggly pattern.
- For accent details, apply glossy top coat precisely to flower petals or geometric shapes to make them pop.
- Once dry, the contrast creates a dimensional effect without adding bulk.
Should Every Finger Be Different or Should One Stand Out?
The « accent nail » is the entry point for most people trying mixed-pattern manicures, but it represents a fundamental misunderstanding of maximalism. The goal isn’t to have nine simple nails and one « party » nail; it’s to create a cohesive ten-piece collection. This is where the « Family of Nails » principle comes into play. Instead of thinking in a binary of « all the same » versus « one different, » a curated maximalist set treats each nail as a unique member of the same family. They don’t have to match, but they have to relate.
As luxury manicurist Iram Shelton notes, the trend is moving decisively away from quiet uniformity toward bolder self-expression.
I feel like we’re slowly moving away from the clean girl/quiet luxury trends and most people are taking on more of a maximalist approach when it comes to fashion/style.
– Iram Shelton, OPI 2024 Nail Trends Interview
This shift requires a more sophisticated approach than the simple accent nail. The « Family of Nails » concept provides a framework for achieving this. Each nail can feature a different pattern, technique, or even a 3D element, but they are all unified by a shared set of « genes »—most often, the strict color palette you established first. This allows for incredible variety while ensuring the final look is harmonious.
Case Study: The « Family of Nails » Principle in Maximalist Design
Professional nail artists demonstrate the « Family of Nails » concept where each nail is unique yet shares common DNA elements. In maximalist summer 2025 designs, artists created sets where nails featured different techniques—3D gel overlays, blooming gel, chrome, hand-painted florals—but unified them through a consistent tropical color palette and a recurring motif (like a palm leaf or hibiscus flower appearing in different scales across the nails). This approach moves beyond the binary of ‘all different’ versus ‘one accent nail,’ creating a cohesive visual rhythm where the hand reads as an intentional collection rather than random designs.
Testing for Snags: Ensuring Maximalist Art Is Smooth
A maximalist manicure is a tactile experience, not just a visual one. The ultimate mark of a poorly executed design, especially for a DIYer, is a surface that snags on clothing, hair, or fabric. A visually stunning creation is worthless if it’s impractical to wear. Ensuring a perfectly smooth, glass-like finish is a non-negotiable step in the curation process. This is particularly crucial with the rise of complex, textured designs; as trend analyses for 2024 show that 3D textured art featuring pearls and raised sculpting is a leading style.
Before you consider your manicure complete, you must conduct a functional audit. The goal is to identify and eliminate any raised edges from decals, foils, glitter, or 3D embellishments. A rough surface not only feels unpleasant and causes damage to clothing but also signals an amateur finish. A professional-grade manicure is sealed and encapsulated, creating a durable and flawlessly smooth surface. Fortunately, testing for and fixing these imperfections is a straightforward process.
This final quality-control step transforms your art from a fragile experiment into a durable, wearable masterpiece. It’s the difference between a manicure that lasts a day and one that lasts for weeks.
Action Plan: The Pre-Wear Snag Test
- Cotton Ball Test: Gently swipe a cotton ball over the finished nail surface. If it catches any fibers, it reveals rough spots that require another layer of top coat.
- Fine Knit Test: Run a piece of fine-knit fabric, like a stocking or tights, over the nails. Any snagging immediately pinpoints a raised edge that needs to be smoothed.
- Diagnose the Source: Determine if the snag is from a raised decal edge or a lumpy texture from glitter particles. This dictates your fixing strategy.
- Smooth Raised Edges: For decals or foils, use a fine liner brush to apply builder gel or a thick top coat around the perimeter, creating a smooth « ramp » from the nail to the embellishment.
- Encapsulate the Design: For lumpy textures or 3D art, fully encase all elements with a thicker viscosity builder gel to create a glass-like, durable, and completely smooth finish.
Gold or Silver: How to Match Your Hardware to Your Nail Art?
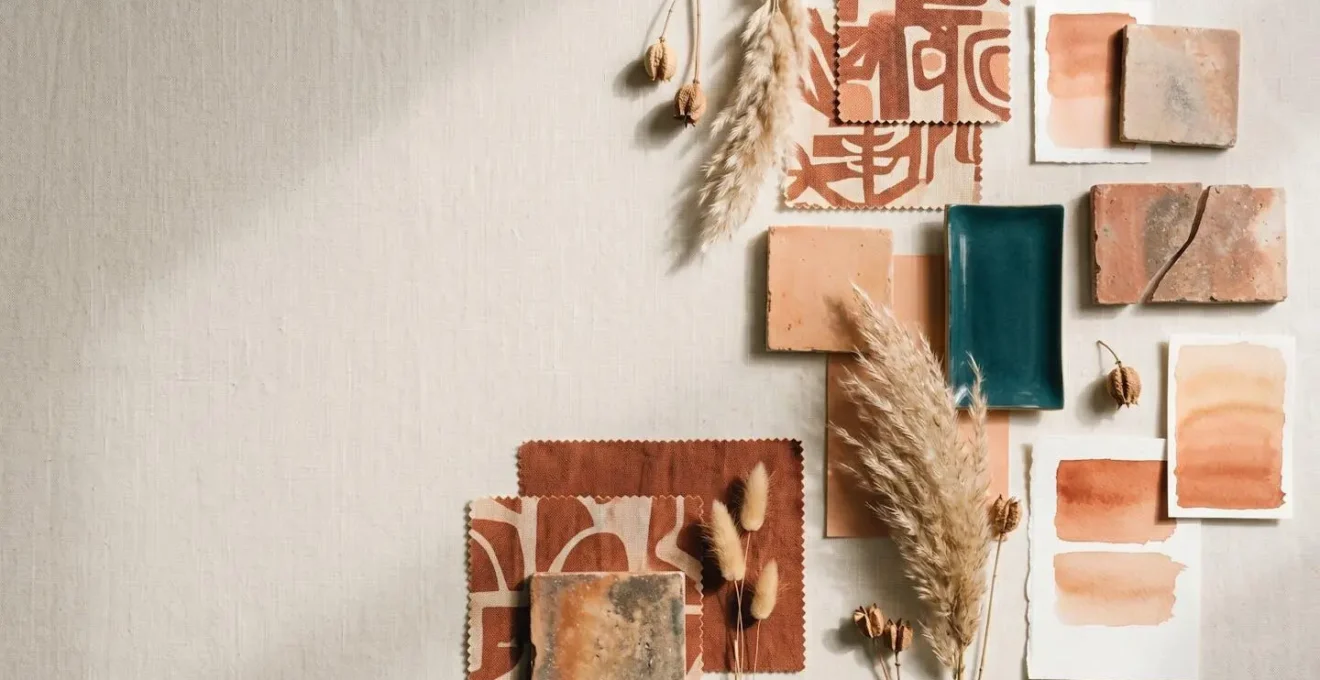
In maximalist design, metallic hardware—studs, charms, foils, and chains—is not just an afterthought; it’s a powerful unifying element. When your « Family of Nails » features a riot of different colors and patterns, a consistent choice of metal can be the very thing that pulls the entire collection together. However, the choice between gold and silver isn’t arbitrary. It should be a deliberate decision based on the temperature of your color palette to ensure compositional harmony.
The rule of thumb is simple and rooted in classic color theory: warm colors call for warm metals, and cool colors call for cool metals. A manicure built on a palette of fiery reds, oranges, and warm earthy tones will feel most cohesive with gold, rose gold, or copper hardware. These metals share the same energetic, sunny undertones. Conversely, a set featuring blues, purples, and cool-toned greens or pinks will be beautifully complemented by the crisp, clean finish of silver, platinum, or gunmetal hardware.
This principle extends beyond just color matching. The finish of your hardware should also align with the finish of your manicure. High-shine chrome studs pair best with a glossy top coat, while brushed or matte black hardware integrates seamlessly into a matte design. By treating your hardware as a strategic « bridging element, » you add another layer of intentionality to your curation, reinforcing the idea that every choice is part of a larger, unified vision.
- Identify Your Palette Temperature: Warm tones include reds, oranges, yellows; cool tones include blues, greens, purples.
- For Warm Palettes: Choose gold, rose gold, or copper hardware to complement the energy.
- For Cool Palettes: Select silver, gunmetal, or platinum hardware for a calming alignment.
- Use Hardware to Bridge: A consistent metal choice can unify completely different patterns and colors across all ten nails.
- Match Finish to Finish: Pair shiny chrome with glossy top coats, and matte studs with matte finishes for seamless integration.
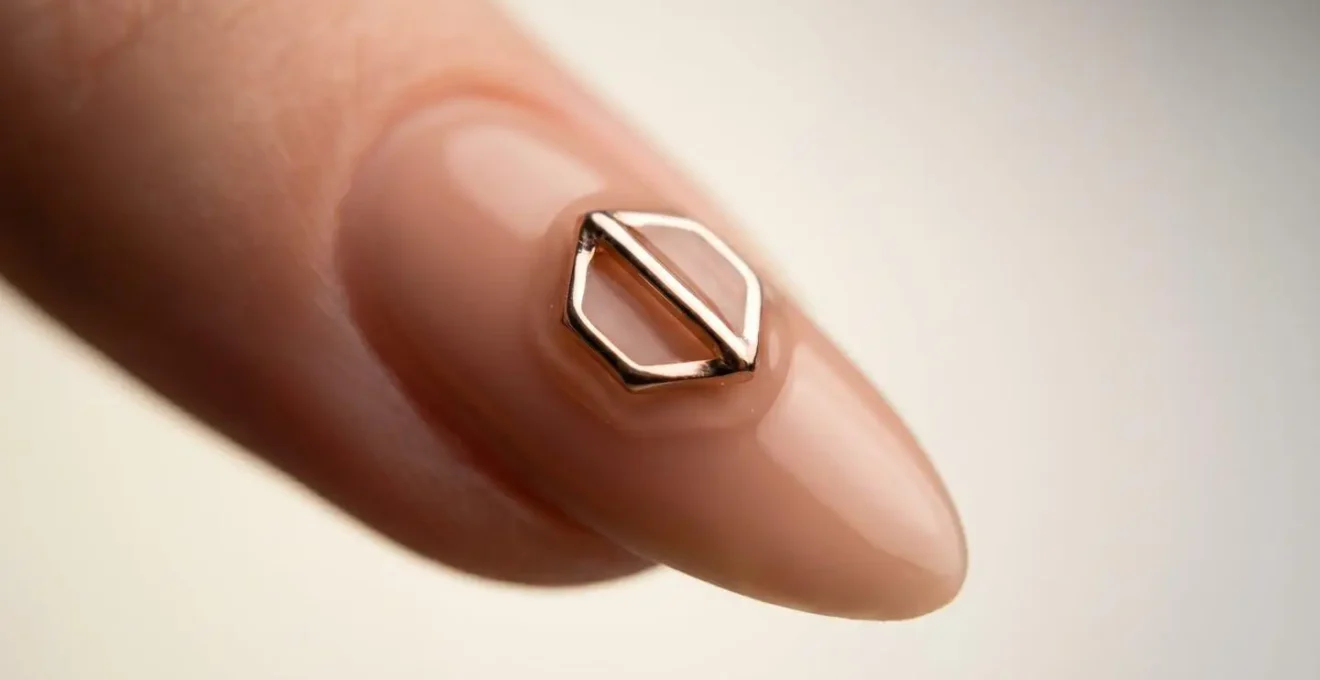
The « Caulking » Method: How to Seal Edges Around 3D Art?
Adding 3D charms and embellishments is a cornerstone of maximalist nail art, but nothing screams « DIY » more than a charm that looks stuck on top of the nail, with visible gaps around its edges. The professional solution is the « caulking » method, a technique that seamlessly integrates the 3D element into the nail structure, making it look like it’s emerging from the polish rather than sitting on it. This not only creates a flawless, high-end aesthetic but also drastically improves the durability of the charm, preventing it from catching or popping off.
The method involves using a thick, self-leveling builder gel to build a smooth, invisible « ramp » from the nail surface up to the edge of the charm. This process, much like applying caulk in a bathroom, fills any gaps and creates a perfect seal. For larger or more curved charms, a pro tip is to gently file the underside of the charm itself to better match the nail’s natural C-curve, minimizing the gap you need to fill. This meticulous attention to detail is what defines a curated, professional finish.
This technique requires the right products—specifically, a jewel glue for initial adhesion and a thicker builder gel for the caulking itself. The process involves flash-curing to set the charm in place before meticulously applying the builder gel with a fine liner brush. The result is a rock-solid, fully integrated piece of art that is both beautiful and built to last.
- Product Selection: Use jewel glue for initial adhesion, followed by a thicker self-leveling builder gel for caulking.
- Pre-filing for Flush Fit: For large charms, gently file the bottom to match the nail’s curve, reducing the gap.
- Initial Adhesion: Apply jewel glue to the charm and position it on the nail. Flash cure for 10-15 seconds to set it in place.
- The « Caulking » Step: Use a fine liner brush to apply builder gel around the charm’s edges, creating a smooth ramp.
- Final Cure: Fully cure under an LED lamp to ensure a rock-solid bond, then apply a final top coat for a glass-like finish.
Key takeaways
- Curate with a strict color palette: This is the non-negotiable foundation that unifies all patterns.
- Use negative space and varied textures (matte/glossy) to create clarity, depth, and visual hierarchy.
- Treat your nails as a « Family, » not individuals. Each can be unique, but they must share a common design DNA.
How to Wear 2-Inch Stilettos Without Losing Daily Functionality?
Your maximalist creation is complete—a ten-piece collection of perfectly curated art. But now comes the final test: living with it. Long, dramatic nail shapes like the stiletto are an integral part of the maximalist aesthetic. As luxury manicurist Iram Shelton explains, « Longer nails are huge at the moment because they not only are a statement piece but can also make fingers appear slender and more feminine. » However, their functionality in daily life can be a challenge. The key is not to avoid long nails, but to strategically adapt your behavior and the art placement itself.
First, ensure the nail has proper structural integrity. A well-built acrylic or hard gel nail with a strong apex (the highest, thickest point) is crucial. This point absorbs pressure and prevents the kind of catastrophic breaks that plague poorly structured enhancements. Second, you must re-learn simple tasks. Pressing buttons on an elevator or phone screen should be done with the side of your finger or your knuckle, not the tip of the nail. This small behavioral shift is the most important habit to adopt.
Finally, be strategic about where you place your most complex art. Bulky 3D charms or highly textured designs are best placed on the ring finger or thumb of your non-dominant hand, as these fingers are used less frequently for precise tasks. By combining a strong nail foundation with smart art placement and minor adjustments to your daily movements, you can enjoy the full dramatic effect of long stiletto nails without sacrificing functionality.
- Strategic Art Placement: Place the most complex or bulky art on the ring finger and thumb of your non-dominant hand.
- Build a Proper Apex: Ensure your technician creates a strong apex to absorb pressure and prevent breakage.
- Relearn Everyday Tasks: Use the side of your index finger or your knuckles, not the tip, to press buttons and type.
- Use Tools: Keep a coin or a dedicated tool handy for tasks like opening soda cans.
- Choose the Right Material: Request a hard gel or acrylic foundation for structural integrity on long stilettos.
Now, stop randomly picking patterns and start curating your next nail masterpiece. Your hands are a gallery—treat them as such by applying these principles of composition, color, and texture for a look that is intentionally bold, not accidentally chaotic.