Your holographic nail art fails in photos not because of your camera, but because you’re fighting the laws of physics—and losing.
- Linear holographic effects are diffraction gratings that require a full-spectrum, point-source light (like the sun) to create a rainbow.
- Scattered holo contains larger, randomly oriented flakes that create a diamond-like sparkle even in diffuse, indoor lighting.
Recommendation: For content creators shooting indoors, prioritize scattered holographic polishes for reliable sparkle, or learn to manipulate point-source lighting (like a phone flashlight) to activate the rainbow in linear polishes.
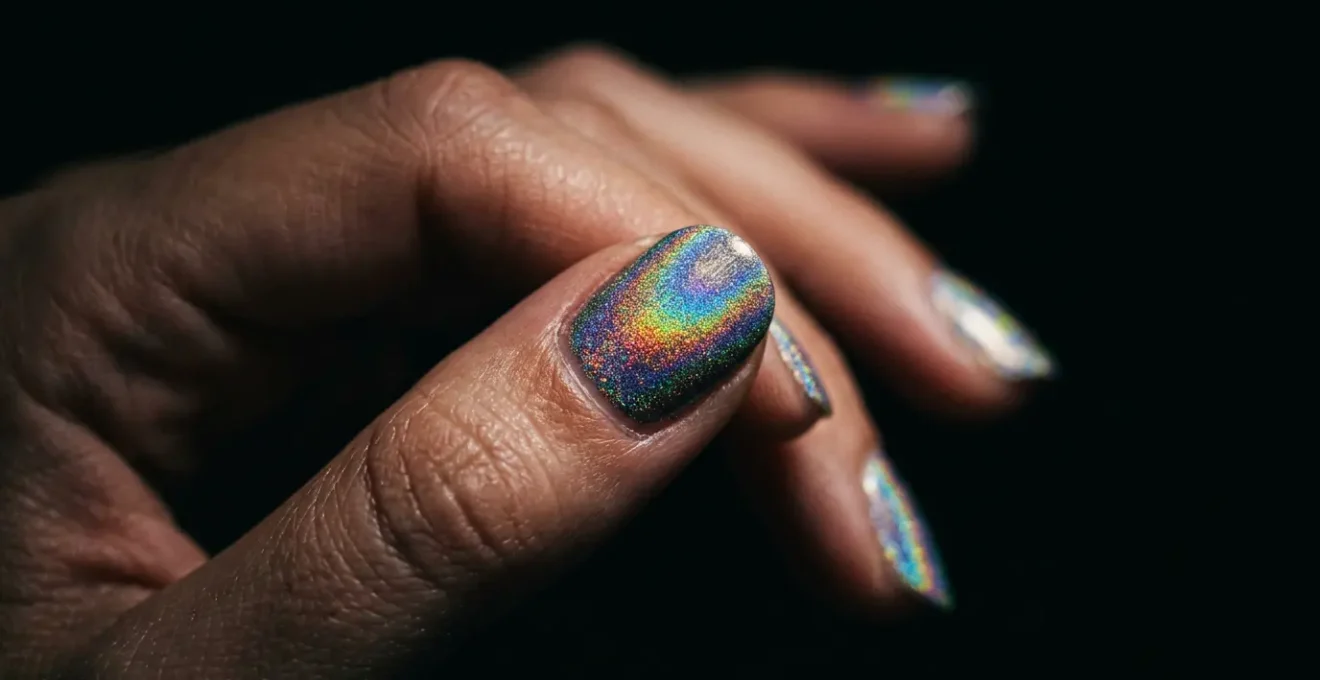
It’s the content creator’s most soul-crushing moment: you’ve spent hours crafting the perfect, fiery linear holographic manicure. Under your lamp, it’s a blazing river of rainbows. But the second you snap a picture, the magic vanishes. What was once a vibrant spectrum is now a flat, disappointing grey smudge. You’ve probably heard the usual advice: « use a black base, » or « you just need direct sunlight. » While not wrong, this advice barely scratches the surface of a fascinating and controllable phenomenon.
The truth is, achieving a photogenic holographic effect has less to do with nail polish application and more to do with applied physics. You are not just painting your nails; you are engineering a microscopic surface designed to manipulate light. Every choice—from the base color to the burnishing technique to the top coat formula—is a variable in an equation of light reflection, refraction, and absorption. Understanding this science is the key to moving from frustrating, accidental results to consistent, dazzling effects that leap off the screen.
This guide will deconstruct the process, not as a series of steps, but as a lesson in light control. We’ll explore how base colors act as light sponges, how burnishing creates a perfect mirror, and why the wrong top coat can instantly shatter the illusion. By the end, you’ll stop blaming your camera and start commanding the light itself.
To navigate this deep dive into the science of shine, the following guide breaks down each critical component. From the foundational choice of base color to the final, protective seal, each section reveals the physical principles you can leverage for stunning, predictable results.
Summary: Linear vs. Scattered Holo: Which Photographs Better in Low Light?
- Black vs. White Base: How It Changes the Holographic Depth?
- Burnishing Holo Powder: How to Get the Mirror Finish Without Grain?
- Why Does Top Coat Sometimes Kill the Holo Effect?
- Educating Clients: Why Holo Disappears in Fluorescent Office Light?
- How to Sponge Holo Polish Without Losing the Rainbow?
- How to Seal Chrome Powder so It Doesn’t Chip or Lose Its Mirror Effect?
- Why Do Air Bubbles Ruin Your Clear Cap and How to Avoid Them?
- How to Keep Cat-Eye Lines Sharp While Curing Multiple Fingers?
Black vs. White Base: How It Changes the Holographic Depth?
The choice between a black or white base is the first and most critical decision in controlling the journey of light. It’s not about aesthetics; it’s about physics. A black base acts as a light void, absorbing stray wavelengths and maximizing contrast. When full-spectrum light hits the holographic particles on a black background, the only light that reflects to your eye is the pure, diffracted rainbow. This is why a black base creates an intense holographic « flame » effect, as it absorbs all ambient light that isn’t part of the prismatic fire. The result is a deep, vibrant, and seemingly floating rainbow with unparalleled intensity, a principle used widely according to professional formulations.
A white base, conversely, does the opposite. It is a highly reflective surface. When light passes through the holographic layer and hits the white base, it reflects a significant portion of that ambient light back up through the particles. This « light pollution » from below washes out the holographic effect, resulting in a softer, more ethereal and angelic rainbow. This is not necessarily a bad thing; for certain photography styles, this diffuse reflection can be desirable, creating a gentle shimmer rather than a sharp flame.
Beyond black and white, other bases offer unique optical properties:
- Deep Jewel Tones (Sapphire, Emerald): These function similarly to black, absorbing most light but adding a hint of their own color to the final effect.
- Silver Base: Provides a metallic, high-shine foundation but can compete with the holo effect, making it look more like a scattered sparkle than a linear rainbow.
- Sheer Jelly Polishes: Used in the « jelly sandwich » technique over a silver holo base, these create a suspended particle effect, giving the illusion of holographic flakes floating in colored glass.
Ultimately, the base color is your background canvas. Choose black for pure, high-contrast drama. Choose white for a softer, angelic glow. Your base is not just a color; it’s your primary tool for managing light reflectance.
Burnishing Holo Powder: How to Get the Mirror Finish Without Grain?
Getting a mirror-like finish from a holographic or chrome powder isn’t about rubbing it in; it’s about microscopic engineering. The goal is to transform a pile of individual, light-scattering particles into a single, perfectly smooth, light-reflecting sheet. This is the difference between diffuse reflection (a grainy, dull finish) and specular reflection (a perfect mirror). The key is a technique called calendering—applying pressure to compress the flakes flat and parallel to the nail surface.
The process starts with the right tool. High-porosity sponge applicators are the enemy; they pick up and redistribute particles unevenly, creating a grainy texture. A zero-porosity silicone tool or a gloved finger is ideal. These surfaces don’t absorb product and allow you to apply firm, even pressure. The « tackiness window » of your no-wipe top coat is also critical. If it’s too wet, the powder will clump into a gooey mess. If it’s too dry, it won’t adhere at all. The perfect surface feels like the sticky side of a piece of tape—it has grip but doesn’t transfer wetness.
The burnishing motion itself should be firm, fast, and light. Think of polishing a jewel, not scrubbing a pot. You are compressing the flakes into a seamless metallic layer, forcing them to lie flat and interlock. Any texture, scratch, or imperfection in the base layer beneath will telegraph through to the final finish, so ensuring a perfectly smooth foundation is non-negotiable.
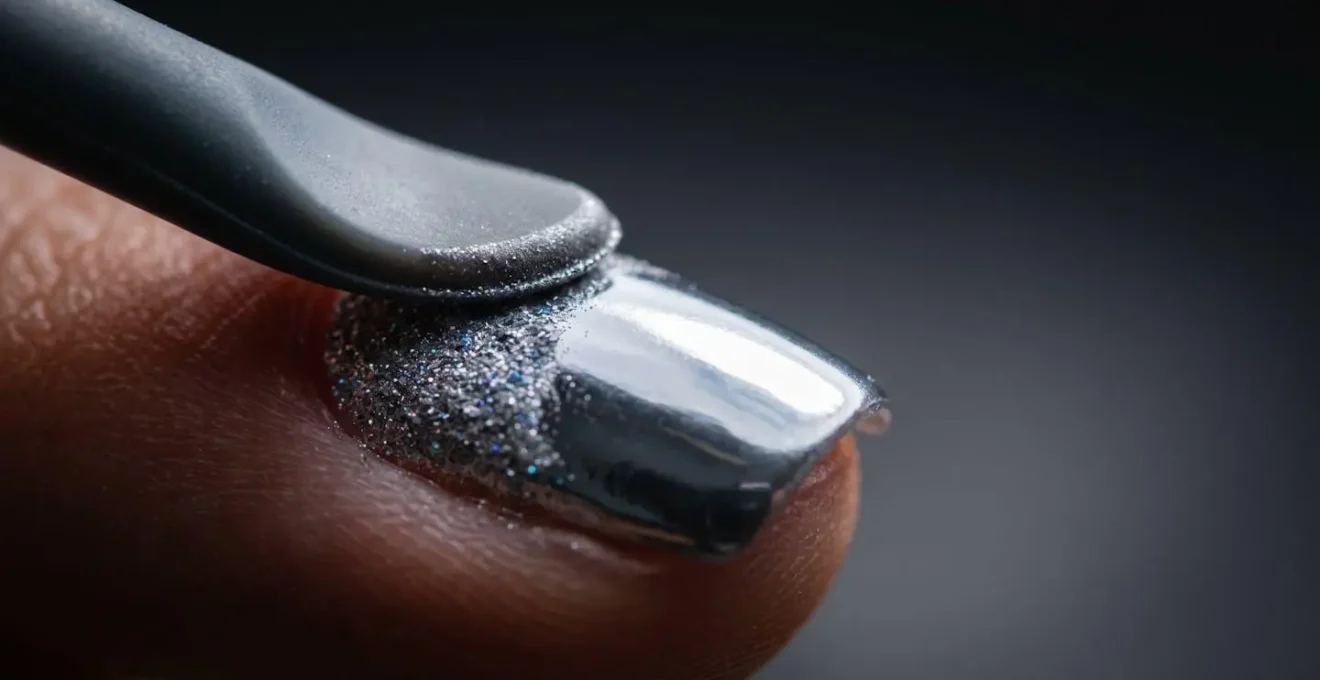
As the illustration shows, this process is a physical transformation. The pressure from the tool flattens the loose, chaotic particles into a unified, reflective surface. Once this mirror is achieved, it’s crucial to use a soft brush to gently sweep away all loose, unburnished particles before sealing. This prevents stray grains from contaminating your perfect mirror and ensures the final top coat has a clean surface to bond to, preserving the flawless specular reflection you worked so hard to create.
Why Does Top Coat Sometimes Kill the Holo Effect?
You’ve achieved the perfect holographic flame, but the moment you apply the top coat, the rainbow vanishes, leaving a dull, metallic silver. This devastating phenomenon is a result of chemistry and optics. The issue isn’t the top coat itself, but the aggressive solvents within it. Many standard top coats are formulated to slightly melt the underlying polish layer to create a strong, unified bond. This is great for longevity, but catastrophic for holographic particles.
Holographic effects depend on the microscopic, perfectly aligned grooves of the particles acting as a diffraction grating. When a top coat is applied, its solvents can wreak havoc. According to polish chemistry formulations, strong solvents like acetone, butyl acetate, or ethyl acetate can partially dissolve and re-flow the delicate, compacted layer of holo particles. This causes their perfect alignment to be disturbed, effectively destroying the diffraction grating. Light can no longer be split into a rainbow, and the effect is « killed. »
Protecting the fragile particle alignment from these solvents is paramount. Pros use several techniques:
- The « Floating » Technique: This is the most crucial skill. Instead of painting, you load the brush with a generous bead of top coat and « float » it over the nail surface. The goal is to let the top coat flow and self-level with minimal to no contact from the bristles, which would otherwise drag and misalign the particles.
- The Sacrificial Layer Method: This involves applying a « barrier » coat first. A thin layer of a water-based top coat or a gel base coat is applied and cured over the holo powder. This sacrificial layer seals and protects the particles, creating a shield against the aggressive solvents of the final, structural top coat.
- Use a Flexible Base Seal: For chrome and holo powders, applying a rigid top coat directly can cause micro-shattering and chipping. Using a flexible rubber base gel as the first sealing layer provides a cushion that absorbs impacts, preventing the rigid holo layer from cracking.
With UV/LED cured powders, the old myth of « waiting for it to dry » is irrelevant. Success is not about time; it is about the right product chemistry and the physical application technique. Protecting that microscopic alignment is the only thing that matters.
Educating Clients: Why Holo Disappears in Fluorescent Office Light?
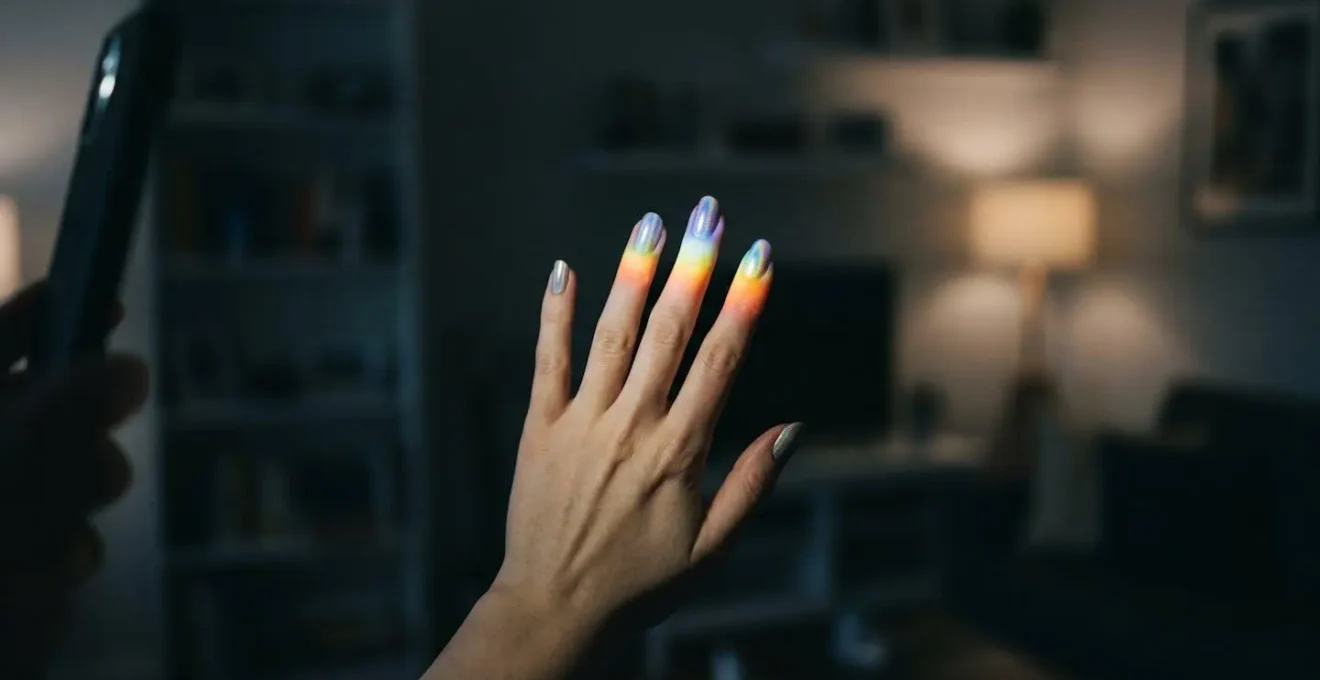
The most common client complaint about linear holographic nails is that the « rainbow disappears » indoors, especially at the office. This isn’t a product flaw; it’s a fundamental principle of light. Explaining this concept simply and visually is key to managing client expectations and demonstrating your expertise. The easiest analogy is that of a prism.
Linear holo is like a prism. It needs a full-spectrum light source like the sun to create a rainbow. Office light is incomplete light—it’s missing some colors, so the prism has nothing to split.
– Professional Nail Education, Client Education Scripts for Light-Reactive Nail Art
A linear holographic polish is a diffraction grating. It works by taking in white light (which contains all colors) and splitting it into its component wavelengths, creating a rainbow. The sun, a halogen bulb, or the LED on a smartphone are point-sources of full-spectrum light. They provide all the colors necessary for the holo to perform its magic. Fluorescent office lights, however, are a poor light source. They emit a very limited, or « incomplete, » spectrum, often with strong peaks in green and yellow and very little in the red and blue ends. If the light source doesn’t contain all the colors to begin with, the holographic prism has nothing to split, and the effect defaults to its base appearance: a dull, metallic silver.
This is where scattered holographic polish becomes the hero of the office environment. Instead of tiny, perfectly aligned particles creating a linear rainbow, scattered holo uses larger, randomly oriented flakes that act like tiny diamonds. They don’t need to split light into a spectrum; they simply reflect whatever light is available, creating a brilliant, twinkling sparkle even in diffuse or poor lighting conditions.
This table helps to recommend the right product for the client’s lifestyle:
| Holo Type | Light Requirement | Indoor Appearance | Best For |
|---|---|---|---|
| Linear Holographic | Full-spectrum direct light (sun, halogen) | Dull silver/metallic, minimal rainbow | Outdoor events, beach vacations, photography sessions |
| Scattered Holographic | Works in diffuse/ambient light | Diamond-like sparkle, visible shimmer | Office environments, 9-to-5 jobs, indoor settings |
For clients who love their linear holo but work in an office, there’s a simple, empowering trick: teach them to use their phone’s flashlight. By using it as a direct, point-source light, they can activate the rainbow on demand, showing off their manicure’s true potential anytime, anywhere.
Educating your client empowers them and reinforces your position as an expert. When they understand the « why » behind their nail art’s behavior, frustration turns into fascination. They’re no longer a passive wearer, but an active participant in a daily light show.
How to Sponge Holo Polish Without Losing the Rainbow?
Creating a holographic gradient with a sponge is a high-risk, high-reward technique that often ends in a dull, glittery mess. The reason for failure lies in the physics of the sponge and the polish itself. The primary enemy is the « thirsty sponge » problem. A dry makeup sponge is highly absorbent; when you apply holographic polish to it, the sponge immediately soaks up the clear suspension base, leaving behind a concentrated, disorganized sludge of holo particles. When you dab this onto the nail, you’re applying misaligned pigment, which kills the rainbow effect.
The solution is to prime the sponge. Before applying any holo polish, saturate the area of the sponge you’ll be using with a clear top coat. This clogs the pores of the sponge, preventing it from absorbing the suspension base of the holographic polish. Now, when you apply the holo polish to the primed area, the sponge will transfer the polish as a whole—particles and base together—rather than just the pigment. This preserves the delicate suspension that keeps the particles ready to align.
Application technique is the second critical factor. The motion must be a gentle, vertical dabbing motion only. Any wiping, rolling, or dragging motion will shear the holographic particles against the nail surface, forcing them out of alignment and destroying the rainbow. Light, repeated dabs build the gradient smoothly, depositing even layers of polish while allowing the particles to settle into their proper orientation. The pressure should be just enough to transfer the polish, not to squish the sponge into the nail.
For more complex or sharp-edged gradients, a far superior method is to use liquid latex barriers. By painting liquid latex on the skin around the nail and on the nail itself to mask off areas, you can create incredibly sharp multi-color holographic designs. This method offers a level of control and precision that freehand sponging can never achieve, turning a simple gradient into a true piece of optical art.
How to Seal Chrome Powder so It Doesn’t Chip or Lose Its Mirror Effect?
Chrome and holographic powders are notoriously prone to chipping, and the reason is a failure of adhesion at the microscopic level. The ultra-smooth, mirror-like surface you create is so non-porous that traditional top coats have nothing to grip onto. The problem is most acute at the free edge, where impacts are common. In fact, professional nail technicians report that 90% of chrome chipping starts right at the tip. Sealing it for longevity requires a multi-step system that creates both a chemical and mechanical bond.
The foundation of this system is preparation. Before sealing, you must create a surface the gel can adhere to. Gently file the free edge and sides with a 240-grit file to break the smooth chrome surface and create a rough texture for the gel to « bite » into. It is also critical to ensure a completely dehydrated and oil-free nail plate by using a dedicated dehydrator product and avoiding all skin contact. Microscopic oils are a primary cause of seal failure and lifting.
A robust sealing strategy involves decoupling the two primary functions of a top coat: adhesion and durability. Instead of one coat, use two different ones. First, a thin layer of a flexible top coat (like a rubber base) is applied. Its flexibility allows it to bond to the chrome and absorb minor impacts without cracking. This is your adhesion layer. Second, after curing the flexible layer, a harder, scratch-resistant top coat is applied for everyday wear and tear. This is your durability layer. This two top coat system is the cornerstone of a long-lasting chrome manicure.
Checklist: The Ultimate Chrome Longevity Sealing System
- Pre-Seal the Free Edge: After burnishing chrome, gently etch only the free edge with a fine-grit file. Apply a bonder or primer exclusively to this etched edge to create a powerful chemical anchor before any top coat is applied.
- Ensure Complete Dehydration: Use a dedicated nail dehydrator product across the entire nail, avoiding skin contact. Do not rely on just an alcohol wipe, as it doesn’t remove oils as effectively.
- File for Mechanical Grip: After dehydration, gently file the free edge and side walls with a 240-grit buffer. This roughs up the smooth chrome, giving the subsequent gel layers a physical surface to grip onto.
- Apply a Flexible Foundation: Use a rubber base coat as the first sealing layer over the chrome. Its flexibility absorbs impact and prevents the rigid chrome from cracking, which is a common point of failure.
- Deploy the Two Top Coat System: After curing the flexible base, apply your final hard, scratch-resistant top coat. This second layer provides the durable, high-gloss finish, while the first layer ensures adhesion.
Why Do Air Bubbles Ruin Your Clear Cap and How to Avoid Them?
Air bubbles are the nemesis of a flawless clear encapsulation. They are not just aesthetic flaws; they are structural weaknesses that can compromise the integrity of the nail. Bubbles are trapped pockets of air, and they form primarily due to two factors: gel viscosity and application technique. Cold gel is thick and has a high viscosity, making it extremely difficult for any introduced air to escape. Warm gel, on the other hand, is thinner and has a lower viscosity, allowing bubbles to rise to the surface and pop on their own.
The first line of defense is temperature control. If your gel is cold, simply warm the bottle in your hands or in a bowl of warm water for a few minutes. This simple step will dramatically lower its viscosity and make it much more forgiving to work with. The second factor is your technique. The common mistake is to « paint » the gel on, using multiple back-and-forth strokes. Every time your brush lifts and re-touches the surface, you are folding air into the gel. Instead, you need to learn to « float » the gel.
Floating involves guiding a large bead of gel and letting it self-level. Place the bead near the cuticle and gently nudge it into place, allowing gravity and surface tension to do the work. The brush should guide the gel, not paint with it. For encapsulating art, a reverse fill technique is often best. Apply a thin slip layer, place your art, then apply the main bead of gel near the cuticle and guide it down toward the tip. This method pushes air out from under the art rather than trapping it underneath.
Even with perfect technique, micro-bubbles can sometimes hide. Before you cure, use a pen light or your phone’s flashlight held at a low angle to the nail. This side-lighting will reveal any hidden bubbles that are invisible under ambient light. If you spot any, you can use a fine-tipped tool, like a needle or a dotting tool, to pop them before the final cure, ensuring a crystal-clear, bubble-free finish.
Key Takeaways
- Holographic success is applied physics: Master light by controlling particle alignment, reflection, and refraction.
- Linear holo is a diffraction grating that demands full-spectrum, point-source light (like the sun or a phone flashlight) to create a rainbow.
- Scattered holo uses larger, reflective flakes to create a diamond-like sparkle that performs well even in diffuse indoor lighting.
How to Keep Cat-Eye Lines Sharp While Curing Multiple Fingers?
The mesmerizing, sharp line of a cat-eye manicure is created by using a magnet to gather metallic particles within the uncured gel polish into a tight, reflective band. The challenge is that these particles are suspended in a liquid; as soon as the magnet is removed, they begin to disperse, and the line softens and blurs. This process, called blooming, happens within seconds. Curing multiple fingers at once seems impossible, as the lines on the first few fingers will have turned to mush by the time you’ve perfected the last.
The professional solution is the flash cure technique. After you create the perfect, razor-sharp line on one finger, don’t move on to the next. Instead, « freeze » the design in place with a 5-10 second flash cure using a pen lamp or by briefly placing the finger in your main lamp. This short burst of UV/LED light is just enough to begin the polymerization process and lock the magnetic particles in their current position, preventing them from dispersing. Once frozen, the line is stable. You can then move to the next finger, create your line, flash cure it, and repeat for the whole hand. A final, full cure for the recommended time is then done for all fingers simultaneously.
For an even sharper and more stable line, advanced technicians use the Opposing Magnet Technique. Instead of one magnet on top, two bar magnets are used on opposite sides of the nail (e.g., top and bottom, or left and right). This creates a more focused magnetic field that pushes the particles into an extremely tight, compressed line. This line is not only sharper but also more stable, giving you a few extra seconds before it starts to bloom. It’s also important to match your magnet’s strength to the gel’s viscosity. A very strong magnet on a thin, low-viscosity gel will create a sharp line that disperses almost instantly, while a weak magnet on a thick gel may not be able to create a sharp line at all. Experimentation is key to finding the perfect combination for your specific products.
One common myth is that you can « fix » a line after curing, but this is impossible. Once the photoinitiators in the gel begin cross-linking during the cure, the particles are permanently locked in place. All magnetic manipulation must happen on wet, uncured gel.
By understanding the interplay of light, chemistry, and physics, you can move beyond frustrating guesswork and begin to intentionally engineer stunning visual effects. Every nail becomes a canvas not just for color, but for the beautiful science of light. To put these principles into practice, the next logical step is to systematically analyze and upgrade your current kit and techniques.