In summary:
- Matte top coats get dirty because their microscopic texture, which creates the non-shiny effect, traps oils and pigments.
- Daily maintenance with a 70%+ isopropyl alcohol wipe is the most effective way to prevent stains and restore the matte finish.
- Proper application technique, including using a « floating » motion and cleansing the nail after curing, is crucial to prevent streaks.
- Yellowing is often caused by over-curing the top coat, not under-curing. Follow the manufacturer’s recommended time precisely.
- A shiny matte nail can usually be restored by deep-cleaning with alcohol or, in stubborn cases, gently re-etching the surface with an ultra-fine buffer.
The allure of a matte manicure is undeniable. It’s sophisticated, modern, and offers a velvety texture that feels as good as it looks. Yet, for anyone who loves this finish, a familiar frustration soon sets in. That perfect, non-reflective surface seems to be a magnet for dirt, foundation smudges, and oils, quickly turning dull or, even worse, developing unwanted shiny patches. You find yourself hiding your hands or constantly wiping them, wondering if the high-maintenance reality is worth the aesthetic.
The common advice is often simplistic: « just be careful » or « use a little alcohol. » While not entirely wrong, this advice misses the fundamental point. It treats the symptom, not the cause. Many believe the key is just finding a better product, but even the most expensive matte top coats can fall victim to staining. The problem isn’t necessarily the product, but our understanding of it.
The real secret to pristine matte nails isn’t just about cleaning; it’s about understanding and managing the unique micro-texture of the surface. This guide reframes the issue: instead of viewing your matte top coat as simple paint, you will learn to treat it as a high-performance, light-diffusing material. By mastering the science behind its properties, you can control its behavior from application to daily care.
We will explore the precise techniques to apply it flawlessly, the daily routines to keep it clean, and the restoration methods to bring it back from the brink. This is your complete manual for maintaining that perfect, velvety finish, ensuring your matte manicure remains as stunning as the day you got it.
Summary: Why Matte Finishes Behave Differently and How to Master Them
- How to Apply Matte Top Coat Without White Streaks?
- Alcohol Wipes: The Daily Cleaning Routine for Light Matte Nails
- Which Matte Top Coat Feels Softest to the Touch?
- Does Matte Top Coat Require Longer Curing to Prevent Yellowing?
- Can You Re-Matte a Nail That Has Become Shiny from Oil?
- Using Buffing Cream or Wax: Is It Necessary for High Shine?
- Creating a « Fabric » Look with Matte and Powder Techniques
- Why Does Your Gel Top Coat Go Dull After 3 Days and How to Fix It?
How to Apply Matte Top Coat Without White Streaks?
White streaks or a cloudy finish are the most common application errors with matte top coats. This issue isn’t random; it’s a result of the very ingredients that create the matte effect. The finish is achieved by adding microscopic matting agents, like silica, into the gel. According to coating chemistry research, these agents are typically added at a 1-3% concentration range. If these particles are not evenly suspended in the gel or are dragged across the nail during application, they clump together, causing visible streaks.
To achieve a perfectly even, streak-free surface, you must adopt a specific application method that prioritizes gentle handling and even distribution. The key is a « floating » technique, where the brush glides over the nail without applying pressure, allowing the gel to self-level and the matting agents to disperse uniformly. This prevents the brush from carving tiny channels in the finish.
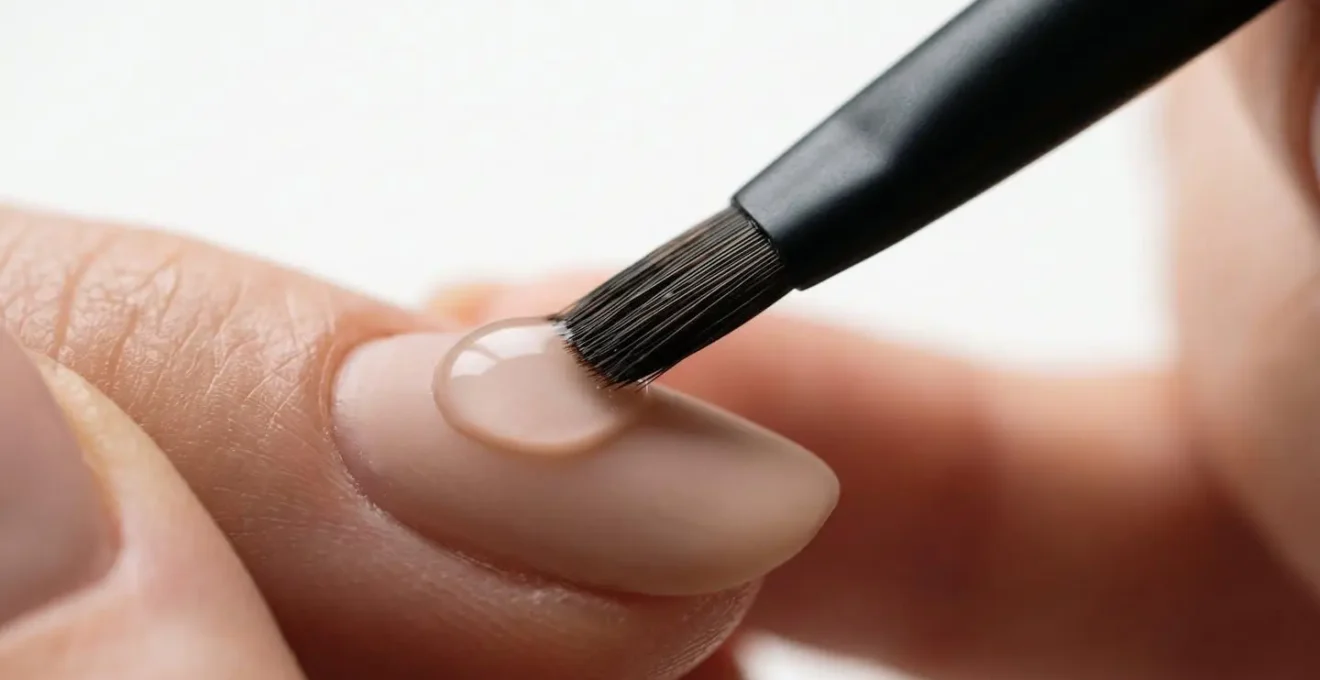
As seen in the technique above, allowing a generous bead of product to do the work is essential. Follow these steps precisely for a flawless result:
- After the color has cured, always remove the dispersion layer (the sticky residue) before applying the matte top coat. This provides a smooth, non-reactive canvas.
- Gently roll the bottle between your palms for 30 seconds. Never shake the bottle, as this creates air bubbles that are difficult to remove. Rolling helps suspend the matting agents evenly.
- Apply an even, generous layer using the « floating » technique. Do not press the brush hard against the nail; let the gel flow off the brush and self-level.
- Extend the product slightly beyond the edge of the color, especially in the cuticle area, to avoid leaving a visible shiny line where the matte coat ends.
- Cure under an LED or UV lamp according to the manufacturer’s recommended time.
- Finally, always degrease the surface with a cleanser or alcohol after curing. This removes the final dispersion film and reveals the true, perfect matte effect.
By treating the application as a delicate, controlled process, you prevent imperfections before they can even form, setting the stage for a long-lasting, beautiful matte finish.
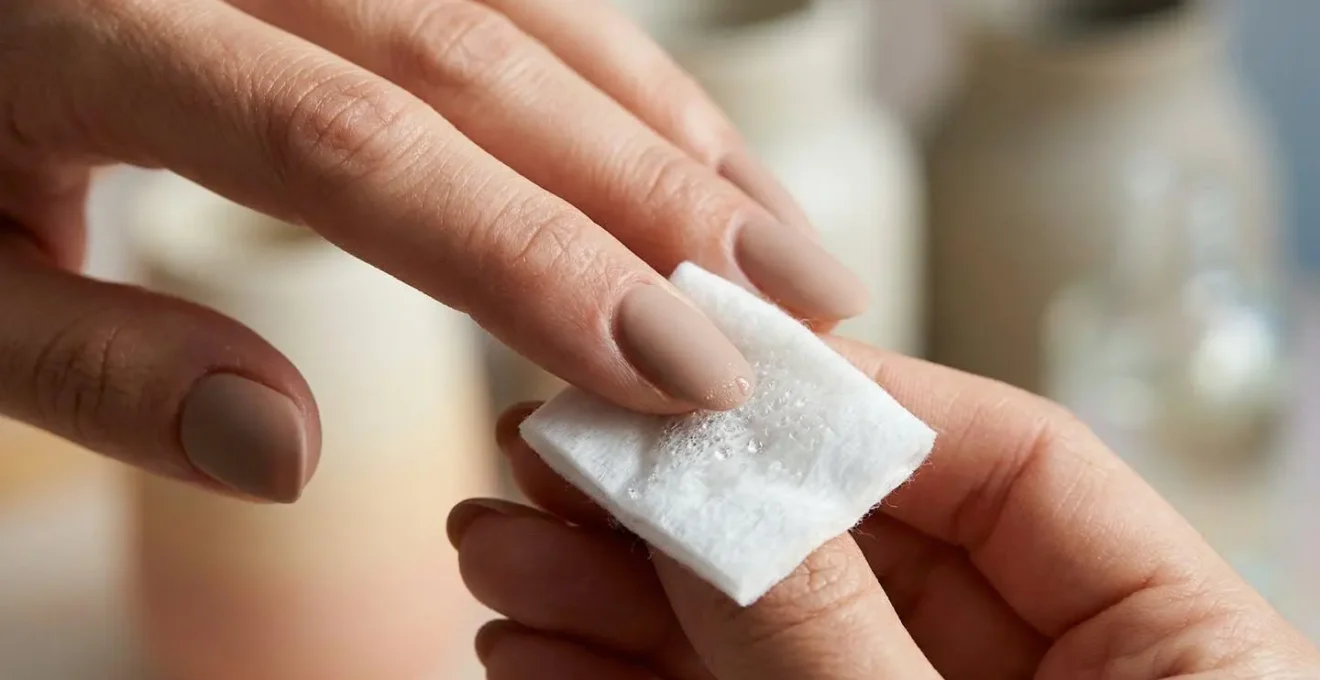
Alcohol Wipes: The Daily Cleaning Routine for Light Matte Nails
A pristine glossy manicure can often be revived with a simple wipe, but a matte manicure that’s been stained by makeup, spices, or denim dye presents a much greater challenge. The reason lies in its fundamental structure. A matte top coat is not a smooth, sealed surface; it is intentionally porous, with a microscopic texture designed to scatter light instead of reflecting it. This texture is what gives it that beautiful, velvety look.
Case Study: The Porosity Problem
A nail cosmetics manufacturer’s two-year testing program confirmed that matte top coats are inherently more porous than their glossy counterparts due to this micro-textured surface. This porosity makes them more delicate and susceptible to staining, especially on light colors. Their research concluded that effective maintenance is similar to dental hygiene: a few seconds of daily cleaning with an alcohol-based cleaner makes a significant difference in preserving the matte effect over a typical four-week wear period, preventing contaminants from deeply embedding in the surface pores.
Because of this porosity, daily cleaning is not just a recommendation; it’s a necessity for preserving light-colored matte nails. The most effective tool for this is an isopropyl alcohol (IPA) wipe. For routine cleaning, you don’t need a harsh, pure concentration. In fact, professional guidelines for cleaning automotive matte finishes, which share the same principles, often recommend a 50% alcohol and 50% deionized water mixture for basic surface cleanup. For nail care, a standard 70% IPA wipe is perfect for dissolving and lifting away fresh oils and pigments before they can set.
Think of it as brushing your teeth—a small, consistent effort that prevents much larger problems down the line. A quick swipe with an alcohol pad each evening can keep your velvet finish looking flawless for weeks.
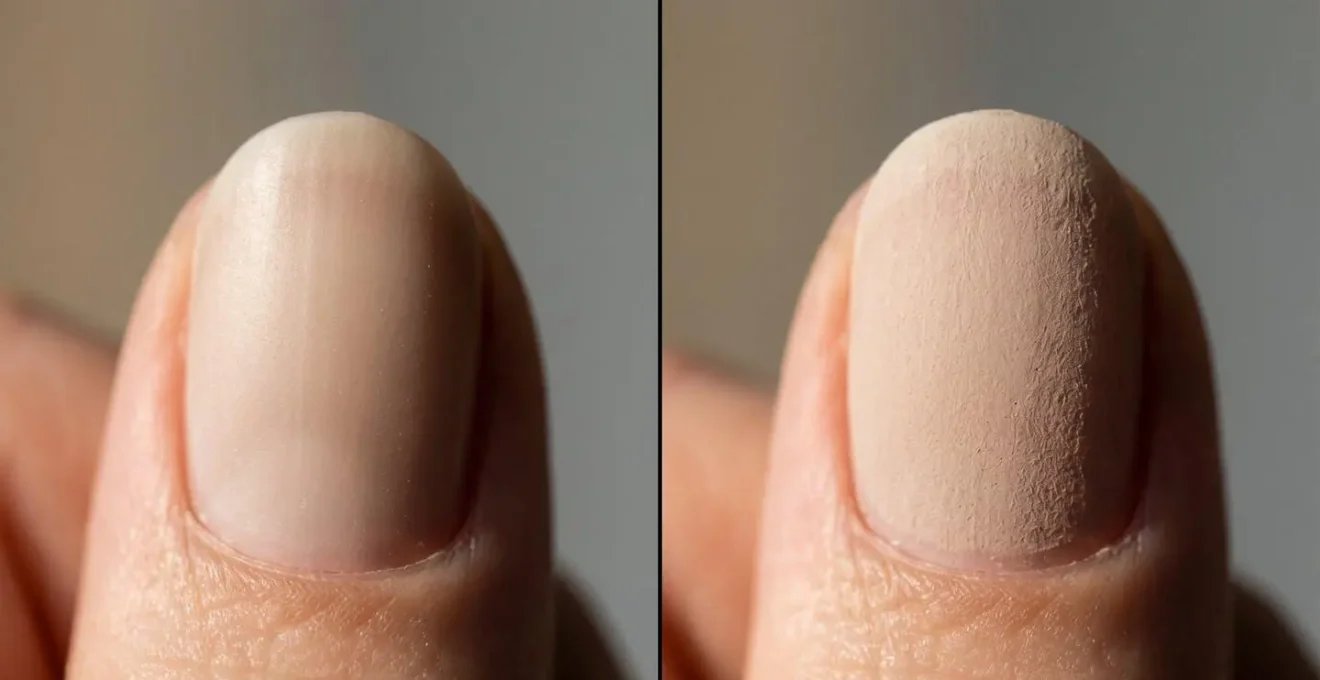
Which Matte Top Coat Feels Softest to the Touch?
Not all matte finishes are created equal. Some feel chalky and dry, while others have a luxurious, soft-touch « velvet » or « satin » feel. This tactile difference is determined by the science of the matting agents within the top coat. The size, shape, and concentration of these particles dictate both the visual effect and the physical sensation. Research on matting agents demonstrates that particle sizes from 2.5 to 10 microns directly affect these tactile properties. Generally, finer particles in a well-formulated gel create a smoother, more velvety feel, while larger or more irregularly shaped particles can result in a coarser, « flatter » texture.
The « softest » top coats are often labeled as « velvet matte » or « satin matte. » They use finely milled, spherical silica particles that protrude just enough to diffuse light without creating a rough surface. This creates a subtle light diffusion that feels silky to the touch, as opposed to a « flat » matte which absorbs almost all light and can feel chalky.
However, achieving this high-end feel involves a technical trade-off. Creating a heavily matted, soft surface requires a higher load of texturizing agents, which can impact the coating’s overall performance. As experts in finish technology point out, there is always a balance between aesthetics and durability.
Flatting agents required to reduce sheen in flat or matte topcoats also slightly reduce clarity, water resistance, durability and resistance to common household contaminants.
– General Finishes Technical Team, Water Based Topcoat Application Guide
Therefore, while a velvet top coat offers the most pleasant tactile experience, it may also be the most delicate and require the most diligent daily maintenance to keep it free from stains.
Does Matte Top Coat Require Longer Curing to Prevent Yellowing?
When a top coat—matte or glossy—begins to yellow, our first instinct is often to blame under-curing, assuming the product didn’t harden properly. This leads many to cure their nails for extra time, « just to be safe. » However, in the world of gel chemistry, this is a critical mistake. Yellowing is far more often a sign of over-curing, not under-curing. The photoinitiators in gel polish that react to UV/LED light can degrade and turn yellow if exposed for too long.
This is a well-known issue among nail professionals and chemists. The key is precision; you must cure for the exact time recommended by the manufacturer for your specific lamp. Adding an extra 30 or 60 seconds doesn’t make the cure « better »—it actively damages the top coat’s chemical stability and clarity.
The worst thing about over-curing your gel nails is your top coat yellowing.
– Paola Ponce, 5 Common Gel Nail Curing Mistakes – Beginner Nail Tech Guide
This type of yellowing is distinct from staining that occurs over time from external sources like lotions or sun exposure. According to nail chemistry experts, curing-related yellowing is uniform across the nail and appears within 24 hours of the service. If your nails look perfect leaving the salon but have a yellowish tint the next day, over-curing is the most likely culprit. A matte top coat’s texture can sometimes make this yellowing appear more pronounced as it doesn’t have shine to mask it.
The solution is simple but strict: trust the manufacturer’s instructions. Use a timer and cure for precisely the recommended duration to ensure a stable, clear, and perfectly matte finish without any unwanted discoloration.
Can You Re-Matte a Nail That Has Become Shiny from Oil?
Yes, in most cases, a matte nail that has turned shiny can be restored. The shine isn’t a sign of permanent damage; it’s simply a result of the top coat’s microscopic pores becoming filled with oils, lotions, or other debris. This effectively smooths over the light-diffusing texture, causing the surface to reflect light (shine) instead of scattering it. The goal of restoration is to clean out these pores and re-expose the matte texture.
The primary tool for this is, once again, isopropyl alcohol, but at a higher concentration for a deep clean. A nail technician’s experience confirms that this simple daily act is key to longevity.
To keep the matte effect beautiful over time, just a few simple tricks are enough: Clean your nails daily with a pad soaked in cleaner or alcohol. Apply light pressure until the surface feels clean. It’s a bit like brushing your teeth – a few seconds a day make a difference.
– Professional nail technician, Cactus For You
For those moments when daily cleaning isn’t enough and you’re faced with a stubborn shiny patch, a more intensive restoration process is needed. This two-step method can often bring even the most compromised matte finish back to life.
Your Action Plan: Restoring a Shiny Matte Finish
- Cleanse and De-grease: Vigorously wipe the nail with a lint-free pad soaked in 90%+ isopropyl alcohol. This potent concentration is needed to dissolve and lift the stubborn oils that have filled the micro-pores of the matte finish. Rub until the surface feels squeaky clean and the shine has dissipated.
- Gently Re-Etch (If Necessary): If cleansing alone doesn’t work, the texture may have been worn smooth. Gently buff the nail with an ultra-fine buffer (3000-4000 grit). Use only a few light passes to microscopically re-etch the surface, restoring its light-diffusing properties. Do not use a coarse buffer, as this will remove the top coat entirely.
- Final Wipe Down: After buffing, wipe the nail one last time with alcohol to remove any buffing residue and reveal the restored matte surface.
Creating a « Matte Emergency Kit » with a small vial of IPA, lint-free squares, and a tiny piece of an ultra-fine buffer can be a lifesaver for maintaining a perfect look between appointments.
Using Buffing Cream or Wax: Is It Necessary for High Shine?
This question gets to the heart of the difference between matte and glossy finishes. Buffing creams, waxes, and detail sprays are specifically designed to create high shine on glossy surfaces. They work by filling in microscopic scratches and creating a perfectly smooth, uniform layer that produces specular reflection—a mirror-like shine. Applying these products to a matte surface is fundamentally counterproductive; it’s like trying to polish a frosted window.
The entire purpose of a matte finish is to prevent specular reflection. Its textured surface is engineered to do the opposite. As coating physics research demonstrates, matte surfaces scatter light diffusely, which is what our eyes perceive as a non-shiny, soft finish. Using a wax or cream fills in that carefully engineered texture, instantly destroying the matte effect and creating a greasy, unevenly shiny mess that is very difficult to remove.
Therefore, not only are these products unnecessary, but they are also to be strictly avoided. The danger often comes from accidental transfer. Many everyday products contain oils and silicones that act just like a wax. Being mindful of what your hands come into contact with is a critical part of matte nail maintenance. The following products are common culprits for ruining a matte finish:
- Hand creams containing mineral oil or petrolatum that create glossy patches.
- Oil-based cuticle removers that can transfer shine to the nail surface.
- Standard paste wax products designed for cars or furniture.
- Hair styling products like serums, gels, and oils that can transfer during touch.
- Commercial detail sprays or « quick shine » products.
- Any product labeled « gloss enhancer » or « shine booster. »
The rule is simple: if a product promises to add shine, it is the enemy of your matte manicure. Stick to alcohol-based cleansers for maintenance and keep shine-enhancing products away from your nails.
Creating a « Fabric » Look with Matte and Powder Techniques
One of the most exciting artistic uses of matte top coat is as a base for creating unique, fabric-like textures. Effects like « cashmere, » « velvet, » or « sweater » nails are all made possible by the unique properties of a matte surface. The same micro-roughness that can trap dirt also provides the perfect foundation for nail art powders to grip onto.
The Science of Adhesion: The « Dirt Magnet » Paradox
Research into matting technology explains this phenomenon perfectly. The micro-rough surface created by silica particles provides the necessary mechanical anchoring for powders to adhere. The porous structure essentially gives the fine powder something to « grab. » This is why you can’t achieve a true velvet powder effect on a super-slick glossy top coat—the powder just slides off. However, this highlights the central paradox of matte finishes: the very quality that makes them great for these advanced techniques is what also makes them a « dirt magnet. » The more textured the finish, the better the powder adhesion, but also the greater its susceptibility to contamination.
This technique allows for incredible creativity, turning the nail into a miniature textile. A soft grey matte nail with a dusting of fine white powder can perfectly mimic a cashmere sweater, while a deep burgundy with a corresponding velvet powder can look like crushed velvet fabric. The matte top coat acts as the perfect primer, ensuring the powder sticks evenly and creates a convincing textural illusion.

Achieving this look requires a matte top coat that has a noticeable texture—often a « flatter » matte works even better than a super-smooth « satin » one, as it provides more grip. The process involves curing the matte top coat and then burnishing or pressing the desired powder into the tacky (or cleansed) surface, depending on the desired effect.
Ultimately, this technique transforms the matte top coat from a simple finish into an interactive canvas, showcasing its unique properties in a visually stunning way.
Key Takeaways
- A matte finish’s beauty and its weakness both come from its microscopic texture, which scatters light but also traps dirt and oils.
- Consistent, preventative care with an alcohol wipe is far more effective than trying to scrub away deep-set stains later.
- The feel (« velvet » vs. « chalky ») and performance of a matte top coat are determined by the size and concentration of its matting agents, involving a trade-off between softness and durability.
Why Does Your Gel Top Coat Go Dull After 3 Days and How to Fix It?
The frustration of a glossy gel top coat going dull after just a few days is a common complaint. This happens because the initially smooth, light-reflecting surface accumulates microscopic scratches from daily wear and tear. These scratches create texture, diffusing light and making the surface appear dull. The fix is often to reapply a glossy top coat to fill in the scratches and restore the shine. Interestingly, this is the exact inverse of the problem faced by matte top coats.
A matte top coat starts with a deliberately imperfect, textured surface designed to diffuse light. Its problem is not that it goes dull, but that it becomes shiny. This occurs when its pores are filled with oils and debris, smoothing out the surface and causing it to reflect light. As experts on automotive finishes note, the principle is the same: the textured clear coat is the source of the effect. This fundamental difference in how they wear and fail requires completely opposite maintenance strategies.
This table clearly illustrates the inverse relationship between the two types of finishes and their maintenance needs.
| Characteristic | Glossy Top Coat | Matte Top Coat |
|---|---|---|
| Surface Structure | Smooth, light-reflecting | Textured, light-diffusing |
| Primary Wear Mechanism | Micro-scratches create texture | Pores fill with oils/debris |
| Visual Result of Wear | Goes dull (loses shine) | Goes shiny (loses matte effect) |
| Restoration Method | Re-apply glossy top coat | Cleanse with alcohol or gentle buffing |
| Preventive Maintenance | Avoid abrasive contact | Avoid oily products, daily alcohol wipe |
| Chemical Resistance | Higher due to dense structure | Lower due to porous structure |
By understanding that a glossy coat’s failure is creating texture while a matte coat’s failure is losing it, you can finally master the maintenance of both. The solution for your matte nails isn’t to add a layer, but to subtract the contaminants, restoring the surface to its original, beautifully imperfect state.